ShareLikeClass TweetPinSubscribeWhatsappTelegram
This article is intended for those who independently decided to figure out how to hang a door on hinges, find out what types of hinges exist and which ones are better suited for certain interior doors.
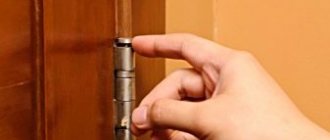
If you are planning to install doors yourself, you need to know how the door leaf is hung on the hinges. In general, this work is simple and can be done by any beginner in construction; the main thing is to understand the theory, know and follow the recommendations of general specialists.
Types of hinges for interior doors and features of their installation
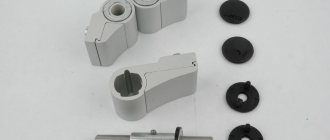
The difficulty of installing door hinges depends on their design. You can install yourself: overhead, mortise, screw-in hinges.
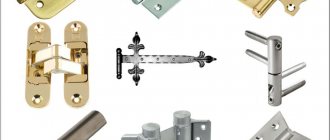
Door hinges, depending on the design and fastening features, are divided into 3 main types:
- Invoices are two identical parts connected to each other. One part is attached to the door leaf, the second to the frame. There are universal loops that represent a single whole. Installation of overhead hinges is not particularly difficult; they can be installed by a master with a minimum set of skills.
- For mortise ones you will need more skill and special equipment. Their installation involves cutting out special recesses for deepening. However, this is the most common type of fittings and is distinguished by its reliability.
- In order to fix the screw-in hinge, threaded pins are screwed into the door leaf. Typically 3 screw-in hinges are used.
- Hidden hinges ensure the safety of your home. The entire structure goes deep into the door leaf and frame. Installation requires experience.
Hidden hinges are aesthetically pleasing; they are not visible when the door is closed. However, their installation will require certain skills. Therefore, it is recommended to entrust the installation of hidden hinges to a specialist.
Cutting and screwing the trims
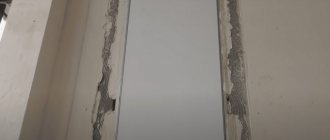
Of course, the box will not fit into the opening with millimeter precision, so the resulting gaps should be foamed using polyurethane foam. Some experts advise first installing paper or cardboard spacers between the plane of the frame and the end of the door. This, they believe, will prevent deformation and compression of the structure. The door cannot be opened until the foam hardens! And this process takes approximately 10-12 hours. Then cut off the protruding foam residues and remove the wedges that temporarily kept the box from tilting.
Lastly, install the platbands, and to do this, take measurements, do it with the utmost care! At the joints, cut these parts at an angle of 45°. A miter box or miter saw will help you with this. By the way, with a saw you can cut a corner faster and much more accurately. After this, nail the trim to the frame using so-called finishing nails.
Experience shows that installing a door is not so difficult! Do you have experience in this matter? Share your skills and abilities! Write us your comments!
Required Tools
In order for the installation process to proceed without complications, you need to prepare the necessary tools in advance:
- door hinges;
- pencil for marking;
- ruler;
- screws;
- screwdriver;
- level;
- chisel;
- hammer;
- drill with a thin drill bit.
To install mortise structures, specialists use a milling machine. In this case, the selection for the loop will be the most even. You can replace the machine with a chisel and a hammer.
Installation of bar hinges
Bar hinges installed
Bar hinges are also called spring or pendulum. This explains their functioning to some extent, but not completely. Essentially, these are 2 spring curtains assembled into one structure, thanks to which the door can be opened in any direction and it will return to its original state.
Most often, pendulum (bar) curtains in operation can be seen at the entrance to a bar, store, medical institutions, etc. In such places this is convenient, since the person entering does not think about which way the door opens and will not leave it open.
Spring adjustment
Correct marking
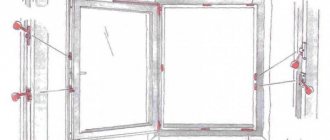
Installation of fittings begins with marking:
- At a distance of 20 cm from the upper and lower edges of the door leaf, the initial lines are drawn with a sharp pencil.
- Determine the direction of opening the door and apply a loop to the marked lines. The rods should not touch the canvas, this will impede free movement when opening/closing. They should also not be pushed out too far, as this will weaken the strength of the fastening.
- Trace the outline and mark the attachment points.
- In the same way, mark the location of the hinge on the assembled box, leaving a gap of 2-3 mm. between the canvas and the timber.
Depending on the weight and height of the door leaf, a third hinge may be needed. It is not planned in the middle, but closer to the top, so that the weight of the door is distributed more optimally.
Before applying the markings, check the canvas and loop beams for the presence of knots. When screwing in self-tapping screws, skew or splitting of the canvas may occur. If knots are detected, the loop is shifted by 2-3 cm.
It is more convenient to make markings on the floor when the door frame has not yet been installed in the opening. Place the canvas in the box and make sure that the markings match. If the door frame is already installed, you will need supports for the door leaf to place it in the frame and mark the hinges at the same distance. A discrepancy between the markings on the timber and the canvas is unacceptable.
Choice
Review of different companies
The most popular brands:
Palladium company produces high-precision fittings that ensure high-quality closing and opening of doors. Typically, palladium products are made from brass, but when using steel, a durable two-layer varnish coating of different colors is created.
Palladium hinges
Apex hinges are installed in interior doors. The kit includes two products and screws for fastening them.
The designs are universal and easy to install. Made of steel with high-quality protective coating.
APECS
Euro loops.
Euro products
Design feature: elements are made of stainless steel, which significantly increases their service life
Doctor Khan.
Door hinge Dr. Hahn
Manufactured by Dr. Hahn white door hinges, one of the samples of which is shown in the photo, have the following features:
- attractive appearance;
- Six-way adjustment without loosening the mounting screws;
- smooth adjustment in vertical and horizontal directions with the door closed;
- door hinges 150 mm long can withstand loads of up to 140 kilograms;
- no maintenance required;
- universal products can be used for fireproof doors with the O sign;
- a hinge made of extruded aluminum with a screw fastening can withstand heavy loads from compression and tension;
- if necessary, stainless steel door products are supplied;
- models are equipped with plastic bushings, which improves sliding;
- The cover plate with a clamping function allows for quick installation.
Combined.
Combined hinge
The peculiarity of the designs is the high quality of the material and manufacturing process.
Criterias of choice
There are other criteria when choosing door hinges.
These include:
Material for making:
- brass, such products are the most popular.
Brass hinge
This is a plastic, durable material that can withstand very heavy door leaves. Products are often plated with chrome;
- steel.
Steel product
These are strong, reliable and durable hinges, but also the most expensive. They do not deform and serve for a long time. It is more expedient to use them for installation on heavy entrance models;
- zinc, aluminum or steel alloys.
Zinc alloy hinge
To sell door hinges at a higher price and to give them a more attractive appearance, they are coated with brass on top.
The products are resistant to corrosion and have good glide. To create a designer effect, parts are often coated with various varnishes and paints that perfectly imitate gold, silver, chrome, copper and other natural materials;
- The material from which the most expensive door hinges are made is stainless steel. Such products surpass all others with their strength, hardness and elegance.
- Screw-type hinges cannot be used for entrance doors. Most often they are used for interior models; one-piece hinges - absolutely universal, suitable for all types of doors;
- detachable hinges are the best option for doors that will need to be removed periodically.
- The side the door will open towards. Left or right loops are selected.
- Installation features. There must be a gap of at least 1.5 millimeters between the door leaf, on the side where the hinges are installed, and the frame. This will ensure that if the dimensions of the canvas change, due to humidity in the room or too dry air, the structure will not jam.
- Number of door hinges. For a door up to two meters high, it is enough to install two strong hinges. For a massive entrance door up to 2.5 meters high, three hinges will be required. Massive, heavy models made of natural wood require the installation of more than three door hinges.
The simplicity, convenience and service life of entrance doors depends on the correct choice of products. All these recommendations are indicated by the certificate of conformity for door hinges, which is used by manufacturers in the manufacture of models.
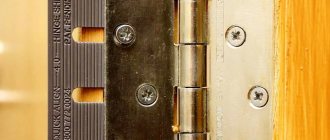
Mortise hinges
To cut a hinge well, you will need certain skills.
Difficulties arise from the need to make a sample for the loop. The process consists of stages :
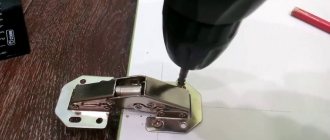
- Using a milling machine or chisel, a sample is made on the canvas and the box. The loop should fit into the recess with difficulty.
- After inserting the loop, use a drill with a drill diameter smaller than the diameter of the screw to make holes for the screw. This will make subsequent screwing easier.
- Use a screwdriver to screw in the screws, securing the hinge to the door leaf.
- Inserting the canvas into the box and supporting it with wedges from below, combine the two parts of the loop.
- Screw the second part of the loop to the hinge beam.
During installation, it is necessary to ensure that the canvas does not move. Leveling is done using a building level.
Drilling holes
Installation is carried out with all the rules:
The depth of the hole for the furniture hinge should be about thirteen millimeters. If possible, the insertion of furniture hinges should not be deeper, otherwise the front side of the canvas may crack; The diameter of the hole depends strictly on the cup of the loop
Tools must be completely aligned with their axis to prevent damage to the surface; A sharpened cutter will help protect the blade from damage and chips; Do not rush while drilling, otherwise there is a risk of doing it sloppily; It is worth paying attention to the dimensions of the cups and their dimensions when installing furniture hinges;
Having drilled one hole, proceed to the next and so on until all the holes for laying the hinges are prepared.
What tools should I use for this?
The bowl must be secured to the facade, and the bar to the body of the bedside table. The furniture hinge must be inserted into the hole, which must be made in advance. The shoulder of the loop becomes a kind of bridge, now connecting both parts. To make holes for such loops, you need to prepare the following tools:
- screwdriver or drill;
- special drill-mill;
The diameter of the cutter for the hole for a furniture hinge is 35 millimeters or 25-26mm. It is selected depending on the size of the loop cups. To create holes for such hinges, you can also use a simple drill.
A multifunctional drill, with attachments that are easy to replace, is quite suitable for such work.
The middle spike must be installed in the center of the circle, outlined using a specially prepared caliber. Automatic calibration is used on the corresponding machines, but at home the master cannot do without a specialized electric tool.
During installation, hinges require a high level of care and precision. The chance to complete exactly the required niche is the most important advantage of the so-called Forstner drill. It can provide a stop that will prevent you from penetrating further than required. And the teeth of the drill do not allow it to deviate from the intended “course”. The end result is an almost perfect hole. And due to this, the cup fits into the recess quite tightly.
But the above-mentioned drill also has one significant drawback, which manifests itself when working with a solid piece of wood. This is low quality, which is to be expected if the instrument was not made in a factory. This is why you should choose tools exclusively from official companies. And, of course, don’t forget about warranty cards.
Depending on the type of panel you are working with, the cutter can get quite hot. Due to this, it can burn the edges and wood that is removed from the recess. That is why, when working with such a foundation, you should not forget about breaks in work. So that the drills have time to cool down at least a little. Working in three to four sets will be ideal.
Particular attention should be paid to breaks when working with MDF sheets. If the activity is carried out with chipboard sheets, parts made of strong alloys will be able to make recesses for hinges really quickly and without much stress
Overhead hinges
Installation of the overhead hinge is the simplest, since no insertion is required.
This method is similar to installing a mortise hinge. But the parts do not go deep into the selection, but are simply screwed to the canvas and timber. Throughout the entire process, it is important to maintain a strictly vertical position of the door leaf. The butterfly loop is installed as follows :
- The direction of opening the door is determined and hinges are applied to the door leaf, at a distance of 20 cm from the top and bottom edges.
- Markings are applied.
- A loop is installed according to the markings and secured with self-tapping screws.
- The canvas is inserted into the box, checked with a level and secured with supports.
- The second part of the butterfly is applied to the beam and outlined. Attachment points are outlined.
- Using a thin drill, holes are made for the screws.
- The plate is fixed with self-tapping screws to the hinge beam.
Butterfly hinges are suitable for most interior doors, with the exception of very massive ones.
Installing the Top
Since card-type hinges are considered the most popular fittings, their installation procedure requires special attention. To carry out the work, you need to ensure that you have the following tools:
- chisels;
- screwdriver;
- blades;
- level;
- hammer;
- set of fastenings.
Butterfly
Experts recommend following this sequence of actions. First, the placement of elements is planned. Two hinges are usually enough for a door. In this case, the upper canopy is placed at a distance of 200 mm from the edge, and the lower canopy is placed slightly above 100 mm from the lower end of the door. If a third loop is required, then, if necessary, it is placed exactly in the center - between the bottom and top.
Algorithm for installing card awnings:
- Disassemble the loop. Attach the elements to the end line of the canvas, circle the product at the required distance. Using the marks obtained, remove a small part of the material. For accuracy, use a sharp pencil or stationery knife. Then use a hammer to remove part of the coating where the hinge is installed. It is important that the resulting recess coincides with the thickness of the plate.
- When all the spare parts are recessed, they can be fixed in the intended area. Self-tapping screws are used for this. If you plan to screw screws, then you need to make holes for them in advance.
Screw-in hinges
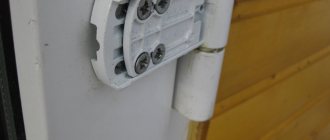
Installation is as follows:
- Taking into account the gap, the canvas is installed in the box and secured with supports.
- Using a special template that comes complete with hinges, holes are drilled in the door leaf for the leaf part of the hinge.
- Holes for the frame part of the hinge are drilled in the box at the same level.
- The procedure is repeated for all door hinges.
- Using a screwdriver, install both parts of the hinge.
- One part of the loop is threaded onto the other.
- Using a hex key, the height and pressure of the sash can be adjusted.
Screw-in hinges can only be installed on doors with a Euro door. A standard door leaf cannot be attached to this type of awning.
We hang the door leaf and cut in the latch
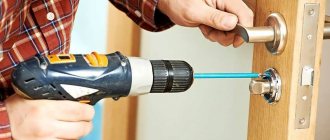
If you have correctly cut and assembled the box, cut in the hinges and installed the structure, then hanging the canvas will not take you much time. To do this, you just need to put the fabric on the loops. Now you should make sure that the door opens and closes smoothly, without squeaking or friction. In addition, you need to make sure that the hinged door does not open or close spontaneously. If this happens, it means that you made serious mistakes when installing the box, which must be corrected immediately. Most often, the cause of all troubles is uneven installation of the box.
Once you have installed the door correctly, proceed to install the latch and handle. To do this, you will need specially designed drill attachments, with which you can cut a hole of the required parameters. After you install the lock, make sure that the door clearly performs its functions. And then proceed to install the strike plate under the latch.
Features of working with furniture hinges
Furniture hinges are divided into several types:
- invoices;
- loose-leaf;
- semi-overhead;
- heel;
- inverse;
- gallery;
- pianos and others.
Most often, four-hinged overhead hinges, the so-called “frogs,” are used. They are suitable for most designs with hinged doors.
For cabinets, overhead canopies with cup bases are often used. They are attached with self-tapping screws. The “shoulder” structure is placed in this base and attached to the side panel and door.
Some types of furniture hinges are used exclusively for classic models, where style plays an important role. For simple wardrobes, overhead and semi-overhead awnings are preferred.
Thermal curtain - what is it?
A thermal curtain is an element of a utility system that serves to cut off external air from the internal volume of a building by creating a directed air flow. The air flows created prevent cold or warm air (depending on need), dust or gusts of wind, as well as insects and vehicle exhaust from entering the interior space. The operating diagram of the thermal curtain is shown in the following figure.
Schematic representation of the operating principle of an air curtain
How to evenly screw hinges to a cabinet door?
Installing fasteners on cabinet sides and doors is a complex process. The aesthetic appearance of the furniture, the balance of the doors, the correct opening and closing, the absence of cracks and distortions depend on the correct installation. The better the installation, the longer the item will last.
Before starting work, you need to prepare a set of tools and materials:
- pencil;
- screws and screwdriver;
- drill with pads;
- self-tapping screws;
- ruler.
The choice of fasteners depends on the material and thickness of the doors, the massiveness of the door leaf. For loose materials, fibrous materials or glass, special types of fastenings and fixing methods are used.
Usually 2 fastenings are needed. If the sash is very large and massive, then three or more hinges are used. An additional hinge is needed if the door weight exceeds 9 kg. In this case, for every 5 kg. One mount adds weight. Maximum quantity – 5 pieces.
Before installing the hinges, carefully check the product and determine the position of the shelves. Fit the doors to the sides. Making a sketch will help. This is necessary so that the fastener does not fall into the place of the shelf.
Make the markings with a sharp pencil or thin chalk. 10 cm or a little more depart from the upper and lower edges. Otherwise the door will become loose.
From the edge of the door to the center of the hinge, mark about 2.2 cm. This value is for standard fasteners.
Installation of fasteners:
- Drill holes for cups. It is better to do this by placing the part on a horizontal surface and fixing it. A hole depth of 1.2 cm is sufficient.
- Cups are inserted into the holes and screws are screwed into the door part. It is important that they fit straight in, otherwise the door will not be installed correctly.
- The strike plate on the side can also be installed in a vertical position by marking the location of the connections.
- The overhead parts are made “deaf”, otherwise they will creep apart during assembly. They should not have distortions or gaps.
- Connect the sash and side frame. In this case, it is better to use outside help for better installation.
When installing parts on glass doors, special care is required. For glass, special fasteners are used. Holes are drilled on the side of the cabinet. The glass is fixed using special clamps.
For cabinets made of chipboard, it is better to choose wide hinges, since the material of the product can crumble
During installation of the fasteners, their alignment is required. Any distortion will affect the normal operation and appearance of the cabinet.
After installing the fasteners, it is recommended to lubricate the hinges by dripping machine oil onto the mechanism. At first, opening/closing may be difficult until the hinges are developed. Over time, the sashes may sag, so they will need to be tightened.
Interior door weight
This is one of the basic characteristics, taking into account which the fittings are selected. It is clear that overhead models made of aluminum alloy will not cope with heavy glass sheets, so they cannot be attached, and powerful hidden ones will make opening and closing a light plastic sash quite difficult.
The most common materials for interior doors are as follows.
Plastic is an option for the office. Budget-friendly, lightweight, but not too durable. It will require the simplest light fittings.
- The panel door is a wooden frame lined with MDF sheets. The weight is minimal, the strength is low, the appearance is much more presentable. You can hang overhead and mortise fittings.
- Chipboard - a canvas made from a whole sheet - has quite decent strength. So you can install any fittings that are suitable in weight.
- MDF - an interior door made from MDF sheet weighs noticeably more, is stronger, more durable, is not afraid of water, and has a very aesthetic appearance. Fittings can be mounted of any kind - forged overhead models, hidden, mortise, etc. It may be necessary to install more than 2 elements for larger sizes.
- Solid wood canvas is the most elegant and expensive option. The heaviest - here you will probably need not 2, but more elements.
How to choose a thermal curtain, what to look for
When choosing a thermal curtain, you need to pay attention to its technical characteristics - power, overall dimensions and performance, as well as:
- type and design of the heat exchanger - electric, water or without it;
- location and direction of air flows – vertically “bottom-up” or “top-down” and horizontally – in one-way or two-way direction;
- modes of use - can be constant or variable;
- air intake location - internal air of the room where the thermal curtain or external air is installed;
- availability of automation, control and protection systems;
- type of jet protection.
Control buttons for electric heat curtains for household use
Household models of air curtains are equipped with two (three) switches that enable the heating elements and fan to be turned on. In addition, such systems can be equipped with multi-stage regulators (power and heating speed), as well as built-in control units that operate remotely.
Jet protection is the protection of air flows, it can be:
- gate type – complete repulsion of outside air is carried out;
- mixing type - during operation, the outside air is partially passed through and mixed with the air inside the room, followed by heating.
Using a remote control unit, you can set the temperature and air flow
At what price can I buy a thermal curtain for the front door?
Heating equipment can be purchased from specialized organizations, as well as retail chains engaged in the sale of electrical, energy-saving and thermal engineering equipment.
In large trade organizations, the most famous brands are represented by separate stands
In addition, you can contact dealers of the company that produces the model you like, or find a suitable version of such equipment on the Internet. The price of thermal curtains installed on the front door can vary greatly in different trade organizations, so you need to be extremely careful when choosing a seller. The following table shows the cost of thermal curtains of various designs, as of the beginning of the 2nd quarter of 2022, when selling them through, which is a dealer of many manufacturers of heating equipment.
| Brand | Series | Model | Technical characteristics (kW, mm, m³/h) | Cost (as of April 2022) rubles |
| "Teplomash" | Optima | KEV-3P1154E | Power – 1.5 and 3; Overall dimensions – 800×160×160; Air consumption – 500 | 6150 |
| Diamond | KEV-10P1061E | Power – 5 and 10; Overall dimensions – 1550×195×185; Air consumption – 1000 | 15900 | |
| Comfort | KEV-20P2111W | Power – 7 and 9; Overall dimensions – 1040×225×225; Air consumption −1000 | 17541 | |
| Ceiling | KEV-29P2181W | Power – 10 and 13.5; Overall dimensions – 1620×420×205; Air consumption − 1250−1500 | 28440 | |
| BALLU | S1 | BHC-CE-3 | Power – 1.5 and 3; Overall dimensions – 505×190×135; Air consumption - 300 | 4290 |
| T2 M | BHC-H10-T12 | Power – 6 and 12; Overall dimensions – 1105×280×300; Air consumption – 2500 | 19590 | |
| PS (W) | BHC-M10W12-PS | Power – 11.3; Overall dimensions – 1090×240×260; Air flow – 1000, 1200 and 1400 | 25190 | |
| PS-B (W) | BHC-B10W10-PS | Power – 8; Overall dimensions – 1125×215×240; Air consumption – 1100 | 19490 | |
| TROPIC | TO | K-3 | Power – 1.5 and 3; Overall dimensions – 452×145×114; Air consumption – 180 | 3700 |
| A | A-9 | Power – 4.5 and 9; Overall dimensions – 1320×110×170; Air consumption – 800 | 10183 | |
| T | T109W10 | Power – 9; Overall dimensions – 1000×200×213; Air consumption − 1150 | 17790 | |
| X | X315W10 | Power – 15; Overall dimensions – 1000×258×229; Air consumption – 2100 | 23490 | |
| FRICO | RA | PA 1006E03 | Power – 3; Overall dimensions – 650×164×153; Air consumption – 230 | 14183 |
| SFS | SFS23E08 | Power – 8.1; Overall dimensions – 2200×580×295; Air consumption – 2300 | 629538 | |
| PA C | PA2210СW | Power – 6.9; Overall dimensions – 1050×355×210; Air consumption – 1200 | 66027 | |
| PA W | PA2520W | Power – 11.5; Overall dimensions – 2050×355×210; Air consumption – 2600 | 130126 |
The presence of a large number of models allows you to choose a thermal curtain in accordance with the selection criteria and personal preferences of the consumer, and the availability of reviews from experienced users helps you not to make mistakes.
Popular manufacturers of thermal curtains
Among the variety of models presented on the engineering equipment market, the most popular among domestic users are thermal curtains of the Teplomash , BALLU , TROPIC and FRICO . "Teplomash" is a plant, part of (Russia), engaged in the production and supply of thermal curtains, fan heaters and accessories for them. The plant’s product line includes thermal curtains of the following series: “Optima” and “Brilliant”, “Comfort” and “ceiling”, “IP54” and “IP21”, as well as “interior”. All series are available with or without electric and water heat exchangers. Models in series, differing in technical characteristics, materials used and case design.
Thermal curtain Teplomash model "KEV-5 P1152E" (series "100 Optima")
- “BALLU” is a brand owned by the industrial concern “BALLU Industrial Group” (Taiwan), which produces climate control equipment and engineering equipment. The company's product line includes a series of thermal curtains:
- “S1” and “S2”, “S2-M” and “T2 M”, “PS-B (T)” and “PS (MT)”, “PS (HT)” and “Stella” - with an electric heat exchanger;
- “PS (W)” and “PS-B (W)”, “Stella” - with a water heat exchanger;
- “PS A” – without heat exchanger.
- "TROPIC" - (Russia) is engaged in the production of heating equipment for various purposes and accessories for it. The group of products related to thermal curtains includes the following series:
- “K” and “A”, “M” and “T100E Nova”, “TE” and “XE”, as well as “D” - with an electric heat exchanger;
- “T” and “X” - with a water heat exchanger;
- “TA” and “X” - without heat exchanger.
Water thermal curtain TROPIC model “T109W10” (T series)
- "FRICO" - (Sweden) is a European leader in the production of heating and energy-saving equipment. The line of thermal curtains includes the following series:
- “RA” and “SFS”, “RDS” and “AR”, as well as “Portier” - with an electric heat exchanger;
- “PA C” and “PAW”, “ARW” and “ADCorinteW”, as well as “AGIW” - with a water heat exchanger;
- “PA2200С” and “PAA”, “ADA” and “PSA” - without a heat exchanger.
Reviews from customers of thermal curtains for the front door
Thanks to the fact that the Internet has firmly entered the life of a modern person, you can always use it if any questions arise. This could be an online consultation or reading user reviews about a model of a piece of equipment you like. Below are reviews from buyers of thermal curtains, the models of which are discussed in this article.
Review of the BALLU BHS-3.000SB model:
More details on Otzovik:
Review of the TROPIC M3 model:
More details on Otzovik:
Another review about the TROPIC M3 model:
More details on Otzovik: