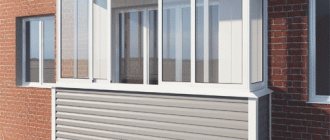
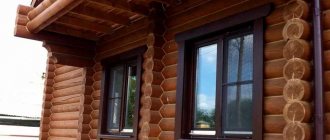
Siding is used to cover not only the walls on the street side, but also other various parts of the façade of a residential building, including window openings. This allows you to turn any private house into a neat and harmonious structure. Therefore, we will consider how to decorate a window with siding from the outside of the building. Read to the end and you will understand which finishing panels are the most popular, what fittings are used for finishing, the features of its installation, how window structures are faced without slopes or with them.
Professional finishing of a private house with siding Source fasadel.com
Popular types of siding
There are many manufacturers producing siding from various materials. It began to be used back in the 19th century. The finishing material is popular because of its durability and attractiveness. It comes in different colors. It is not negatively affected by sudden changes in temperature. When finishing the façade elements of private houses, vinyl and metal panels are most often used.
Vinyl siding
This type of finishing panels is more popular than a similar metal material. It is made from polyvinyl chloride mixtures with the addition of special components. Therefore, vinyl panels are lightweight and are not adversely affected by precipitation.
Plastic finishing material does not require complex maintenance. It is easy to wash off dust particles and dirt from its surface. The panels are also durable if they are not made from recycled PVC and are installed correctly. At the same time, the price of plastic panels is lower than the cost of a similar metal finishing material.
Vinyl panel option Source norvek.ru
Metal siding
Metal cladding panels have higher durability compared to vinyl material if their production was carried out in strict compliance with technology. The service life of such siding can reach 50 years. Moreover, a polymer coating is applied to its surface, which is highly resistant to ultraviolet rays. It prevents corrosion processes.
The polymer coating significantly improves the appearance of the material. Manufacturers produce versions of metal siding, which at a distance are almost indistinguishable from natural wood. In addition, this material is a fireproof finish. It withstands high temperatures compared to vinyl panels, which begin to melt when exposed to them.
The advantages also include the flexibility of metal siding. This property is taken into account when cladding windows using special profiles. In many cases, when decorating a facade with vinyl panels, metal siding is used to decorate the openings of window structures.
Metal siding Source metallocherepica.tmi.by
The disadvantages of metal siding include its high cost compared to other similar products. The disadvantage is also the possibility of corrosion in places where the coating is damaged.
Structures recessed into the wall
Window strips are ideal for cases where the window is recessed into the wall, but not too deep. Thanks to the use of planks, slopes can be closed. After this, the near-window strip is placed in the hole of the finishing profile. When joining planks on elements located vertically and which are connected to the slope, special cutouts should be made. Be sure to cut and bend horizontal elements. After this, finishing the siding around the window can be considered complete. Various design solutions used when installing windows have their own installation nuances.
If the window is recessed deep enough into the wall, then there is no need to use near-window strips. For this type of construction, only small pieces of wall panels are used. When installing, use a corner. Installation can be done using a special ebb. Its edges must be cut and folded under the vertical elements. To increase the reliability of fastening, be sure to use sealant.
Installation of siding on windows is carried out in the following order:
- First of all, a J-profile is attached around the perimeter.
- After this, the pre-prepared panel elements are installed on the walls.
- At the end, corner profiles are installed.
When installing, you should follow rules similar to the general installation of siding panels. Each connection must have a gap of 0.5 cm
Arched windows
This type of structure looks elegant, but its finishing gives owners some difficulties. Installing siding on arched windows is complicated by the fact that there is a curved part at the top of the structure. Usually for finishing they take a J-profile, which itself is quite flexible. But usually its cost is much higher than that of a regular profile. Because of this, they often buy not the J-profile, but its cheaper analogue. To do this, you need to make several cuts in the standard profile, which will be made on the mounting part, and then bent to create the required radius of curvature.
Alternatively, you can replace the arched opening with a polygonal opening. The design of an arched window should be done using the same technology, but the profile cutting should be larger. The convenience of bending the J-profile will largely depend on the material of manufacture. If we are talking about metal, then it will yield much harder than the same plastic. Creating an arc requires a radius of curvature, and vinyl siding is ideal. To make it easier to create a bend, first warm the material well, but do not overuse it - plastic melts easily.
If you take into account all the recommendations and rules, you can finish the windows quite efficiently and quickly. This will make it possible to save energy and time. If the cladding material is installed correctly, the window will look very beautiful.
Accessories used
Before covering the windows with siding with your own hands, you need to select profile parts and hardware. It is recommended to choose fittings manufactured by the same manufacturer that produces the finishing panels used. However, there is a practice when installing vinyl siding to use metal profiles, because they allow for easier installation.
On a note! When purchasing finishing materials, experienced specialists select all parts exclusively from one batch. They are purchased with a small reserve. This allows you to use elements with the same shade. If there are not enough parts and you have to buy more, then there is a high probability that the elements will have a different tone.
Siding and profiles must be chosen in the same shade Source housefasad.ru
To calculate the required number of profiles and fasteners, specialists perform the following steps:
- Measure the distance under the window frame and the free outer part of the wall, if installation of a drip lining is provided.
- Measure other external parts of the window opening intended for installing slopes. In other words, their required width and height or length are measured depending on the position of the part in space.
- Add up the measured lengths of all slopes. Adds 15% to the final result. The stock is needed to make cuts and bends of parts. In this case, the ebb is measured separately.
Covering a window with siding can be done without using ebb. This cladding option is implemented before installing the façade panels. After all, this installation method allows you to cover all the fasteners with siding.
Window trim without using drip tide Source trulogsiding.com
See also: Catalog of companies that specialize in finishing materials and related work
During the installation of window slopes, a number of additional parts are used to refine the joints of finishing materials:
- finishing strip, which gives the finish a finished look;
- metal casting is a practical detail;
- a window strip that allows you to make a beautiful connection to the frame;
- plastic molding, often used together with vinyl siding and often supplied with PVC windows;
- corners used for joining two finishing materials;
- H-bar, allowing you to connect two finishing panels;
- J-profile made of plastic.
Additional details for hiding joints when covering windows Source zelenodol-krovla.ru
The simplest window finishing option
The materials you will need are platbands and universal Alta-Profile slopes. The procedure will be as follows:
- Installation of the corner slope element. One end of the element is inserted into the starting strip, the other is attached with self-tapping screws to the sheathing. Corner elements allow you to easily connect slopes and platbands without the need for trimming. Installation of the corner slope element. Photo No. 13.
- Installation of slope. 15 cm are sawn off from the universal slope along with mounting fasteners. Then it is connected to the corner element with the cut part. The other side is attached to the next slope - and so on until the entire perimeter is completely finished. Joining a universal slope with a corner element. Photo No. 14.
- After completing the installation of the slopes, the corner element of the platband is installed. It needs to be inserted into the mounting groove of the slope angle, and the other end attached to the sheathing with self-tapping screws. Installation of the corner element of the platband. Photo No. 15.
- Platband installation. On one side of the plank you need to saw off 6-8 cm along with the mounting fasteners. The sawn-off side of the casing should be fastened to the corner element. On the free side it joins with the next platband. This is how the perimeter is completely finished. Platband installation. Photo No. 16.
We tell you more about how to finish windows using Alta-Profile materials in the video:
Features of installing profiles
Houses lined with the same siding can differ significantly in appearance. This is influenced by the type of panels used and the overall design of the entire structure. However, there are general rules that experts adhere to. These are taken into account before covering the window:
- Use only galvanized hardware or stainless steel screws to secure profile elements.
- I screw in the fasteners exclusively at right angles. If you allow even a slight tilt, the reliability of fixing the profiles will decrease.
- The hardware is not screwed in completely, because the profiles cannot be pressed too hard. Craftsmen leave a gap of at least 1 mm so that the fittings have the opportunity to move if the material expands under the influence of high temperature. Otherwise, the profile elements will be deformed.
- To bend the ends of the panels, cuts are made at an angle of 45°. This design eliminates the appearance of large gaps when connecting individual parts.
- The ebb is always secured first, since the fasteners with which it is secured will be subsequently covered by vertical slopes.
Slope installation diagram, in which the ebb is installed first Source vseprosiding.ru
- The facing material is pressed as tightly as possible against the walls of the opening. Additionally, a sealant can be used to seal. It is applied to the inner edge of each panel.
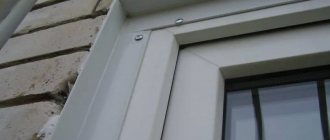
Experts also take into account how deep the window is installed in the wall. This affects the way the siding is installed on the sides of the frame. According to Russian standards, the minimum width of slopes is 200 mm. Their design is carried out using a J-profile. It is fixed directly to the frame and the facing panel is inserted into it. On its other side, which connects to the wall siding, an external corner is used. It closes the gap between two parts.
On a note! Solid siding can be used for finishing if it matches the width of the slopes. Otherwise, equal fragments of several panels are used. They are connected using an H-profile.
Sheathing slopes with solid panels Source s-stroit.ru
External window trim with plastic
The use of sheet plastic allows finishing work to be carried out as quickly and accurately as possible. The panels have an aesthetic appearance, they are durable and practical.
They do not require additional finishing, since they are ideally combined with the material of the frames and form a harmonious and complete solution in tandem.
Advantages of PVC slopes:
- long service life;
- extensive color palette; low thermal conductivity;
- no condensation forms;
- resistance to moisture and mold formation.
Weaknesses of plastic:
- the need for replacement in case of damage - cannot be restored;
- low noise and heat insulating properties.
Installation of siding on slopes
Before finishing the windows with siding from the outside, it is necessary to prepare the slopes. The process begins with their revision. When there are chips, cracks or other similar defects on the slopes of a stone opening, they are eliminated by applying plaster. Thanks to this action, it will be possible to prevent their further expansion. After all, it will lead to delamination of the material.
Preparing the outer part of the opening Source hozsektor.ru
As soon as the applied layer of plaster has dried, it is covered with a primer. It is better to use a composition that can penetrate deeply into the material. It will prevent the negative effects of water, mold, and the proliferation of harmful microscopic organisms.
Installation of sheathing
On some objects it is necessary to create a sheathing when the opening is being decorated. It is created in exactly the same way as when attaching siding to the facade. This design must be installed if finishing is carried out in a stone house.
The creation of the sheathing begins with marking the places where its slats will be fixed. They are subsequently used for the installation of panel elements and profiles. Depending on the placement of the siding, the slats can be attached in a vertical or horizontal direction. In this case, it is necessary to accurately determine the total thickness of the cladding so that the window clearance does not decrease.
Often the sheathing is not installed at all, since liquid nails are often used to secure all the elements. If the house is built entirely of wood, then the cladding is secured with hardware that is screwed directly into the walls.
Fastening slopes using liquid nails Source oboiman.ru
Window covering without using slopes
When the window is mounted flush with the outer surface of the wall, the opening is designed using exclusively platbands. Additionally, J-profiles can be used.
This finishing is performed in the following sequence:
- measure the bottom of the window frame;
- measure the measured size on the platband and add twice its width to cut the part to the required length;
- each side of the resulting casing is cut at 45°;
- measure and cut the side parts in the same way, but only the end on top is beveled;
- measure and cut out the top part, but only its ends are not beveled at 45°;
- glue using liquid nails and screw the lower casing using self-tapping screws;
- install side scarves, the solid edges of which are brought behind the lower casing, which eliminates the formation of gaps;
- secure the top bar by sliding it behind the side elements.
If you decide to use a J-bar, then it is installed on the window frame. It allows you to refine the junction of two parts.
Subsystem
The duration of operation and the quality of finishing of window openings depends on the quality of the components.
Component materials
Finishing window openings with siding involves installing a metal or wooden frame. A wooden frame will be cheaper, but a metal frame will be more reliable and durable .
Metal profile subsystem
To make slopes from siding on a metal frame, you need to purchase the following materials:
| UD profile - to calculate the required amount, you need to add the perimeter of the window to the perimeter of the wall. For example, if the wall is 4 x 4 meters and the window on it is 1.5 x 1 m, then 4+4+4+4 = 16 m.p. profile will go to the wall and 1.5 + 1.5 + 1 + 1 = 5 m.p. will go to the window. | |
| CD profile (stand-up). When calculating its quantity, the length of the surface must be divided by 0.6, since this element is installed every 60 cm, but this indicator also depends on the type of insulation. | |
| A CD connector is purchased for building heights over 3 meters. The number of such elements depends on the number of docking nodes. | |
| CD connector mounting method. | |
| ES-bracket. It is used for attaching a CD profile. Using a U-shaped bracket, you can build a structure based on the building level. | |
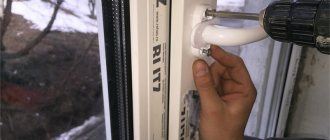
| Using hardware, UD profiles are attached. They are selected based on the wall material: self-tapping screws are used for aerated concrete and brick, and dowel screws are used for wood. | |
| To fasten metal elements together, use “flea” hardware. |
The structure of the frame is made on the basis of pre-made markings.
At this stage, work on waterproofing the facade is carried out. The method of fastening the frame elements is shown in the photo below.
Method of fastening frame elements
When constructing a metal frame for siding, a UD profile is fixed to the wall along its perimeter and around window and door openings.
UD profile is fixed around the opening
Using a UD profile, a guide strip is mounted, and the siding is attached to the metal frame using a CD profile, the pitch of which depends on the width of the insulation material.
Siding panels are fixed to the frame using a CD profile
The UD profile makes the structure rigid and fixes the CD profile. You can attach it to the outer wall using an alligator clip, which positions the frame based on building level readings.
Wooden subsystem
Features of the construction of a wooden frame when installing slopes on windows for siding include the following nuances that you need to know about:
| Standing profiles made of timber are calculated based on steps of 50 - 60 cm. Their height should be equal to the height of the building, since their length is difficult to increase. | |
| Hardware is purchased taking into account a step of 40 cm per hardware. | |
| If the moisture content of the wood exceeds 12%, then it is dried naturally under pressure in order to avoid the effect of “torsion” of the beams. |
To increase the service life of wood, it is treated with various protective compounds.
Subsystem installation
To decorate an opening with siding on a wooden sheathing, horizontal guides are not required. Vertical guides must be installed in increments based on the width of the insulation material .
The pitch between the guides depends on the type of insulation
The starting strip is attached to the bars.
Setting the starting line
Near the window openings, the beams are fixed in a horizontal position to ensure rigidity. The starting profile and other components, as well as the window strip, will be attached to the beams.
A horizontal beam is fixed along the upper edge of the window opening
Video description
An option for professionally made drip sill is shown in the following video:
The side parts of the drip bent upward will allow you to avoid through gaps during installation and will prevent water from penetrating into the opening. Moreover, during installation they are covered with slopes.
The manufactured part is screwed to the bottom of the window frame. It is first recommended to apply a layer of liquid nails directly to the joint. They will completely close the gap between the window frame and the ebb. The lower part of the cladding is also fixed on the vertical walls of the opening. Fastening is carried out through previously created side bends.
Laying insulation
Insulation is recommended using mineral slabs
To create comfort in the premises of the house, you need to additionally insulate the facade near the windows and openings. Such insulation will play a dual role:
- firstly, heat will be retained inside during the cold season;
- secondly, the facade will not heat up in the hot season.
It is advisable to choose basalt fiber wool as the insulation material. Mineral wool not only retains heat, but also has high fire resistance, which cannot be said about some other materials. The only drawback of mineral wool is the possibility of its interaction with moisture - to avoid problems, waterproofing is placed on top of the insulation.
You should start laying the insulation from the bottom side. The first row of material should rest on the plinth or sheathing strip. Gaps should not be allowed to form - otherwise the properties of the material will not be able to fully realize themselves.
If you use polystyrene instead of mineral wool, the formation of cracks is inevitable. Get rid of them using polyurethane foam. The insulation is attached to the walls using plastic dowels.
When installing insulation around windows, the mineral slab is carefully cut to the required dimensions. It is desirable that the trimmed slab be slightly larger than the space between the sheathing profile.
Video description
You can watch the installation of the window sill in the following video:
At the next stage of window covering, the J-bar is attached. It is fixed on the sides and top of the frame. Siding cut to size is inserted into this profile. In this case, the side slopes at the top and bottom are cut at angles that are equal to the slope of the horizontal finishing strip and the ebb, respectively.
The dimensions of the upper slope are determined in the same way as the dimensions of the low tide. The difference is that the width will be equal to the same size at the opening. At the same time, it is necessary to measure the inner and outer sides of the upper slope, respectively, along the length of the frame and the outer part of the opening.
All prepared slopes are placed in J-profiles. The joints between the panels in the opening and the façade finishing are covered with external corners. If required, siding on slopes can be inserted horizontally into the profiles. This is influenced by the architecture of the building.
Design solutions
It would seem that covering a window is a simple matter. But it can be done in different ways and get completely different design effects. Here are a few examples of how exterior windows can be decorated with siding or façade panels:
- Cover the openings with platbands.
- Install the casing with a slope.
- If the window is set deep, use the “platband + slope + extension” set.
- An alternative option for a wide window slope: siding or facade panels that you have chosen for the main facade cladding. For example, Alta-Profile platbands are connected both to slopes and to panels of the same production.
- Another option for a wide slope: siding or facade panels + outer corner, without trim and slopes.
- You can also use a slope without a casing. For example, as a window sill. But in no case should you use a slope instead of a low tide.
Rice. 2. To finish these windows, a window strip is used.
Rice. 3. Window cladding: casing + slope
Rice. 4. Instead of platbands, the same corner elements are used as on the walls of the house.
The slope can be used without platband. For example, as a window sill. But its use as a low tide is prohibited.
Briefly about the main thing
When covering windows, siding made of metal or vinyl is used. Most often, the same material is used as when facing walls from the outside. When covering a window with siding, finishing and window strips, metal or plastic molding, J and H profiles, and corner elements are often additionally used.
To install finishing profiles, use stainless steel screws or galvanized fasteners. They are screwed in exclusively at right angles. At the same time, they do not tighten too much.
Sheathing the slopes begins with fixing the drain, and only then all other panels are fixed. Moreover, they can be composed of several parts if the window opening is large. If there are no slopes, only platbands are installed.
Tools for work
There are practically no differences in the installation of vinyl and metal siding in terms of technology. The same can be said about the tools used during installation.
The only exception is cutting panels or additional elements - it is better to cut vinyl parts with a fine-tooth hacksaw, a hand-held power saw or, which is somewhat worse, a jigsaw.
The most suitable tool for cutting metal siding is tin snips or a hand-held power saw with a special blade.
A very convenient tool is cutting shears, which allow you to make cuts or holes of any configuration , which is convenient when it is necessary to design elements of a non-standard shape.
CAREFULLY!
Cutting metal siding with a grinder is prohibited. In this way, the protective coating will most likely be damaged, resulting in the immediate onset of corrosion processes that destroy the material.
The remaining instruments are almost identical in composition:
- Ruler, tape measure.
- Pencil, chalk for marking.
- Hammer.
- Cutter knife.
- Screwdriver, screwdriver, electric drill.
- A square, in some cases a protractor is convenient.
- Building level.
- Hammer.
The listed tools are a general set; in special cases, additions to this list are possible.
conclusions
Decorating window openings with siding is a labor-intensive and time-consuming process that requires you to have certain knowledge and skills. Sometimes theory differs significantly from practice, and it can be very difficult to master all the nuances by doing the cladding correctly. Therefore, siding manufacturers recommend seeking qualified assistance to avoid additional costs and disappointments.
If you decide to decorate the windows yourself, you should thoroughly study the instructions provided by the manufacturer, and only then begin to practice. By following these simple tips, you will certainly avoid problems and difficulties, and the result of the work itself will delight you and your loved ones for a long time.