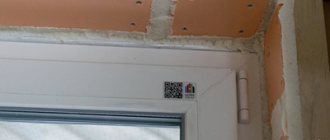
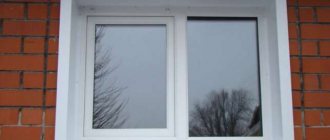
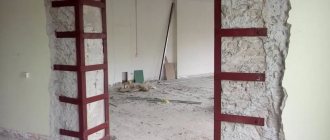
Slopes are the edges of a window or doorway. The main task when carrying out plastering work is to give it a finished look, preparing it for subsequent use.
To work, we will need the following minimum set of tools: a level, a tape measure or ruler, a pencil, a knife, a screwdriver, a wide spatula, a trowel, a 50 cm long rule, a trowel or a trowel. The materials you can use are gypsum or cement plaster, which you will have to prepare yourself from a dry mixture. Perforated corners, a beacon profile and slats nailed to the inside of the slope can act as limiters for creating a layer of the required thickness. To form the upper slope, depending on the thickness of the plaster layer, it may be necessary to use a stainless reinforcing mesh.
Preliminary work
If for plastering door slopes the only requirement is a clean base, devoid of crumbling parts of the wall, then when finishing window openings you will have to perform a significantly larger amount of work:
- after installing the window unit, remove excess polyurethane foam (level with the plane of the window);
- because polyurethane foam, which is used to seal the gaps between the frame and the opening, is a vapor-permeable material, then in order to avoid the effect of condensation on the plaster it will be necessary to vaporize the hardened foam. To do this, simply coat the material with a thin layer of acrylic sealant. When it is completely dry, you can proceed to the next stage;
- The process of forming slopes can hardly be called clean, so the window block, window sill and the heating radiator located underneath are protected with plastic film or cardboard, which can be conveniently secured with wide tape. Particular attention is paid to the fittings - they are the most difficult to clean if something happens;
- cleaning the base and priming it. The edges are cleaned with a stiff brush, and contact concrete or any deep penetration primer is used as a strengthening compound.
Slope plastering technology
It is best to plaster the slopes simultaneously with plastering the walls; in this case, the corner protection profile is immediately smeared into the plaster layer of the wall and goes into the slope.
But this work can be done after plastering the walls. To do this, you will have to knock down about 5 cm of the plaster layer from the edge to install the profile. Work should begin with surface preparation. It is necessary to dismantle the old plaster, decorative panels, drywall, carefully treat the surface with a primer and carefully seal the window and frame with a protective film.
Preparation should be carried out immediately before plastering work, and not several days before it begins. Since the surface will become dusty during this time, especially under repair conditions. Then, using a vertical level (you can use a laser or bubble level), install a galvanized mesh profile on the outer corner. It will serve as a guide and set the desired turn. The profile must be set taking into account what “opening angle” we need: straight or “at dawn”. For a professional, this is enough to move on to plastering. To do this, the master cuts out
aluminum rule so that it moves freely along the window frame, setting the desired angle.
For beginners, you will need to install an additional plaster beacon inside the slope. It should also be installed level, taking into account the turn of the slopes. Exactly the same procedure must be performed along the entire perimeter of the window, while ensuring that the slopes are symmetrical relative to each other and have the same width. So, when all the preparatory work is completed, you can proceed to applying plaster and leveling. For plastering work, use a short aluminum rule, a spatula and a rubber trowel to make the surface smooth.
In old buildings and in country houses, semicircular windows are often found; plastering of slopes in such cases is carried out according to a template cut from 10 mm thick plywood.
We carry out plastering of semicircular slopes. If necessary, we will make a plane “at dawn”
The template must be cut out so that it exactly follows the contour of the semicircular part of the window.
This work is very painstaking and requires high skill, so it is better to turn to professionals who have extensive experience in such work. To ensure that the plaster adheres well to the work surface, it is better to use high-quality primers and a plastering station for mechanized work. Plastering slopes is an important and complex stage of repair. By contacting us, you will make the right choice, since we will provide high-quality finishing of this integral element of the premises.
The cost of plastering slopes is 350 rubles. for 1 linear meter without material and from 500 rubles. for 1 linear meter with material. Plastering semicircular slopes depends on the complexity of the work and geometry; the cost of this work is calculated after the visit of the surveyor. Our company performs the full range of plastering and painting works. Check out our current price list.
You can order this service by phone; a specialist will visit you and prepare an estimate for free.
Calculation of apartment wall area
Any repair work in a residential area is a very troublesome task. It requires the contractor to have an accurate approach to calculations and correct measurements of the total area in order to draw up an estimate and purchase the required amount of building materials. One of the main questions that arises at the initial stage of repair is how to correctly calculate the wall area, taking into account window and door openings.
Correct calculations are the key to successful repairs
If the work is carried out by a construction team, then they will do everything on their own, but it is necessary to be able to carry out such calculations. This will help you calculate the exact square footage not only for finishing yourself, but also to check the correctness of the workers’ calculations.
Technology
Plastering the slopes begins after the surface of the main walls is leveled. The work ahead is dirty, so it is advisable to cover the door leaf, floor and door frame with film, oilcloth or other similar materials. You can cover the jamb with masking tape - it will be easier to clean.
Preparation
The first stage of work is surface preparation. First, poorly adhering plaster, pieces of brick, and other building material are removed. If the doors have been replaced, the old plaster may stick out a lot. In this case, even if it holds up well, it gets beaten up.
If the old plaster sticks out a lot, it is refinished
Then, grease or oil stains, if any, are treated with neutralizers. Old paint is also removed: plaster does not adhere well to it. Afterwards, remove dust and dirt.
If the cracks were not foamed when installing the door, you will need to do this now. Polyurethane foam is applied to the wetted surface in a volume of no more than 1/3 of the required amount. First, clean out all the dust, then moisten it with a spray bottle. In a few minutes it will greatly increase in size, filling all the empty spaces. After waiting for the foam to polymerize (harden), the excess is cut off with a knife. It’s more convenient to do this with regular stationery paper.
If plastering is to be done with cement-sand mortar, the surface is moistened. This can be done from the same spray bottle or using a brush or roller.
Setting up the guides
It is more convenient to plaster slopes with your own hands, as well as walls, using guides. On the outside of the doorway, to obtain a smooth and rigid edge, a perforated paint corner is usually placed. Once secured well, it can be used as a guide.
It is cut to the height of the doorway. The upper edge of the corner, which will be adjacent to the main wall, is cut down at an angle of 45°. It is better to do this, since during work this edge for some reason always lifts up and causes a lot of inconvenience.
You can fix the corner in several ways:
- Gently apply the solution inside the corner, then press it into the corner. You need to apply the solution carefully: the walls are made very thin and even with a small mass it breaks. Therefore, it is better to use the second method.
- The solution is applied to the corner, and the corner is pressed into it.
There shouldn’t be too much mortar, but there
shouldn’t be any voids either. Having pressed the corner in well, it is leveled so that its edge is flush with the main wall. The solution that protrudes through the holes is removed with a spatula. Then they take a level bar (you can use a building level or a rule), apply it to the corner, checking how level the corner is. They check both from the side of the main wall and from the side of the slope.
The procedure is repeated on the other side, and then on top. At the junction of the corners, the absence of differences can be checked by running your finger along the joint.
There is another way to attach the corners - with nails or self-tapping screws. This method is good when working with drywall, but it is not used when plastering: the caps get in the way.
When plastering door slopes it is convenient to use a template
The second guide is the door jamb. When installing the doors, they were aligned straight, so this is a good guide. But since the solution should not cover the entire surface of the jamb, a template is cut out of some dense material, which is then used to level the solution. It is better to cut it out of a piece of plastic: the edge is smooth, glides well, and is quite dense. You can use a piece of flat wooden plank. Only the edge that will cut off the excess mortar should be perfectly smooth. The part of the template that will slide along the jamb is made in the form of a step. This protrusion will remove excess solution.
You can work with a spatula or a rule, but then a beacon is installed and secured along the jamb at the required distance. The tool rests on it when cutting off excess mortar.
In this video tutorial on plastering slopes, the technology for attaching perforated corners is explained in detail, and explanations are given regarding the technique of applying putty during finishing.
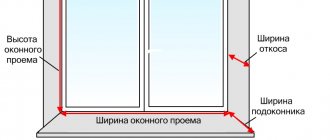
Calculate the area of window and door openings
Before calculating the area of the walls, it is necessary to measure the window and door openings in order to subtract this space and find out the quadrature of only the surface being processed. Readings are taken only along the slopes of openings.
It is important to accurately measure window and door openings
For example, we have a square window whose dimensions are 1.50 in length and 1.60 in width. We carry out similar calculations: 1.50x1.60 = 2.40 m 2. If there are several windows in the room, then each of them is measured separately and the data obtained is added to one sum. A similar operation is carried out with doorways, where readings are taken not along the door itself, but precisely along the opening in the wall.
For example, as a result of measurements, we found out that the window area is 2.40 square meters, and the door, for example, 5.60. Next, we add the dimensions of the openings into one sum and subtract it from the total area of the room 2.40 + 5.60 = 8, 46-8 = 38. As a result, we have an opening area of 8 m2, subtract it from the total square footage of the room and get 38 m2 of treated surface.
Video on how to calculate wall area:
The cost of plastering slopes per linear meter at the San Sanych company
If you are looking for experienced craftsmen to plaster slopes, contact us. We have been working in Moscow for many years, so we have a lot of experience. Only the best specialists are hired to complete each order. They are fully competent in their field and fulfill all client requirements. To carry out repair work, the company purchases materials only from trusted suppliers, which eliminates defects. Achieving high quality is very important to us, so our engineers monitor compliance with the technological scheme after each stage. The cost of plastering per 1 linear meter is set individually. The price of the service depends on the amount of materials used and basic labor costs.
List of required tools
To perform repairs, our specialists use the following tools:
- level;
- rule;
- fry;
- roulette;
- putty knife;
- Master OK;
- pick;
- container for preparing the solution and others.
✅ Surface plastering technology
There is nothing complicated about plastering a slope. Even a novice master will take no more than 2-3 hours to complete the work.
✅ Materials and tools
When choosing a mixture, you should focus on the type of surface and the conditions of the room where the openings are located. For ordinary rooms, compositions based on gypsum or acrylic mixtures are chosen, for rooms with high humidity - with the addition of cement. The following additional materials should be prepared in advance: orientation beacons, primer, polyurethane foam and frost-resistant sealant.
Set of tools required for work:
- grater;
- rule;
- construction knife;
- tape measure and pencil;
- building level;
- narrow and wide spatula;
- mixing container;
- “stroker” for distributing the composition;
- roller and brushes.
An important point: for finishing work it is necessary to use only an even rule, free of any damage to the ribs.
✅ Preparation of the base base
All excess is removed from the surface: the protruding remains of the polyurethane foam are cut off and made level with the window frame. If there is old coating on the slopes, it is recommended to completely remove it. This will minimize the risk of cracks and voids.
The leveled surface is wiped from dirt and dust and left until completely dry. To improve adhesion, the slopes are coated with a primer in two layers, not forgetting to maintain the time interval required for each layer to dry.
To create a vapor barrier, the surface is covered with sealant, paying special attention to the joints. It is necessary to work with the composition quickly, immediately removing excess.
Application and distribution of the composition
Before proceeding directly to plastering, the frame and window are covered with plastic film. To create guides, beacons are installed near the window and at the corner of the slope, leveling them using a level. To simplify the task when determining the plane for applying the composition, install a bar.
The plaster composition is mixed on the basis that you will have time to process the resulting volume within an hour. If the work takes longer, it is better to do the kneading in 2-3 stages.
The prepared solution, which has a paste-like structure, is taken from the container with a small spatula and thrown onto the treated area. Level the composition with a large spatula, gradually moving from top to bottom.
To level the layer in a vertical plane, apply a rule and gradually move it upward. If defects are found after leveling, they are eliminated by applying and distributing a new portion of the composition.
The easiest way to level the surface is to use a grater, running the pre-moistened working part of the tool over it in a circular motion. Having leveled and cleaned the surface, the slopes are left to dry completely. When the composition dries, all that remains is to apply 2-3 layers of paint and remove the protective film from the window frames.
The main task when plastering door slopes, especially those at the entrance to the apartment, is to reduce the negative impact of temperature fluctuations on the finishing material. To do this, the treated area must be coated with a primer and filled with sealant.
Technology of mechanized plastering of slopes
It is important to remember that before starting work on machine plastering of slopes, the windows must be covered with film to avoid the solution getting on the glass and the window profile.
- Preparing the base . First, old dirt and dust are removed from the slopes. Then their surface is primed with highly adhesive primer “Knauf Betokontakt”.
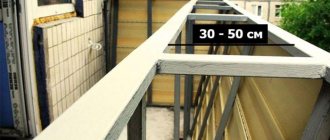
- Installing profiles . The role of persistent beacons when plastering slopes is performed by the corner profile and the window strip. They are set using a laser level. Properly aligned profiles allow you to achieve ideal window geometry and set the slopes to the required opening angle. When performing work in brick houses and in old buildings, the plaster mixture is reinforced with a metal mesh.
- Applying plaster . The solution is applied to the window slope from a gun under pressure, first to the upper quarter of the opening, then to the sides. It is important that all window sills are already installed before starting work. This will ensure the maximum effect of thermal insulation of the opening and eliminate the ingress of moisture, and therefore the formation of mold.
- Grouting and smoothing . After uniformly distributing the mortar as a rule and drying it for two hours, the process of smoothing and grouting the slope plane is carried out in the same way as grouting plaster on walls. But unlike walls, the profile is not removed from the slope, but performs the protective properties of the corner.
It is advisable to carry out the final finishing of the surface (painting, wallpapering) no earlier than 7 days after applying the gypsum solution.
Self-adhesive window adjacent profile - choosing reliable protection
Specifics and characteristics
The adjacent profile, as a rule, is equipped with a reliable fiberglass mesh glued to an additional shelf. The reinforcing mesh allows you to reliably fix the plaster liquid on slopes and practically eliminate the occurrence of cracks, visual unevenness and shedding of plaster, in particular located in critical areas of the profile abutment.
High-quality plastic is a good means for stable sealing and thorough sealing of all installation seams on window structures. The adjacent profile - unlike roll-tape sealants - is a more popular product for plastering slopes.
Characteristics:
- made from impact- and weather-resistant PVC, alkali-resistant;
- has a protective strip and a universal self-adhesive seal;
- resistant to UV rays;
- vapor barrier and waterproof;
- lightweight and easy to install, cut with scissors.
Area of use
Depending on the type, window adjacent profiles are used in the process of finishing external and internal . They are effective in creating precise and high-quality plaster joints along the entire perimeter of slopes. Mainly self-adhesive adjacent profile is used for:
- plastering door and window slopes in places adjacent to door and window blocks, serves as an effective beacon of 6 or 9 mm (depending on the thickness of the plaster layer);
- plastering works in places where the profile adjoins other façade materials.
Adjacent window profile on the external window slope
Advantages and installation of the profile
The main advantages of the adjacent strip of the above type are:
- a budget option;
- fast and convenient finishing;
- preventing cracks between the plaster layer and window or door blocks;
- providing high-quality protection from weather influences and vapors;
- maintaining the thermal insulation functions of the seams: reducing heat loss and heating costs;
- protection from mechanical damage, as well as deep contamination during the finishing procedure;
- ensuring an aesthetic and harmonious connection of the plaster layer to the frame of window and door types;
- no need to use additional sealants or carry out additional repair procedures.
Step-by-step installation
Please note that in order to firmly fix the profile, the surface of the window frames must be cleaned of various contaminants and adhering fat . The temperature during the installation procedure should not exceed 40 °C. The maximum lower temperature level is +5 °C.
Varieties
To achieve an exceptionally strong connection between the window frame and the plaster, as well as to protect the frame during installation work, adjacent profiles of 6 and 9 mm are used. There are reinforcing strips with and without fiberglass mesh. The first is used for external work, the second - mainly for finishing internal slopes.
Do you want to finish the slopes with high quality? Read our article on how to properly plaster window slopes without outside help.
Read about the pros and cons of suspended ceilings in this article.
PVC profile with mesh
This is a classic version of a reinforcing profile: it is a shelf with a self-adhesive seal and a durable protective mesh. It has a tear-off strip that serves to attach a protective film, which protects the windows from possible dirt and scratches.
Thanks to its use, the penetration of moisture and mold is eliminated . A very aesthetic finishing element, which is a thin and even strip that frames the window frame.
Advice: You should start working on applying reinforcing elements no earlier than 24 hours after creating the heat-insulating belt.
PVC profile without mesh
An adjacent profile without reinforcing mesh is used, as a rule, for interior work . However, this type of profile can also be used for external installation, but on the condition that additional reinforcement is not used.
One of the popular and high-quality protective strips of this type is a self-adhesive profile without mesh (9 mm) of the BauKom brand, made in Germany. The adjacent profile without mesh facilitates the application of plaster, ensuring uniform coverage and ease of installation.
Self-adhesive adjacent profile with and without reinforcing mesh
The profile element can be supplemented with PVC corners with mesh and a profile with an open drip. The first will help provide additional protection for arched window vaults and strengthen the corners, the second will eliminate the possibility of moisture accumulation in corner areas, provide a high degree of reinforcement of the plaster layer and minimize the number of cracks.
Window profile adjacent video
In this section, we invite you to watch a video on the topic of our article about the self-adhesive adjacent window profile. This video shows the process of installing a profile and it will be a good visual addition to the material you read.
Cladding works
The surface can be covered with natural and artificial stones, as well as wood, plastic and other products. The volume of facing work is calculated separately for each material used to cover the surface.
Calculation of construction volumes of work on surface cladding is calculated based on the surface area of the cladding, without taking into account the relief. When determining the cladding area, you must be guided by the following rules:
- the dimensions of walls and columns should be taken taking into account fractures in the plan along the outer contour, i.e., along sections that include facing slabs;
- The relief of the profiled parts should not be taken into account when taking the area of the vertical projection of the cladding.
The volume of work on facing steps and laying window sill boards should be calculated taking into account the ends of the slabs embedded in the masonry or plaster.
Products
Horizontal blinds
Vertical blinds
Fabric roller blinds
Horizontal blinds Venus
Roller blinds Day-Night System
Roman blinds
Wooden horizontal blinds
Bamboo and jute blinds
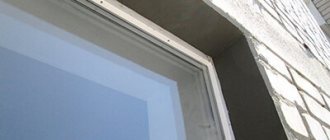
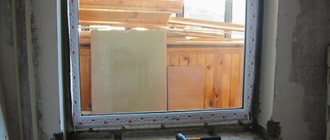
What tools and materials will be needed?
Plastering window slopes begins with preparing the tool. No special devices or equipment are required for this work; this is the main advantage of this finishing method.
- A building level 1 m or more long depending on the height of window and/or door openings.
- Rule for leveling the applied layer of mixture.
- Spatula for smoothing out small imperfections.
- Plaster trowel and trowel.
- A drill with a “mixer” attachment and a container for mixing the solution – if a dry plaster mixture will be used.
Figure 2. Tools and materials that may be needed for work
www.spsm-msk.com
Mounting adhesive/adhesive for foam plastic and mini-slabs Baumit NivoFix - glue and create a protective layer! — from 300 rub./bag 25 kg.
Promotion! Universal assembly adhesive for gluing insulation and creating a reinforcing layer Baumit DuoContact (Murexin/Baumit) - adhesive for NivoFix foam plastic from 300 RUR/piece
Dry mixes:
gypsum plaster, gypsum putty, tile adhesive, floors, facade plasters, grout mixtures
Facade insulation system
Clinker tiles
Non-metallic materials:
| Name | Price per one. goods | Image | Short description |
Adjacent window profile, self-adhesive 6 mm with reinforcing mesh 10 x 10 cm, produced by ProfiGips (Poland-Belarus) . A self-adhesive window connection profile with a 6 mm reinforcing mesh is used in a façade insulation system for the inside of opening slopes (adjacent with the 6 mm part to the window) to strengthen, impart rigidity, protect the insulation and level the slope of the window/door opening. In a piece - 2.4 m.p. in a pack 72 m.p. or 30 pcs. An element connecting the thermal insulation system to window and door frames. It is a profile element made of a plastic shelf with a self-adhesive seal and fiberglass mesh. Sold in multiples of boxes.
Adjacent window profile self-adhesive 9 mm with reinforcing mesh 10x10 cm PREMIUM. produced by Bella Plast (Poland PREMIUM) . A self-adhesive window connection profile with a 9 mm reinforcing mesh is used in a facade insulation system for the inside of opening slopes (adjacent with the 9 mm part to the window) to strengthen, impart rigidity, protect the insulation and level the slope of the window/door opening. In a piece - 2.4 m.p. in a pack 120 m.p. or 50 pcs.
Adjacent window profile with reinforcing mesh 9 mm STANDARD (PS-9S). produced by Profile (Russia) . In a piece - 2.4 m.p. in a pack 72 m.p. or 30 pcs. In a corrugated box.
Adjacent self-adhesive profile 6 mm with reinforcing mesh 10x10 cm, produced (Russia) . A self-adhesive window connection profile with a 6 mm reinforcing mesh is used in a façade insulation system for the inside of opening slopes (adjacent with the 6 mm part to the window) to strengthen, impart rigidity, protect the insulation and level the slope of the window/door opening. In a piece - 2.4 m.p. in a pack 144 m.p. or 60 pcs. An element connecting the thermal insulation system to window and door frames. It is a profile element made of a plastic shelf with a self-adhesive seal and fiberglass mesh. Sold in multiples of boxes. Pickup is not a multiple of boxes.
Adjacent self-adhesive profile 9 mm with reinforcing mesh 10x10 cm 2.4 m.p. produced by Bella Plast (Poland) . A self-adhesive window connection profile with a 6 mm reinforcing mesh is used in a façade insulation system for the inside of opening slopes (adjacent with the 9 mm part to the window) to strengthen, impart rigidity, protect the insulation and level the slope of the window/door opening. In a piece - 2.4 m.p. in a pack 120 m.p. or 50 pcs. Shipped in multiples of packs, pickup from retail stores starting from 2.4 m.p.
Adjacent self-adhesive profile 9 mm with reinforcing mesh 10x10 cm 2.4 m.p. production (Russia) . A self-adhesive window connection profile with a 9 mm reinforcing mesh is used in a facade insulation system for the inside of opening slopes (adjacent with the 9 mm part to the window) to strengthen, impart rigidity, protect the insulation and level the slope of the window/door opening. In a piece - 2.4 m.p. in a pack 72 m.p. or 30 pcs. pickup from 2.4 m.p.
Finishing work.
Sales department:
- +7 (Moscow)
- 8 (Federal)
Delivery, setup and consultation FREE
Licensed SN-2020, TSN-2001, Russian Railways, TSNB-2001, FER-2017
30% discount on weekly courses
A. Cladding works
Calculation of construction work for surface cladding with natural stone and reinforced concrete textured slabs and parts should be calculated based on the surface area of the cladding. When determining the cladding area, you must be guided by the following rules:
a) the dimensions of walls and columns should be taken taking into account fractures in the plan along the outer contour, i.e., along sections that include facing slabs;
b) do not take into account the relief of the profiled parts, taking the area of the vertical projection of the cladding.
When the extension size of profiled parts is greater than the height, take the extension size (larger side).
The scope of work for facing steps and laying window sill boards made of natural stone should be calculated taking into account the ends of the slabs embedded in the masonry or plaster.
The scope of work on surface cladding with artificial slabs should be calculated based on the projection area of the cladding surface without taking into account the relief.
The scope of work on facing surfaces with artificial marble should be calculated based on the unfolded surface of the facing.
B. Plastering facades
The area of plaster on facade walls should be calculated minus the area of openings along the outer contour of the frames.
With high-quality plastering of facades, the area occupied by architectural details (cornices, corbels, platbands and other drawn parts), as well as columns and pilasters adjacent to the building, is not included in the area of the walls and must be calculated separately.
With improved plastering of facades, rods and cornices should not be calculated separately, since the pulling of these parts is taken into account by the standards.
Window slopes and ebbs, door slopes, as well as the side surfaces of architectural and structural parts protruding from the plane of walls or protruding into the thickness of walls during high-quality plastering of facades should be calculated separately, subdividing by width up to 200 and more than 200 mm.
With improved plastering of facades, slopes and ebbs are not calculated separately, since their plastering is taken into account by the standards.
The scope of work on plastering columns (adjacent to the building or free-standing), as well as pilasters, should be calculated based on the area of their vertical projection.
The amount of work on pulling out cornices, rods, belts, platbands and other drawn parts for high-quality plastering of facades should be calculated by the area they occupy on the surface of the facade (as projected onto the wall).
When installing cornices with a pitch greater than the height, take the area of the horizontal projection of the cornice.
B. Internal plaster
Building codes and regulations establish three types of wet plaster for internal surfaces: simple, improved and high-quality.
As a rule, simple plaster is prescribed in warehouses, basements, attics, elevators, etc., utility rooms, and improved plaster is prescribed in apartments and all other premises of residential and civil buildings, as well as in domestic and service premises of industrial buildings. High quality plaster is installed as specified in the design in the main areas of the most significant public buildings.
With improved and high-quality plaster, the finishing area is calculated separately for the following surfaces:
a) walls, pilasters, niches, pillars on stone and concrete;
b) the same, on wood;
c) ceilings with cornices on stone and concrete;
d) the same, on wood;
e) ceilings without cornices and arches on stone and concrete;
f) the same, on wood;
g) window and door slopes;
h) lower window plugs.
In addition, you should separately calculate the areas of walls, ceilings, columns, cornices and rods, the surface of which is plastered over a metal mesh with a division: with and without a frame device.
The plastering of staircases and landings from individual elements is also calculated separately, indicating:
- without finishing of stringers and beams and with finishing of stringers and beams;
- without traction and with traction.
For simple plastering, the total (total) area of finishing of walls, ceilings, pillars and pilasters is calculated, subdivided into plastering for wood, stone and concrete. In this case, the area of window and door slopes is not taken into account.
The varieties of wet plaster listed above are used to finish the surface of brickwork or other small-sized elements.
In large-panel buildings, the area of surface finishing for painting or wallpapering is calculated separately: walls and partitions, ceilings, staircases and landings.
When calculating the area of plastered surfaces, you should be guided by the following rules:
a) the area of the walls should be calculated minus the area of the openings along the outer contour of the boxes and the area occupied by the stretched platbands. Wall heights should be measured from the finished floor to the ceiling; the area of the sides of the pilasters should be added to the total area of the walls;
b) the area of ceilings (including coffered ceilings with a horizontal projection area of the caisson up to 12 m2) should be calculated by the area between the internal edges of walls or partitions;
c) the area of ribbed floors and coffered ceilings with a horizontal projection area of the caisson of more than 12 m2 should be calculated based on the unfolded surface;
d) the area of internal platbands should be determined by their vertical projection on the wall;
e) the area of staircases and landings is calculated according to their horizontal projection (floor-by-floor);
f) the area of plastering walls, ceilings and columns using wire mesh should be determined by the area of the surface to be finished, and cornices and rods - by the total area of vertical and horizontal projections;
g) the area of the base under artificial marble is not included in the scope of plastering work.
The scope of work for installing scaffolding should be calculated:
a) when plastering ceilings and walls in rooms with a height of more than 4 m - along the horizontal projection of the ceilings;
b) when plastering in rooms with a height of more than 4 m only walls - along the length of the walls multiplied by the width of the scaffolding;
c) when plastering facades with a height of more than 8 m - according to the vertical projection of the walls without deducting openings;
d) when plastering on facades more than 8 m high, only cornices, rods, slopes and platbands - according to the project.
G. Painting work
Estimated standards establish three types of painting: simple, improved and high-quality. As a rule, simple painting is prescribed in warehouses, basements, attics, elevators and other utility rooms, and improved painting is prescribed in apartments and all other rooms of residential and civil buildings. High-quality painting is used in the main areas of hospital buildings and the most significant public buildings.
The area of painting facades with lime, silicate, cement and emulsion compositions is calculated without deducting openings and without taking into account the area of painting window and door slopes, as well as the unfolded surface of cornices, rods and other architectural details.
The scope of work on painting facades with perchlorovinyl compounds should be determined based on the actual surface to be painted.
The area of painting internal surfaces (walls and ceilings) with aqueous compositions should be calculated without deducting openings and without taking into account the area of window and door slopes and the sides of niches. The area of the pillars and sides of the pilasters is included in the total area of painting the internal surfaces
The area of painting of internal walls with an opening of more than 50% is determined by the actual surface to be painted, i.e. minus the openings and adding the area of window and door slopes and the sides of the niches.
The area of walls painted with oil compositions should be calculated minus the openings. The area for painting pillars, pilasters, niches, window and door slopes is added to the area for painting walls.
The area of window and door openings to exclude it from the area of the walls is calculated by the outer contour of the frames.
The scope of work on painting ribbed ceilings should be calculated based on the area of their horizontal projection using a coefficient of 1.6.
The scope of work on painting coffered ceilings should be calculated based on the area of their horizontal projection using a coefficient of 1.75.
The scope of work on painting stucco ceilings should be calculated based on the area of their horizontal projection using the following coefficients:
when saturated with modeling
from 2.1 to 10% - 1.1
from 10.1 to 40% - 1.5
from 40.1 to 70% - 2.1
from 70.1 to 100% - 2.8
The saturation of the molding is determined based on the area of the horizontal projection of the molded parts.
The area of floor painting should be calculated excluding the areas occupied by columns, stoves, foundations and other structures protruding above the floor level.
Painting of baseboards for plank floors is provided for in the standards and is not taken into account separately.
For linoleum and parquet floors, the area of skirting boards for painting is taken to be 10% of the floor area.
The painted surface of the filling of window and door openings is determined by applying the transfer coefficients established in the technical part of the collection to the filling area calculated from the outer contour of the frames. 15.
The scope of work on painting wooden trusses with silicate paint should be calculated based on the area of the vertical projection of the trusses (on one side), without excluding the gaps between the truss elements.
The scope of work on painting metal roofs should be calculated by the area of the roof, while painting seams, gutters, caps on chimneys and coverings of dormers are not taken into account separately.
The scope of work on painting drainpipes, belts, sandriks and external window sills should be calculated based on the area of the facade without deducting openings.
The volume of work on painting surfaces made of corrugated asbestos plywood and steel should be calculated based on the area measured without taking into account the bending (wave), applying a coefficient of 1.2 to this area.
The scope of work on painting steel gratings should be calculated based on the area of their vertical projection (on one side), without excluding the gaps between the posts and belts, using the following coefficients:
a) for simple gratings without relief, with filling up to 20%, such as parapets, fire escapes, wire mesh with a frame, etc. - 0.5;
b) for gratings of average complexity without relief and with relief, with filling up to 30%, such as staircases, balconies, etc. - 1.0;
c) for complex grilles with relief and filling of more than 30%, such as louvres, radiators, art, etc. - 2.5.
The paint area for central heating and sanitary fixtures, as well as small metal parts, is determined as follows:
a) the painting surface (on all sides) of central heating devices is assumed to be equal to the heating surface of the devices;
b) shell coloring surface - twice the area of their horizontal projection;
c) the surface of the bathtubs - triple the area of their horizontal projection;
d) painting surface of the flush tank, taking into account protruding parts and brackets - 0.7 m2
D. Glass works
The scope of work on glazing wooden window sashes and balcony doors in residential and public buildings is calculated by the area of the openings, measured along the outer contour of the frames.
The scope of work on glazing doors (except for balconies) and shop windows should be calculated based on the glazing area calculated based on the design dimensions of the glass.
When glazing with display glass on elastic gaskets, the weight of the gaskets must be separately indicated according to the design data.
The scope of work on glazing wooden partitions should be calculated by the area measured along the outer contour of the bindings.
E. Wallpaper works
The scope of work on wallpapering walls should be calculated based on the area of the surface to be pasted.
To exclude it from the area of the walls, the area of window and door openings should be determined by the outer contour of the frames.
The scope of work on door upholstery should be determined by the area of the upholstered surface.
The areas of the surfaces to be finished are calculated using tables in the construction of which three methods are used.
The first is that since a surface can have different types of finishes, not each individual type of finish should be counted, but only the one that occupies the least area on this surface. The area of the predominant type of finishing is obtained by subtracting the calculated area of other types of finishing from the total area of the surface to be finished.
For example, the total area of the wall surface being finished was 9100 m2, the area calculated in the usual manner for facing with ceramic tiles was 1200 m2, facing brick was 1700 m2 and wet plaster was 1400 m2. Then the area of dry plaster will be: 9100 - 1200 - 1700 - 1400 = 4800 m2.
The second technique follows from the interdependence of the structure and its decoration. For example, the area of painting ceilings is equal to the area of floors without taking into account the area of thresholds and niches, the area of painting window and door blocks is equal to the area of filling openings with the corresponding coefficients, the area of finishing partitions is equal to their area multiplied by 2, etc.
The third method uses previously obtained data to calculate finishing areas with the additional use of specially calculated corrections
For example, the area of finishing at the bottom of flights of stairs and landings is taken according to the area of their horizontal projection with a coefficient of 1.55, calculated experimentally.
Plastic windows
Our company has been professionally installing plastic windows in Krasnoyarsk for more than 15 years. Affordable prices, free measurements, in-house production, warranty. We use reliable and time-tested profiles from KBE Expert and ECP PLASTICS. You can order the production and installation of PVC windows in both standard and custom sizes.
Interactive selection of window and sill colors
Prices for PVC windows
We have favorable rates and conditions for the installation of plastic windows. Prices start from 11,500 rubles for a standard double-leaf window. We offer several ready-made turnkey solutions, as well as custom manufacturing and installation.
To find out the preliminary cost, use the calculator below. Just select the required parameters and find out the price.
Our managers will help you calculate a more accurate amount; to do this, contact us in any convenient way. Based on your order, the company's technologist will take accurate measurements and create an estimate free of charge.
Typical installation options
- Profile: 3-chamber
- Double-glazed window: 2 cameras
- Windowsill
- Warm slopes
- Low tide
- Delivery
- Dismantling
- Installation according to GOST
To get a consultation
- Profile: 3-chamber
- Double-glazed window: 2 cameras
- Windowsill
- Warm slopes
- Low tide
- Delivery
- Dismantling
- Installation according to GOST
To get a consultation
- Profile: 3-chamber
- Double-glazed window: 2 cameras
- Windowsill
- Warm slopes
- Low tide
- Delivery
- Dismantling
- Installation according to GOST
To get a consultation
Our advantages
- Free measurement and cost calculation
- More than 15 years of experience
- Warranty up to 10 years
- Low prices
- Installment payment or loan
- Installation according to GOST
We approach each order as responsibly as possible. Below you can see examples of our work on installing PVC windows, glazing and insulating loggias and balconies.
What types of profiles do we use
PVC profile KBE Expert 76 mm
KBE Expert 76 mm is the latest innovative PVC profile that combines first-class quality, practicality and appearance. Today, the German brand KBE is considered the leader of the Russian market among manufacturers of PVC windows. And windows created using the KBE Expert profile are the most reliable and durable.
PVC profile KBE Expert 70 mm
KBE Expert 70 mm - a high-tech plastic profile from a world-famous manufacturer has allowed us to take a fresh look at the thermal insulation of a building, in particular the use of plastic windows.
Here advanced technologies are combined with first-class German quality. Plastic profile KBE_Expert 70 mm is the choice of those who value style, reliability and comfort. ECP PLASTICS profile system, ARCTIC PLAST series
, Zelenogorsk. Quality and certificates of conformity: quality control in accordance with GOST 30673-99 (inspection of raw materials, testing of physical and chemical characteristics of product samples from each batch).
ECP PLASTICS profile system, CITY PLAST series
The ECP PLASTICS line of polyvinyl chloride profiles, which includes the 3-chamber CITY PLAST system, was developed for operation under conditions of large temperature changes. Significant strength of window and door structures is ensured by the powerful front wall of the main profile, the thickness of which is at least 3 mm, which corresponds to class A according to the requirements of GOST 30673-99.
You can choose the color and texture of the window
Here you will find a wide palette that will allow you to choose plastic windows for your interior or exterior. Our own production makes it possible to fulfill orders of any complexity, taking into account all the client’s wishes. All products are made from environmentally friendly materials.
Nikolay Vasiliev The work was done quickly and efficiently. The developer received very poor quality balcony glazing. Insulated with a five-chamber profile. Price, quality, teamwork of employees - all parameters are excellent. Thanks a lot!
Victoria Kuznetsova spent a long time choosing a company to entrust with the renovation of an old balcony. Either the prices were excessively high, or the terms and conditions of the agreement were unclear. turned out to be the most acceptable option - I made the right decision.... I ordered the installation of glazing of 5 sections, a wardrobe, 2 doors, mosquito nets. Everything is stated in the contract, 50% is an advance payment. The rest is due after acceptance of the work. The installation was carried out in 2 days, the workers did everything conscientiously, carefully, and removed all the rubbish after themselves. The renovated balcony passed the winter test, the installation was done very well, there is nothing to complain about. The fittings also worked at 5+, despite the severe Siberian frosts. In general, I am satisfied and glad that I decided to trust your company. I will recommend to friends and family!
Andrey Litvinov This is not the first time we have contacted , they glazed and insulated a loggia for ourselves, but this time we needed to do work on the balcony for our parents. As always, everything was done flawlessly. Everything was done very quickly and with full responsibility. We leveled the wall and floor, laid polystyrene foam and connected heated floors, filled it, and sewed it with panels. All in two days! In terms of price/quality ratio, everything is excellent. Thanks to the company for the beautiful balcony and to the installation team!