PVC windows are available in a wide variety. All models are equipped with a locking device. Many people choose a tilting mechanism for plastic windows. It is simple in design and setup. You need to understand what it is and how it differs from other locking options. Having an idea and basic knowledge regarding the operating principle and internal structure of a plastic window will make it easier to choose the appropriate option, and also easier to carry out adjustments and repairs yourself.
What is window fittings called?
Window fittings are a device that combines various mechanisms designed for the full functioning of the window.
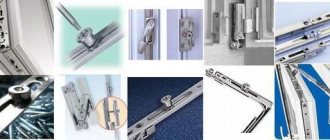
Handles and hinges, locks and seals are those elements whose importance is difficult to overestimate, although we do not give them due importance. But even a small malfunction in the window mechanism on a frosty winter day, for example, can lead to not very pleasant consequences. Therefore, all components of PVC windows must be of ideal quality, assembly and stable strength. Plastic window fittings diagram
Window fittings are:
- Loops. Or the so-called loop group, which consists of lower and upper loops.
- Mechanical locking window elements.
- Rotating components.
When choosing accessories, the most important thing is to pay attention to its quality, because its service life will depend on this.
What is included in window fittings?
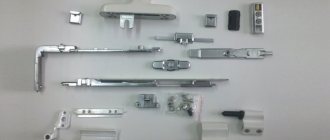
The design of window fittings provides for the presence of such elements as:
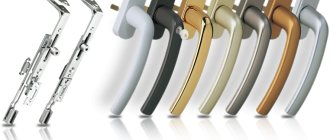
- window handle that controls the entire operation of the fittings from one point;
- corner element, with the help of which other structural elements are connected;
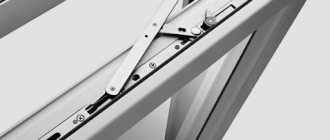
- a locking bar that presses the window against the sash using adjacent rollers;
- scissors, an element necessary for tilting the window sash;
- window hinges, allowing you to attach the window to the frame and smoothly open and close it;
- additional scissors necessary to strengthen and increase the performance of element 4;
- additional corner strip to enhance the work of the structure;
- a strike plate located on the window frame and allowing the rollers to operate to provide the best connection between the sash and the window frame;
- a pin or roller that ensures the window sash is pressed as tightly as possible to the frame;
- an additional set of locking elements that allows the window to be tightly pressed to the frame.
Composition of window fittings
Additionally, the fittings may include the following elements:
- anti-burglary protection of windows from penetration from the street;
Elements of anti-burglary fittings
- Child locks provide child protection.
One of the types of child lock that limits the opening of the window sash
No. 4. Accessories for child safety
Statistics say that about 4,000 children fall out of windows every year. Keeping your child away from the window is not an option - children are inquisitive. When the baby grows up and learns to climb onto the windowsill on his own, the window design needs to be modernized, and now we are not talking about bars. There is something better:
- handle with key - the simplest option, it is installed instead of a regular handle, and with the help of a key you can lock the window when closed. If the key is well hidden, then the child is not in danger at all. The downside is that you won’t be able to open the door.
- lock on the bottom door blocks swinging, but allows the sash to recline;
- the child opening limiter, as it were, stops the opening of the sash more than the required level; it opens and closes with a key;
- child lock with cable. One part of the cable is attached to the fixed sash, the second is thrown onto the movable sash and secured with a key. Fresh air enters the apartment, but the child cannot accidentally fall out of the window.
Types of window fittings
Plastic fittings for windows vary according to the type of opening. She may be:
- rotary, that is, the window opens in the standard way;
Standard window with hinged sashes
- folding, opening the window up or down;
The flap is ideal for ventilation
- tilt and turn, that is, opening the window in two positions. Typically to the side and down;
The most popular are tilt and turn sashes.
Pivot fittings are optimal for balcony doors, tilt fittings for roof windows, and tilt and turn fittings for windows in rooms.
Classification of fittings according to the method of opening the window
- Rotary ones with vertical suspensions are the most common in Russia;
- Mid-suspended, in which the suspension is installed horizontally.
With this arrangement, it is possible to fix the sash in any convenient position and open it 180°.
Three groups of mid-hanging fittings should be distinguished:
- having a locking central lock and an internal tilt limiter;
- opening 90° due to the lever system;
- controlled remotely by means of a remote drive;
- tilt and turn. Allows you to use a knob to select the location of the window;
- components for PVC sliding windows.
PVC windows have the largest variety of fittings. And, in order not to make a bad choice, later in the article we will look at its specifics and tell you how to determine a quality product.
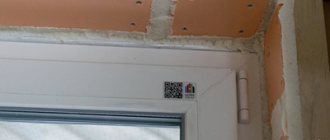
Vapor permeable sealing tape
PSUL provides self-ventilation of the seam between the frame and the opening. Due to its porous structure, polyurethane foam allows not only air to pass through, but also moisture, which can lead to the accumulation of moisture on the surface of the slopes and their dampening. The use of PSUL allows you to avoid these troubles.
Ventilation of the gap between the opening and the frame is ensured by PSUL
Window installation tape is porous polyurethane foam treated with a special compound. One side of the PSUL has an adhesive layer. Delivery to the installation site is carried out in rolled form. The material must be unrolled immediately before installation, otherwise it will lose its properties.
PSUL is glued to the window structure, having previously removed the protective coating from the adhesive layer. This tape is sealing and self-expanding, that is, after the tape is impregnated with oxygen, its linear dimensions increase. As a result, the expanding tape completely covers the seam.
It is important to take into account that for high-quality overlap of the installation seam it is necessary to use a PSUL of the appropriate width . Increasing in size, the tape acquires its vapor barrier properties and ensures the removal of moisture from the installation seam, and also protects it from precipitation.
Installing a vapor barrier tape is a prerequisite when installing windows
Self-expanding tape is produced in a compressed state. It seals the inner seam against moisture penetration. This protects the slopes and the installation seam from mold. Vapor barrier for PVC windows is a mandatory type of work.
Major manufacturers of high-quality window fittings
Window fittings are produced by a large number of companies, but only a few of them can be highlighted:
- Roto company (Germany). The only company that provides a 10-year warranty on manufactured elements. The fittings are distinguished by increased quality, reliability and a wide range of products that interact with each other;
- Maco company (Austria). It mainly produces hidden fittings, that is, hidden inside the window, and also specializes in the production of anti-burglary security elements with at least 6 degrees of reliability;
- Siegenia (Germany) produces universal fittings suitable for both PVC windows and wooden products. Upon customer's request, fittings for non-standard size windows can be manufactured;
- the Winkhaus company (Germany) produces fittings based on its own patented design, which differs from competitors in the special design of the rollers, which allows the necessary adjustments to be made easily and smoothly.
When choosing a manufacturer, you should base your choice on the quality of the products and the company’s product range.
Tips for choosing accessories
You must select window fittings according to the following rules:
- first of all, you need to decide how the window should open;
- measure the window dimensions and select sets that clearly match the main parameters;
- it is more advisable to buy accessories from the widely used companies listed above;
- It is not recommended to purchase plastic products (they have a very short service life). It is better to buy metal components and cover them with overhead caps in visible places;
- There should be no “burrs” on high-quality fittings, that is, the metal should be even and smooth;
- A high-quality element of fittings must have at least two holes for subsequent fastening.
What does a plastic window consist of? Of five important components!
The components of a plastic window occupy different shares in the cost, but they are all equally important for the proper operation of the structure.
If you add thin reinforcement or a low-quality seal to a premium window profile, the service life of the window will be significantly reduced. It is optimal to use premium-class fittings with a similar profile, reinforcement and double-glazed windows.
Replacing a low-quality window is an expensive proposition. Replacement work involves dust and dirt. It’s better to immediately understand the details and enjoy comfort for many years.
The best manufacturers
Pay attention to the progressive leaders in the global market for the production of window fittings:
- German company Winkhaus. For more than a century and a half on the market of global manufacturers. Unsurpassed workmanship goes hand in hand with comfort and excellent functionality.
- Accessories Maco. An Austrian company specializing in the production of the best tilt and turn fittings.
- German company Aubi also one of the recognized world leaders. Reliability and time-tested quality.
- Company Roto. High-quality and reliable German fittings, made with the conscientious pedantry characteristic of German manufacturers. The warranty period for Roto products is 10 years.
What kind of accessories are there?
There are different models of devices that differ not only in functionality, but also in the material from which they were made. Products may also differ in purpose depending on the shape of the window. The most common mechanisms are of the following form:
- Rectangular: most common.
- In the shape of a trapezoid.
- Arched.
Each design may contain the following elements, without which replacement of window fittings cannot be carried out:
- The main part is the platform for installing the handle. It takes up the most space. The handle controls the rest of the system, since depending on its position, certain system actions will be performed. The handle can be located at different heights depending on what type of window you have and what design they have; The parameter is not of fundamental importance. If the window is located high, the handle may be located in its lower part; if at a low height, then it is usually installed in the middle part of the structure.
- In order for the mechanisms to move, the window is equipped with angular gears. This element consists of four plates that work together. This design is located in a special frame, which is located horizontally in the window, but at an angle. When installing the plates, a uniform load is calculated. Only in this case will the window last a really long time and will not warp over time.
- Correct installation of fittings on plastic windows plays an important role, since if this is done incorrectly, the elements will be distorted and will not work for long. Most often, scissors suffer from improper installation: this element is responsible for locking the doors, so you need to be especially careful when installing it. It is important that the elements of the part that are located on the sash and on the frame clearly coincide. The connection with the rest of the structure occurs using a special rod. It is the scissors that you often have to change yourself for better ones.
Part 3: seal - an invisible but important part of the window
In the window, all parts must fit tightly to each other, otherwise blowing cannot be avoided. Only an elastic seal (elastic band) is able to compensate for small gaps between the frame and the sash and create a complete seal of the windows without blowing or noise from the street.
Problems due to poor quality seal:
- Blowing;
- Poor sound insulation
- A sealant cut from pieces and welded in the corners can cause blowing.
- Need to be replaced after 2-3 years.
An important property of the seal is elasticity - the ability to maintain and restore its shape under temperature changes from low (from -20 and below) to high (+30 and above). The type of material directly affects the elasticity of the seal.
Seal material.
Manufacturers mainly use four types of seals:
- VMQ silicone seals are the most elastic and durable. Temperature range from -80° to +100°С, and service life up to 40 years. They are the most expensive of all materials and manufacturers rarely offer them.
- EPDM rubber seals (ethylene propylene diene rubber) with a service life of up to 30 years and a temperature range from -55° to +80°C. Optimal price-quality ratio.
- TPE-S or thermoplastic elastomer works in the range from -40° to +70°C. A more affordable, but less durable seal.
- Soft plastic PVC (plasticized polyvinyl chloride) changes its shape irrevocably at subzero temperatures.
Photo: if the choice is between a beautiful color or a higher quality material, then it is better to give preference to the second. The color of the seals is:
- Black – base color of epdm (rubber seals)
- Gray – it looks more “fresh” and invisible in the window, mostly TPE-S seals, sometimes EPDM
- White - less commonly used, dirt is immediately visible on it, mainly TPE-S.
Number of sealing circuits in the window:
- 2 circuits - the most common
- 3 contours are less common - premium. The third circuit increases sound and heat insulation
The quality of the seal is very important for the proper operation of the window. We recommend ordering an original seal from the profile supplier, installed as a single bundle with a joint in the upper part of the opening.
Selection of accessories
In order not to make a mistake when choosing accessories for your home, you should contact only trusted manufacturers. After all, basically, the overall reliability and durability of window structures depends only on the quality of the fittings you choose.
Therefore, when choosing accessories you need to focus on such product qualities as:
- Resistance to various types of loads.
- Ease of use, minimal maintenance requirements.
- Long term.
- Adaptation of the manufacturer to customer requirements.
It should be remembered that the price of good fittings is only 15% of the total cost of the structure, but you should not save on it. It is better to buy it once and for a long time than to fix minor problems caused by the same insignificant external factors a hundred times.
Video about choosing window fittings:
What elements can be used for locking?
Replacing fittings in plastic windows with your own hands is important not only when it fails, but also, if necessary, to replace it with a more reliable one. Almost any windows can be made burglar-proof; in addition, installing reinforced elements will allow the structure to last much longer.
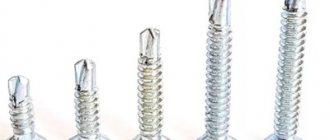
Most devices are installed externally, so they do not cause any difficulties during installation. Most often they are attached with screws. During installation, you need to pay attention to the following:
- The screws used for plastic and wood are different, therefore, when installing, you need to pay attention to the features of the fasteners and select the appropriate ones. The length must be appropriate: you can’t use fasteners that are too short, but you shouldn’t use fasteners that go through either.
Screws for plastic windows for installing fittings
- Some elements may be mounted in a special groove, require a crossbar or a bar; this will require drilling special holes. They may already be present by the window.
- If the frame size exceeds 1 meter, it is recommended to use several clamping mechanisms to lock it instead of the standard one.
- The fastening strip may have holes. This will allow you to remove the mounting pin and install a stopper that can lock the lock if necessary.
- If the sash is wooden, the latches are usually installed on top of the frame, less often they are made mortise. Work is carried out while the frame is in a fixed position. To install locks with a key, you need to drill a hole for it.
- To secure the latches in the sash and frame, you will need to drill special holes; they may also be needed for the lock cylinder
- If your windows swing up, you can purchase latches that are designed specifically for them when opening them. They are needed to simultaneously fix two leaves.
No. 6. Comb limiter
There are windows whose sashes can only swing open, and they do not have a tilting or micro-ventilation mechanism. Such designs are cheaper, and many, trying to save money, choose them. Then it turns out that there are more problems with the windows than initially thought, so you have to come up with something in order to be able to ventilate by opening the sash slightly and fixing it in this position.
The easiest way is to install a comb limiter. A latch is mounted on the movable sash, and a comb with several gaps for fixation is mounted on the stationary sash. When you need to open the window slightly, you need to hook the comb on the latch. It is most convenient to install at the level of the window handle.
Combs are usually made of white plastic, so they won’t be too noticeable. The longer the length, the greater the permissible maximum fixed level of opening of the sash. As a rule, combs are made 10-12 cm long, but longer ones can be found. The more gaps there are, the more fine adjustment of the opening of the sash can be made. The standard option is 4 gaps, but combs with 10 gaps are available on sale.
How is installation done?
Installing fittings on plastic windows with your own hands can cause some problems, as it requires precise drilling of the frame for the parts. When purchasing accessories, make sure that they come with instructions: this will make the work much easier. First of all, strikers and fragments of elements are installed on the frame, which are located above and below the frame. After this, work must be carried out without violating the sequence:
- First of all, the corner drive mechanisms are installed. The main element must be fixed only in the open position of the sash: it must be selected strictly according to its size. The drive type can be either constant or variable. It depends on which side the additional strip will be on and how many of them will be needed. Don't forget to make holes for fasteners. Please note that moving structural elements should not be fixed; they should still be able to move along the contour.
- After this, you can install the scissors.
- Installation of hinges and sashes. Before securely tightening the fasteners, you should check whether the sash closes correctly and whether it is locked in the closed position if it is level. If necessary, you can adjust the fittings.
Fitting adjustment points
It is not difficult to check the correct operation of the sash: to do this, you will need to see how easily the handle opens. It should turn easily, without any difficulty. If a problem occurs, the elements that were installed incorrectly are removed and reinstalled.
Handle installation
Any plastic windows have one thing in common - they always have a handle and it is installed according to the same principle. Therefore, this point is worth considering first. In addition to the outer element, the handle design includes one or three metal rods, as well as a platform for fastening to the profile.
As a rule, holes for stubble are pre-provided in the frame and you just have to fasten the handle with self-tapping screws.
If there are no such holes, you will have to make them yourself. Place the pen in the desired location. Use a pencil or felt-tip pen to mark the places where the rods are located. Don't worry about marker and pencil marks ruining the appearance of the frame, they will still be hidden behind the handle. Using a drill, make holes in the desired places. Their diameter should match the diameter of the rods, or it may be slightly smaller. Insert the handle into the holes made. Then you need to slightly move the decorative plug at the base. There you will see two holes for screws. Attach the handle to short-length self-tapping screws and push in the decorative trim.
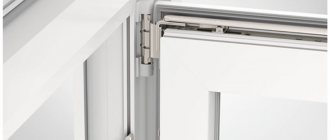
Installing hinges on classic windows
Classic windows, as a rule, have two types of opening - hinged and tilting. In the case of a swing opening, the installation of a handle and hinges is required. For a folding one, you will also need an opening system. Hinges for plastic windows are slightly different from standard ones, and their installation accordingly is also different. Moreover, sometimes the loops themselves may differ. In the kit you will see two mounting plates and a metal axle. Each mounting plate has two or three holes for self-tapping screws.
First, you need to mark the location of the loops on the fold. The distance from the edge to the loop must be at least 15 cm.
Once the marks are made, one of the mounting plates can be installed on the fold.
The fastening plates differ from each other in that one has a groove, and the other has a small ridge for fastening. Sometimes there may be more than one such grooves and ridges. It doesn’t make sense which plate to mount to the sash and which to the profile. Then you need to attach its second part to each fixed plate and install the metal axis in its place. In this form, the sash is applied to the main frame, and the location of the hinges and profile is marked with a simple pencil. In the future, you need to remove the fastening axis and drill the second part of the loop into the designated place. In general, the installation is complete, all you have to do is connect the two mounting plates using an axle, but this must be done only at the end of the complete installation of the plastic window.
No. 9. Protective films
Protective films for plastic windows are glued in exactly the same way as stained glass films, only their task is not to decorate, but to protect. If, when choosing a window, you made a mistake with a double-glazed window and took the simplest one, and then realized that it does not retain heat well enough or does not reflect the sun's rays well, then you can improve the design with a suitable film:
- heat-saving films are produced on the basis of polyethylene phthalate, a thin coating of silver or a chromium-nickel alloy is applied to the polymer layer. This coating allows you to reflect IR rays into the apartment and keep it warm. According to the manufacturers of such films, it is possible to achieve up to 30% savings on heat payments. This is the main, but not the only advantage of such a film. If the glass is damaged, all the pieces will remain on the coating. It is better to mount the film for the winter period, and remove it with the onset of warm weather. Self-adhesive and shrink films are available for sale. Installation of the latter is carried out using warm air;
- reflective films – a necessity for south-facing apartments. They allow you to reflect the sun's rays, making the room cooler and more comfortable in the summer heat. Such films are made based on polyethylene terephthalate and coated with a thin layer of rare earth metal oxides, which have the property of reflecting UV and IR rays. The coating can be colorless, or it can have a colored coating or even a mirror surface. Films that reflect up to 15% of sunlight are suitable for apartments. If you take an option that is too dense, you can get the opposite effect - the room will become too dark. It is good to use such films in the warm season and then remove them;
- shockproof film makes the double-glazed window more resistant to impacts and other violent burglary attempts. No, such a film will not completely protect against a hammer blow, but it will increase the durability of the structure, and then you’ll see which of the neighbors will see the intruder. Anti-vandal films are divided into classes. Films of class A2 can protect a double-glazed window from thrown bricks, and class A3 films can even withstand gunfire. If the glass unit is nevertheless damaged, then all the fragments will remain on the film;
- You can also hide the room from prying eyes thanks to a matte film with a pattern. A certain amount of light will leak in, but no one will see you from the street. A good option for the bathroom.
Installing the Tilt&Turn Mechanism
It would seem that tilt-and-turn windows are found in almost every home and have become so commonplace that their installation is somewhere on the verge of the simplest.
Installing fittings on plastic windows with tilt-and-turn mechanisms is quite labor-intensive and complicated.
When purchasing such accessories, in addition to the components themselves, you should receive several instructions, a template for the location of the accessories, and even a small one for selecting the diameter of the drill. Make sure that all this is present in the kit, otherwise you simply will not be able to mount the mechanism yourself. Even professionals always use such instructions and templates; it is simply impossible to remember so much information. 1) First, take a template for the location of the fittings on the sash and the main frame. She looks something like this.
2) For convenience, you can lay out all the accessories on the table according to the template.
3) It is best to start installation from the lower left corner. There will be a corner switch there. We leave it in a specially provided groove.
4) The horizontal middle lock is installed according to the same principle.
5) Similarly to the lower switch, the upper one is also inserted. It will be mounted in the right corner of the sash.
6) Then we need the main constipation. It is applied between two angle adjusters.
Make marks with a felt-tip pen where the corners and the main lock meet. The length of the main lock is made with a margin and you must adjust its size during the installation process.
7) The main lock is removed from the profile. Now we need clamp plugs. These are small pieces of metal with several indentations (you can see them in the photo). You need to attach the edge of the plug to the mark you made in advance, so that the plug itself is closer to the middle. A second mark is made on the other edge of the plug. This must be done on both sides of the main lock.
Now you need a hacksaw and the skills to use it. The edges of the lock need to be drilled according to the marks.
9) Only after this can the lock be secured to its rightful place, and in those places where the profile remains visible, the previously mentioned plugs are secured.
10) The upper right switch is installed. Then you need to install the second main regulator on the right side, according to the same principle as the first. That is, marks are first made relative to the corners, then plugs are applied, and the excess is cut off with a file. The regulator is inserted into place, and its edges are closed with plugs.
11) Next, we need a template to determine the recommended drill diameter.
12) Using the template, drill holes for the lower hinge on the sash. Pay attention to the recommended length of screws. It is also indicated in the template. Longer self-tapping screws are used to secure the hinge.
13) And now short self-tapping screws will come in handy. They are screwed around the entire perimeter of the sash into the holes provided by the manufacturers.
Do not screw a self-tapping screw into the outer hole of the scissors.
14) We will mount scissors in this hole. And to secure them you need one long self-tapping screw. We screw it into a special hole at the base of the scissors.
15) At this point, all the machinations with the sash are completed. Let's move on to the main frame. Using a template, select the size of the drill and make holes for the lower hinge. Then we lift the template all the way and make the same holes for the top fittings.
16) Secure the bottom loop using self-tapping screws of the recommended length. We do the same with the top one.
17) Place the sash on the bottom hinge.
18) Then lower the sash and connect the two parts of the top hinge together.
19) In those hinges where a pin (metal axis) is provided, it is necessary to install this part, thereby completing the installation of the hinges.
20) Raise the sash and use a pencil to mark the junction of the locking pins and the main profile.
21) The same marks must be made in the place where the blocker is located.
22) According to the mark, we attach the swing-out hitch to the frame. Please note that the central hole for the screw should be exactly below the mark.
23) Focusing on the second mark, install the blocker.
24) Install the handle according to the previous instructions. Now you need to open and close the door several times, thereby checking the serviceability of the fittings.
Installation and adjustment of window fittings
After selecting fittings for metal-plastic windows, it is necessary to carry out its installation and final adjustment.
DIY fittings installation
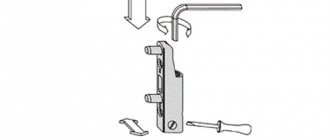
Installation or replacement of plastic window fittings occurs according to the following scheme:
- if fittings are replaced, then at the first stage the old structure is dismantled;
- the new set of accessories is laid out on the table in the required order (a diagram of the mutual fastening of the accessories is shown in the figure at the beginning of the article);
- fastening the fittings begins with the main and additional corner strips;
- then locking strips are installed along the perimeter of the window sash;
Fastening corner strips and locking mechanisms
- Now you can proceed to attaching the main and additional scissors;
Installation of scissors
- The hinge components are mounted on the window sash and frame. The hinges are connected and the window is suspended;
Hanging a window on installed hinges
- strikers are installed on the window frame;
Mounted striker
- a handle and the necessary additional fittings are mounted.
Window handle installation
The window fittings kit includes not only the main elements, but also the necessary fastenings and an installation diagram.
Adjusting window fittings
After installation, the final adjustment of the PVC window fittings is made. This process will require the following tools:
- screwdriver of the required size;
- hex wrench;
- pliers.
You can adjust the position of the window sash in three directions:
- up down;
- back and forth;
- right left.
Window sash adjustment directions
The fittings are adjusted according to the standard scheme:
- decorative caps are removed from the necessary elements of fittings;
- the adjusting screws are tightened or loosened until the problem is completely eliminated.
If the window sash is not installed correctly in the upper or lower part, then adjustment is made using the screws of the upper and lower hinges, with the bolt being tightened at the top and loosened at the bottom. It is necessary to adjust the horizontal of the sash gradually, making several turns of both screws and checking the correct position.
Adjusting the top hinge
If the window sash does not fit tightly to the frame on the side, then the position must be adjusted using the screws located at the bottom of the hinges.
Location of the lower adjustment screws
To adjust the fit of the window to the frame, it is necessary to loosen or tighten the fit of the trunnions.
Trunnion adjustment
A strong clamp ensures a tight fit of the window and is mainly used in the cold season. Weak pressure is relevant for hot periods.
Before purchasing window fittings, special attention should be paid to the quality of the products and the required dimensions. You can install the structure yourself, using the recommendations of specialists and the instructions included with the kit. Any fittings require periodic maintenance, including cleaning and lubrication.
No. 8. Stained glass film
Classic stained glass is expensive and complex; it must be created at the window production stage. But what to do if there are already windows, they cope with their functions, only the interior has been updated a little, and now it could not be better decorated with stained glass. The solution is simple - take a stained glass window film. You can find a lot of ready-made drawings on sale. The installation process is extremely simple. The glass is cleaned, degreased, and then stained glass film is carefully glued onto it. There is no need to use glue - the film is sold on a self-adhesive basis. For greater resemblance to real stained glass, you can use tin broaches, which are also available on a self-adhesive basis.