Sealing window cracks is carried out using different methods and materials. For this purpose, sealants, putties, plasters, and special putties can be used. The specific choice depends on the type of gap, its location, and size.
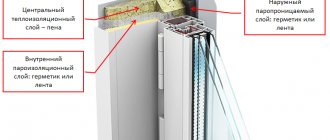
Source spravochnika.ru
Repairing cracks between frame and slope
Since plastic windows are the most common due to their qualities, it is quite rare to find houses where they are not present. A very common problem that arises after installing plastic windows is the appearance of cracks between the frame and the slopes. They can arise for various reasons and can cause both aesthetic problems, and through such cracks dust and dirt can get in, windows can leak. Of course, this problem must be solved, otherwise the quality of life in such a room will significantly deteriorate.
Where do the cracks come from?
Why did a gap appear in the frame of a plastic window? Is it blowing from under the windowsill? Is the sash loose? It all depends on what kind of cracks we are talking about. If this applies specifically to plastic windows, then there are two most important and common reasons:
- Installation errors.
- Broken or incorrectly adjusted.
The first reason for the appearance of cracks is improper installation.
If the window was installed by unreliable craftsmen, then there is a high probability that the joints were pressed incorrectly, and then also insufficiently protected. As a result, thin layers of foam peeled away, deteriorated under the influence of UV, and the window began to blow. Or, for example, quite often installers do not blow out the space under the window sill. As a result, it blows from under it.
How to eliminate cracks in plastic windows if they appear between the frame and the slope. You can try to cover them with putty, but most likely they will appear again. The window was installed incorrectly and as a result it moves and cracks form. What to do? Contact the Teplo Doma company specialists right now. They will help.
The second reason is incorrect adjustment or the window requires repair.
Many people forget that cracks can form due to improper adjustment or, for example, worn out rubber seals. For example, the sash may become skewed, creating a gap through which it will leak. If the seal fails, then again, the sash will not be able to fit tightly to the frame, and a gap will form from which it will blow. You can read more about why it blows from the window in this article. Help Wanted? Gaps in plastic windows, do you need to adjust the fittings? Call us.
How to seal cracks in plastic windows inside an apartment
To insulate plastic windows from the inside of the room, it is better to choose a lightweight and effective sealant. Lightweight and elastic materials lie flat on the inside of the plastic surface, quickly adhere to the materials and last a long time.
- Silicone – suitable for exterior and interior use. It repels water, is not destroyed by precipitation, and lasts longer in direct sunlight. The mass remains plastic after cooling, so it tolerates shrinkage and expansion and contraction of the gap.
- Acrylic – adheres to PVC, wood, metal and glass. Suitable for indoor application on drywall. It is easy to paint and does not have a strong toxic odor. The material hardens, so it can crack due to deformation of the glass unit.
- Thiokol - the degree of plasticity can be adjusted independently. The mixture will withstand temperatures of -48 +128℃.
- Polyurethane - quickly adheres to textured surfaces and glues any materials. Dries quickly and is easy to paint. Elastic after drying, does not shrink.
- Acrylate - applied with a gun or spatula. After drying, the surface is rubbed down, which is important when insulating slopes. Repels moisture and withstands low temperatures. Option “Stiz-A” is best found for outdoor work, and “Stiz-B” for interior decoration.
Work order:
- Remove debris and dirt from the inside of the gap, degrease the area, and wipe dry.
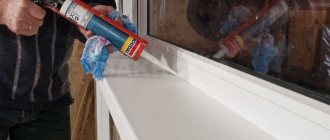
- Cut the tube with sealant at an angle and cover the gap with a thin layer.
- Align the seam in one motion and remove excess sealant from the frame.
You can perform alignment using the edge of a coin. The composition ensures tightness of seams for about 1-2 years. When cleaning or washing, the sealing putty begins to separate from the frame and window sill material, darkens and becomes dirty.
Sealing cracks in PVC structures
We figured out what sealant to use to seal cracks in plastic windows. Next, we'll look at how to do it correctly. It is assumed that PVC slopes have already been installed. Before starting work, you should prepare a syringe for sealant, a container of water, a sponge, a napkin and construction tape.
Sealing seams on PVC windows with sealant
The operating procedure will be as follows:
- The surfaces of plastic frames and slopes are prepared for sealing with a sealing compound. It is recommended to stick construction tape to these surfaces along the edge of the gap, which will remove the remaining sealant, but you don’t have to use it;
Tip: Before sealing, clean the cracks from dirt, remnants of protective film, old sealant, and dust. The choice of insulation for windows and the main question of how best to insulate windows for the winter concerns every owner of not only wooden frames, but also the owner of plastic windows. This will significantly enhance adhesion in these areas.
- Using a syringe, the window sealant is squeezed into the existing cracks. Learn about installing plastic windows yourself! Installation steps than the first. It is recommended to hold the syringe at an acute angle and guide it so that with its nose it simultaneously smoothes the seam;
- The protruding layer of the compound should be smoothed with a wet finger, ensuring its uniform distribution over the entire area of the seam. You need to make sure that all seam voids are filled. The sealant is removed from the finger with a napkin;
- Remains of sealant are removed with a damp sponge. This is done very carefully so as not to damage the laid layer of material. The sponge should be washed in a container of water as often as possible;
- It is better to carry out the work in stages, in small sections. Let's say you apply sealant to one joint, then level it, and then remove the remaining sealant. If this is not done, the applied composition may begin to harden, and it will no longer be possible to level it;
- The surfaces of the frame and slopes must be completely cleaned of sealant residues, as careless cleaning will leave unsightly marks on the white plastic. They will be invisible right away, but will later appear as dirty spots.
Related article: Repair of the tilt-and-turn mechanism of a plastic window
Tip: If the surface of the window sill, frame or slopes needs to be cleaned or degreased, do not use acetone-based solvents for this. Such a solvent will leave stains and stains on the surface of the plastic. It is best to use white spirit or gasoline solvent for this purpose.
What to do if there is blowing from the gap?
In cases where the gap is small and only cool air enters through it, minor repairs can be limited.
The following materials and tools will be useful for the work:
- silicone window sealant;
- gun for applying sealant;
- profile for tiles “internal corner”;
- construction knife;
- masking tape.
The profile is sold in standard lengths of two meters. This is a lot for an ordinary window. To work, you need a piece that exceeds the length of the frame by 1.5-2 cm.
The perforated part of the corner is cut off. The edge along the cutting strip is sharpened slightly using a knife. This is necessary to facilitate the installation process. It is even easier to drive a wedge into a narrow gap.
Plastic windows. Quick sealing of joints and seams
I will answer ALL YOUR QUESTIONS ABOUT REPAIR: Subscribe to new videos: .
How to fix a gap in a plastic window with your own hands.
Detailed description of how to remove the gap
in a plastic window with your own hands.
After eliminating the gap it
comes out.
The joint between the window sill and the frame is cleaned of dust and dirt. Using a knife, the gap widens a little. Small holes are made in the slopes to install the profile.
In order not to create unnecessary problems for yourself, strips of adhesive tape are glued to the frame and window sill. They will protect the surface from excess silicone.
Then, using a gun, a moderate layer of sealant is applied along the entire length of the joint. This must be done so that the greatest amount of it gets inside the gap. The pointed wedge of the profile is also covered with a layer of sealant.
The most important and difficult operation is installing a corner. First it is inserted into the holes in the slope. Then it is carefully tucked into the gap and pressed for a couple of minutes.
After the sealant has set a little, the adhesive tape is removed. Silicone that gets on the corner is carefully removed with a rag soaked in alcohol.
Features of insulation of wooden windows
Gaps in wood windows appear due to deformation of the natural material. Repair rules include several simple methods.
Paper and newspaper tubes
A budget-friendly way to seal wooden windows is to stuff the cracks with paper.
Sealing methods:
- Roll paper (remnants of wallpaper, old newspapers) into thin ropes and compact them between the frame and the doors. In order for the material to penetrate more tightly into the gap, push it conveniently with a thin ruler, a sharp screwdriver or other thin tool.
- Soak paper slices in liquid and squeeze. Add 2 parts of crushed chalk to the mixture. The result is a convenient putty that can easily be used to close the thinnest seam.
- Moisten cut strips of newspaper or pieces of white paper with soapy water and apply to the cracks. In an improved version, apply masking tape. In this case, the shutters cannot be opened for ventilation; sticky marks may remain on the frames.
cotton wool
Cotton wool can be used to cover wide and thin cracks. The plastic material has high thermal insulation. Glue paper strips or tape on top. It is also easy to glue or secure clothesline cord with nails in the gaps.
Foam tape
The material is suitable if there are wide cracks in the window opening. It is important to glue the foam tapes evenly and tightly in problem areas so that the frames close well with a high quality seal. After installing the tape, the window is easy to open.
Pasting process:
- You need to measure the thickness and length of the tape. The width corresponds in compressed form to the width of the window voids, and the length corresponds to the perimeter of the sashes.
- Clean the application areas from dust and dirt, coat with acetone.
- Remove the protective paper layer from the sticky part of the tape and glue the foam rubber to the surface.
Sealant
It is more convenient to seal gaps and cracks in windows between glass and wood with sealant. The work consists of steps:
- Remove the glazing beads and thin slats that hold the glass around the perimeter. It is better to purchase new elements, since the wood breaks when removed.
- Clean the glass landing area from dust, apply an even layer of silicone and return the glass to its place. Coat with a spatula or ruler.
- Nail new wood glazing beads into place.
Important! It is better to carry out all manipulations wearing thick construction gloves.
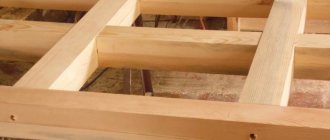
Construction foam
Natural wood frames with wide slots are more convenient to seal with foam.
Nuances of work:
- Seal cracks from bottom to top.
- The foam grows as it hardens, so it is better to seal the gaps by 1/3 of the volume.
- It is better to carry out work at a room temperature of +5+30℃.
- Peel off the dried layer on top with a knife and cover it with finishing material.
Types of materials and results
Liquid plastic
Liquid plastic is most often used to fill cracks and seams between the frame, slopes and window sill. This composition is widely used among professionals. Available in a tube or as a cartridge for a pistol. The color of liquid plastic can be white or transparent.
The kit usually includes a special nozzle that allows you to apply the strip into the seam as thinly as possible. One of the well-known brands that produce these materials is Cosmofen.
After drying, the mass becomes hard, resembling plastic.
Silicone sealant
Silicone sealant is also a means for grouting joints, but many reject its candidacy because of its elasticity. In fact, softness after drying will not affect the performance in any way, so you can safely use it.
By the way, after several years of service, such material can be easily removed from the surface of the window sill and slope panels. This line of products has many shades, so this material is perfect for the owner of textured and colored windows.
Acrylic sealant
Acrylic sealant also has a wide color palette, but the classic white color is also available in almost every store. After drying, it becomes more rigid, but not as hard as liquid plastic. It has a lower percentage of elasticity, but this is its advantage for many buyers. You can also use this product, but it is better to choose from sanitary representatives with special additives. Well-known and high-quality sealants: “Tytan”, “VGT”, “Makroflex”, “Moment”, etc.
Adhesive/cold welding
Adhesive/cold welding can also be used to seal seams on window units, but their properties differ from sealing materials. These compounds glue one part to another, which eliminates the possibility of their easy replacement if they lose their properties after some time. At the same time, the slope panels may be slightly deformed when the cold weld dries, despite the fact that it was originally intended for PVC; this occurs due to the strong adhesion, given that the panel and frame are perpendicular to each other, creating an angle of 90 degrees.
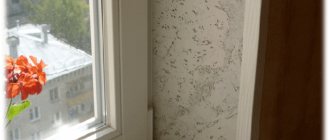
We seal the internal slopes
The interior decoration of windows needs to be given great attention, since not only the level of comfort and reliable protection from the external environment, but also the aesthetic component will depend on the quality of workmanship. Try to carry out the work with great care so that the result pleases you with a presentable appearance.
Application of drywall
This material is one of the most affordable price options that meets environmental requirements. It does an excellent job of retaining heat indoors and looks attractive from the outside. The disadvantage will be difficulty in installation, since the formed joints will have to be sealed especially carefully. The installed drywall must be puttied and painted. When choosing this material as a finish, give preference to moisture-resistant types. Before fixing the sheets, it is advisable to make a layer of glass wool to increase the thermal insulation properties .
Installing drywall is a labor-intensive and complex process.
Sandwich panels for embedding
Sandwich panels consist of two sheets of PVC, the filling of which contains polyurethane foam with a high thermal insulation function. The material has an increased level of comfort with excellent heat retention. Installation of sandwich panels is carried out using profiles, under which isover is laid. The technology is in many ways reminiscent of installing plastic slopes and is simple to implement. The thickness of the structure is 10 mm, and the material itself has a long service life.
Sandwich panels have high thermal insulation properties
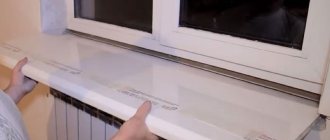
Plastic option
The demand for plastic sealing is explained by its harmonious design due to the ability to choose the same color and structure of materials similar to the color scheme of the window opening. The panel is easily placed on a special glue, but first the surface must be laid out with isover. Upon completion of the work, carefully seal the openings with silicone sealant.
What to do with cracks under the windowsill?
The cause of blowing under the window sill may be subsidence of the window structure, errors during its installation or degradation of the thermal insulation layer.
The problem of depressurization can be solved by using plaster or a shock portion of polyurethane foam from inside the room or from the street. The “outdoor” option is preferable, but it is not suitable for winter. When sealing the gap under the window sill from inside the room, proceed according to the following algorithm:
- Cut off the wallpaper at the work site.
- Unstitch the seam under the window to its maximum length and width.
- Fill the joint with plaster or foam.
- After the foam has cured, trim off any excess foam and cover it with putty or sealant.
- Cover the repair area with wallpaper.
You can fix the problem in 2-3 hours, even if you have no experience in repair work. But it’s better not to let things get too cold and carefully check the tightness of the structure in the summer. Sealing the seams from the street and inside the apartment is guaranteed to save you from an unpleasant draft under the window sill. After blowing in foam, be sure to cover it with plaster or sealant.
Sometimes a draft appears not under, but above the window sill. This problem can also be fixed from the inside or outside. In the latter case, you need to foam the seam that is under the low tide.
This method is effective, but it does not work at sub-zero temperatures. In this case, you should buy a sealant and carefully coat the joint between the frame and the window sill with it.
Making window slopes using drywall
A major renovation of an apartment or house includes the mandatory replacement of old windows with new plastic ones. It is not recommended to install windows yourself, but you can finish the window slopes yourself. This process is not the most difficult if you know the technology of its implementation and know how to handle simple tools. So, let's answer the question, how to make slopes on windows?
How to cover up cracks in plastic windows?
One of the most vulnerable places in the house, where heat loss most often occurs, is the windows. Of course, it is impossible to provide ideal heat and noise insulation in this place, but everyone can reduce the noise level and heat loss to a minimum. The thing is that the cause of increased noise and heat loss is the cracks in the windows. This applies not only to old wooden windows, but also to more modern metal-plastic ones. We will talk about how and what to cover cracks in windows in this article.
Causes of cracks in windows
As one wise man said, it is better to eliminate the cause of the disease than to constantly treat the consequences. The same should be done with cracks in windows. To do this, it is enough to understand the reason for their appearance and eliminate it once and for all.
Reason one: crooked installation
It's no secret that the level of professionalism of the craftsman determines how durable and reliable a particular structure will be. It's the same with windows. Mistakes at the window installation stage lead to drafts coming from under the window and noise from the street preventing you from sleeping.
It is almost impossible to control the quality of work. To do this you need to have certain knowledge. But something can still be done. You just need to check how well all the gaps between the window frame and the opening are sealed. This can be done using a simple lighter, bringing its flame to the joints. You should also pay attention to the outside of the window. The places where the frame adjoins the opening must also be reliably caulked or blown with foam, and their surface must be painted over or puttied. The same is true on the inside.
Reason two: wear of the seal
Unfortunately, timeless building materials do not yet exist, and during use, cracks appear in the windows. And in combination with installation errors, their service life will only decrease.
The same places where the window frame meets the opening are problematic. If for some reason the sealing materials have not been painted or plastered, they will quickly wear out under the influence of temperature changes, ultraviolet radiation, wind and precipitation. Polyurethane foam, even that which is intended for external work, becomes distorted, gradually exposing the voids between the window and the wall. Foam rubber or other sealant dries out, crumbles and blows out, thereby widening the cracks. To extend the life of the seal, it is enough to carry out an inspection every two to three years and maintain the integrity of the protective layer. It is best to do this in the spring, when it is already warm and there is no precipitation.
Reason three: wear of the frame and fittings
Just like the seal, window frames and fittings have their own resource. Over time, the sashes begin to fit poorly to the frame, resulting in cracks appearing. This is especially true for wooden windows. A typical problem with wooden frames is the wood drying out, which leads to the appearance of cracks. But in metal-plastic windows, the rubber seal on the sashes most often fails.
It is impossible to avoid wear and tear, but it is possible to extend the service life. It is enough to carry out regular seasonal inspection and maintenance of windows. First of all, this means painting wooden windows and adjusting the fittings so they don’t dangle.
How to seal cracks in windows
Despite the fact that today most windows are made of metal-plastic, their owners after a certain time are faced with the problem of cracks in these ultra-modern and reliable windows. As for wooden windows, cracks are their inevitable companions. We will look at how you can get rid of cracks below.
How to remove gaps between the frame and the wall
If during installation the master did not apply a protective layer to the foamed areas, then over time the foam will collapse and gaps will inevitably appear. A gap between a window and a wall, a window and a window sill is a fairly common occurrence in such cases.
To eliminate them you will need:
- narrow spatula;
- long screwdriver;
- mounting gun for sealant;
- rags or a regular rag;
- newspaper or plastic film;
- gloves.
Reasons for the formation of cracks
The first sign of increasing cracks is dust on the windowsill, which appears a short time after erasing. Also, a violation of the tightness is indicated by fogging of glass, drafts and noise. The biggest problem is the appearance of drips on the wallpaper under the windowsill and mold.
To seal cracks, it is important to find out the reason for their appearance:
- Violation of installation rules . Unprofessional installation leaves large, poorly foamed gaps between the wall and the glass unit. The installation material dries out over time, causing the window to warp and cracks to form. A candle will help check the tightness. Pass the flame of a candle or lighter along the joints. The external contact areas of the frame must be tightly foamed, puttied and plastered.
- Seal wear . The rubber bands can crack, jump out of the groove and tear. Untreated material is destroyed by sun, snow and rain. It is important to apply a coat of plaster or paint on the street side to protect the seal.
- Wear of fittings . Natural wooden frames are susceptible to adverse environmental influences. The wood dries out during use and the cracks increase. In plastic structures, rubber seals, locks and latches become unusable.
Drywall installation
A sheet of plasterboard is a building material in which gypsum is placed between layers of cardboard. The material is indispensable for hiding various wall defects, so it is recommended for slopes.
Its advantages include:
- wide range of uses. Suitable for all types of windows;
- can be used to finish slopes of any size;
- low price;
- quick installation;
- environmental Safety;
- painted in different colors.
There are also disadvantages:
- low strength. Any mechanical impact leaves traces;
- destruction at high humidity;
- rapid wear, requiring additional painting;
- inconvenient installation. When cutting, it is necessary to use protective equipment, as gypsum dust is harmful to health.
1. Drywall is the base that requires finishing.
2. It is better to choose a moisture-resistant version of the material that is not afraid of condensation on the windows.
There are several ways to cover slopes with plasterboard, but the simplest is considered to be the following installation using putty.
- The slope is measured from the wall to the frame. If the wall is uneven, then it is necessary to take measurements in several places.
- The measurements are transferred to the drywall. For convenience, a pattern is made.
- The future slope is cut out of the sheet. The material is cut with a knife or sawn.
- Putty is applied along the edges and in the center of the workpiece.
- The workpiece is pressed tightly against the slope, and a spacer is installed. It takes a day for good adhesion.
- Very often, aluminum corners are installed to align corners.
- The surface of the slope is puttied and, after drying, treated with sandpaper.
- The cladding is completed with two layers of painting. In this case, the window profile and window sill are protected with masking tape.
In general, everyone independently chooses the method of repairing slopes. If the technology of the work is not violated, then it will be beautiful and reliable.
Description of sealant Stiz A
One of the popular compounds for sealing PVC structures is Stiz A - a sealant for plastic windows made on the basis of acrylic. This is a one-component, vapor-permeable composition, completely ready for use. It is used for external work (Stiz B is used for internal work) associated with the installation of metal-plastic structures.
Using Stiz A sealant:
Sealant Stiz A in different containers
- sealing the contact points of plastic windows to concrete or brick walls;
- sealing cracks in frames;
- filling installation joints around the perimeter of plastic windows;
- filling voids in structures made of metal, wood, concrete, brick, natural and artificial stone.
Features of Stiz A:
- high adhesion to any materials, including wet surfaces;
- sealant for seams on windows is resistant to moisture, wind, and UV radiation;
- has high vapor permeability;
- After drying, the sealant can be painted or plastered;
- applied with a spatula, brush, special gun or other device.
Characteristics of Steez A:
- shrinkage during operation - no more than 20%;
- temperature range for application –25 to 35 degrees;
- operating temperature –60 to 80 degrees;
- sealant consumption - 120 g per linear meter;
- hardening time - 2 days;
- service life - 20 years;
- White color;
- price - 800-900 rubles for 7 kg and about 90 rubles for 0.44 kg.
Polymer sealant (liquid plastic)
It consists of dissolved PVC granules. Indistinguishable from the material of a window block, it combines a plastic slope with a frame into a monolithic structure. It is more expensive than silicone-based analogues. The most popular brand is Cocmofen.
Advantages of liquid plastic:
- easy to apply;
- hardens quickly;
- lasts 15 years without changing color;
- safe;
- resistant to ultraviolet radiation and other atmospheric influences.
- does not tolerate tensile or compressive loads (after hardening, the composition does not have elasticity);
- Suitable only for plastic slopes.
Thiokol
A material whose performance characteristics are in no way inferior to silicone sealant. Thiokol (polysulfide) compositions are based on liquid thiokol, the structure of which resembles liquid rubber. Of the most significant advantages, I will note the following qualities:
Maintains elasticity after hardening.
Immunity to oil, gasoline.
Resistance to ultraviolet radiation and sudden temperature changes.
Source st26.stpulscen.ru
Despite all the advantages of polysulfide sealants, I do not use them in my work for the following reasons:
- Incompatibility with PVC materials. The sealant contains solvents that have a negative effect upon prolonged contact with plastic.
- It is sold in buckets, in large volumes, which is not very convenient for processing window cracks, where a minimum amount of material is required.
- The composition is two-component. Therefore, it is quite difficult to predict the exact amount that will be needed to process several seams.
- The viability of the diluted composition is no more than 2-3 hours. After this period, the material simply loses its original qualities.
Thiokol sealants are excellent for sealing gaps created by installing wooden windows. They are incompatible with plastic double-glazed windows.
Repairing small cracks
If small cracks are discovered, then the owners have to take action immediately. There are several main ways to eliminate them from the inside.
Paper, clay, chalk
To create paper putty, you need to shred paper—newspaper works best. They are soaked in water, part of clay and two parts of powdered chalk are added. All gaps are sealed with the resulting composition.
The putty will be plastic and will clog even the smallest gaps. It is more convenient to work with a knife or a small metal spatula.
For protection, window tape or special adhesive paper is glued on top, or fabric strips pre-lubricated with soap can be used.
Such insulation will be simple but reliable protection before the onset of warming, but afterwards there will be unsightly stripes that will need to be washed.
The process of insulating aged wooden windows can be carried out with cotton wool and fabric. Cotton wool is a unique alternative to paper and newspapers. Technical wool is pushed into the cracks, sealed on top with heavily soaped strips of fabric.
This method is used more often and is quite inexpensive to implement. You can replace the fabric with modern heat-insulating tapes, which, after removal, will not spoil the paint.
Sealant
Silicone sealant for wooden frames is rarely used. In severe frost it will quickly lose its properties, so with the onset of warmer weather the procedure will have to be repeated.
Working with sealant
Putty
This method has come down to us since Soviet times. It was almost the only effective method for maintaining heat. Modern putty can also guarantee protection against drafts. It is used to seal the areas where the frame meets the wall. A special window composition or ordinary plasticine is used.
Materials are applied from the outside of the window - into the joints. First, small pieces are kneaded with your fingers, forming thin sausages and recessing them into the gaps.
The main disadvantages are the destruction of the putty due to frost or melting due to extreme heat.
Polyethylene
This is one of the most accessible and easiest ways. Polyethylene has the following advantages:
- low price;
- ease of installation;
- ease of care.
But its disadvantages should be especially noted, namely:
- insufficient thermal insulation;
- a lot of dust sticks to it.
The film is attached in the following sequence:
- Measure the required length of material according to the size of the window.
- Preparing the frame.
- Fasten the film with tape or pushpins; there should be no gaps left so that warm air does not penetrate.
Foam rubber
Foam rubber is a suitable material for thermal insulation of large gaps.
Special foam rubber
Sometimes wooden window sashes become so dry that they no longer fit tightly to the frame. But using only technical wool will not help. For insulation, foam rubber is glued around the entire perimeter. Thanks to it, the joints become airtight when closed.
Special foam rubber has an adhesive layer on one side. When such materials were not commercially available, foam rubber was attached using the smallest nails. With proper use, the product can serve for 3 years, but then deformation occurs. It is better to seal the top of the strip with tape. In the spring, the tape is removed, and the foam rubber can be left in its place.
Thermal reflective film
The use of heat-reflecting film is a modern method of eliminating cold bridges. The principle of operation of the material is based on the fact that it allows light to enter the house, and infrared radiation does not escape outside, thus retaining heat in the rooms.
The membrane has two parts - two sides. One is shiny, the other is ordinary. The main thing is to make sure that the shiny side faces the street.
The film is overlapped onto the frames with tape. When placed correctly and carefully, the thermal insulation is not noticeable. The membrane is suitable for PVC windows.
Sealing drywall joints - from installing sheets to puttying joints
One of the final stages of working with plasterboard sheets is sealing plasterboard joints . The durability of the repair depends on how well it was made - after all, if the seams were sealed incorrectly, then cracks will appear at the joints. The advice given in the article will help you avoid such troubles.
Types of edges and gaps between sheets of drywall ↑
First of all, it’s worth talking about what types of longitudinal edges there are. The transverse edge of all types of this material, be it simple, water-resistant or fire-resistant sheets, is always straight and not covered with a layer of cardboard. So, the longitudinal edge could be as follows:
- Direct (PC marking). The joints between such sheets intended for rough finishing are not sealed. This edge, as a rule, is made not on plasterboard, but on gypsum fiber sheets.
- Semicircular, thinned on the front side (PLUK). When sealing seams, sickle and putty are used. This is the type of edge that can be found most often on drywall.
- Beveled (UK). Sealing seams in sheets with such an edge is a very labor-intensive process, performed in at least three stages with the obligatory use of a serpyanka. The beveled edge is almost as common as the PLUK.
- Rounded (ZK). When sealing such seams, drywall joint tape is not used.
- Semicircular (PLC). Processing of joints with this type of edge is carried out in two stages without the use of a serpyanka. It is desirable that the putty be as durable and high quality as possible.
- Folded (FC). Just like the PC edge, it is most often done on gypsum fiber board sheets intended for rough finishing.
There are several other types of edges, but it is almost impossible to see them on the shelves of domestic stores. As mentioned above, most often manufacturers make drywall with edges such as PLUK and UK. Such edges do not require any processing after installation of the sheets, so you can immediately begin to putty them.
If we are not talking about a factory-made edge, but about a self-made edge, which is formed after cutting drywall to the required size, then it needs to be thinned. To do this, a special tool is used that chamfers the edge of the sheet. However, this can be done with an ordinary wallpaper knife with a sharp blade. When processing an edge, you need to cut about two to three millimeters of gypsum from it at an angle of 45°.
When installing drywall sheets, you need to leave a gap of no more than seven millimeters between them. This distance between the sheets will allow them to contract and expand freely with changes in temperature and humidity. For the same purpose, gaps are left - a centimeter between the drywall and the floor and a five-millimeter gap between the plasterboard and the ceiling. All seams are subsequently puttied and covered with plinth on the floor.
How to join drywall correctly? ↑
As with any work, joining plasterboard sheets has its own nuances. Firstly, all joints between sheets must be made on profiles, and under no circumstances should they hang in the air. This rule applies not only to longitudinal, but also to transverse joints. Secondly, if the length of the plasterboard sheet is less than the height of the wall, then the cut and whole sheets must be joined in a checkerboard pattern. In practice, it looks like this: a whole sheet is placed below, a cut sheet is placed at the top; then cut off at the bottom, whole at the top, and so on.
If the drywall on the wall is attached in two rows, the second one must be shifted relative to the first by 60 cm. The sheet width is 120 cm, the first to be mounted is half of the sheet cut along the longitudinal line.
The joining of drywall in the corners is done one by one: first, the first sheet is attached to one of the installed corner posts, and then the second sheet is attached to another profile standing in the corner. The gap between the sheets forming the corner should not be more than one centimeter. Subsequently, a special perforated corner is mounted on the outer corners, and the inner corners are sealed using putty and sickle.
How to seal drywall joints and what do you need to know for this? ↑
After all the sheets have been secured and the “non-native” seams have been unstitched, you can begin to putty the joints . To do this, use a gypsum-based composition, which is diluted with water in the required proportion. In this case, you should not buy a cheap mixture, since it may crack later. Also, for puttying you will need a metal spatula 15 cm wide. They use it to collect ready-made putty, which is applied to the seam. In this case, the spatula must be pressed lightly so that the mixture completely fills the joint. Then serpyanka or paper reinforcing tape is glued along the seam, which is then sealed again.
When gluing reinforcing tape or serpyanka, you need to ensure that their middle falls exactly in the middle of the seam; their cuts need to be overlapped.
The seam must be flush with the drywall - this is verified using a level. This must be strictly monitored, since the gypsum composition is practically impossible to polish. After the putty on the seams has completely dried, you can begin to putty the drywall.
At the end of the preparatory work, the opening is completely cleaned of dirt. Everything is swept and dried. In order not to damage the window or door frame, it is sealed with masking tape and cardboard. Installation is simple, and after installing drywall, the openings are beautiful, smooth and strong.
There are other design methods, but using gypsum plasterboard is simpler and cheaper, especially if the seam on the window or doorway is large.
Problem with plasterboard slopes
Specifically, my neighbors were breeding dogs. The room for the puppies was kept closed so as not to get drafty, it was ventilated regularly, but not correctly - the air was hanging around one room. Plus there are warm floors throughout the apartment and non-breathable coating on the walls.
You need to foam all the cracks near the window frame, before plastering. Putty with moisture-resistant putty with a mesh, then with moisture-resistant paint. I have plasterboard slopes on 14 windows. In the first winter, one window was poorly foamed, freezing began at the bottom, I drilled holes and foamed it additionally. Everything dried out, the drywall was dry and did not swell, then I painted it and that was it.
I did it almost like in the picture, but I didn’t put in cotton wool, I just foamed the entire space. alez wrote: Worker, what about the location of the battery under the windowsill? Click on the image to enlarge Name: IMG_2729.JPG Size: 44.3 Kb ID: 271596 Do I need to reduce the width of the window sill or is everything okay. are there any requirements regarding this? [*]Which slopes are preferable - plasterboard or plastic sandwich?[*]how to properly perform heat, sound, water insulation of slopes?[*]Is it worth replacing the plastic window sill (by the way, I’m not delighted with it) with something stronger?[*] ]How to install a drainage system correctly? (I suspect that he is siphoning somewhere)
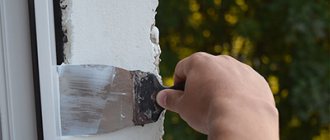
Plastering external slopes of plastic windows
This procedure consists of several stages:
- The most difficult stage in finishing work is plastering the top part. This is where we begin attaching the base for the applied solution - the type of mesh you have chosen. The shape of the fastening depends on the type of slopes you will make - straight (perpendicular to the window frame) or unfolded. We strictly determine the thickness of the layer that we will apply using a plumb line and mark the value with a marker. The surface on which we will apply the plaster must be treated very well with a construction primer, this will allow the solution to adhere more firmly to the surface. After this, mix the plaster solution for the first time. To create the best quality mortar, it is recommended to use a drill with a construction mixer. It will ensure thorough mixing of the components and uniformity of the structure. Using a trowel and spatula, we apply the first rough layer, trying to fill in all the flaws in the surface of the walls as thoroughly as possible. The installed mesh will serve as additional reinforcement and will not allow the plaster to peel off, but to set directly on the wall. If you need to fix a lot, and the layer turns out to be very thick, then you should not immediately apply it completely. It is better to do it in stages, adding the required layer several times, each previous layer being pre-primed. It is advisable to let each of them dry for at least 1-2 days. The last layer must be removed with a spatula, forming the finishing surface. Usually, after drying, small cracks remain on it; they are caused by the fact that “starting” mixtures are used for the plaster. To remove them, you need to use a small (the size of the slope or slightly smaller) spatula to treat the dried slope with a slightly more liquid solution than was used previously. By applying a moderately thin layer, we will hide all the imperfections of the rough surface under it. After the last layer has dried, the surface is carefully sanded, removing small wave-like irregularities. After they are formed, it is necessary to draw a corner with the main wall. To do this, two trowels are used, one of them is placed on the plane of the main wall of the building, and the second one is drawn out at a beautiful even angle. It is recommended to first mark the line of the corner using a plumb line so that it does not turn out to be blocked. For this, the plaster solution needs to be moderately thick, so that the required angle can be freely formed, and after rubbing with a float, the applied layer does not immediately float, but begins to set. After the formation of the corner is completed, you need to wait until the applied solution dries completely. To do this, you need to wait at least 2-3 days in dry weather so that you can safely proceed to further improvement of the slopes. Next, gently but thoroughly rub in the last layer of applied plaster. Visible cracks and minor flaws can be easily corrected with a soft paint brush and liquid solution. This layer does not require much time to dry, and soon you can begin priming the slopes. The next mandatory step is to protect the plaster from moisture. The ideal option for this would be to use hydrophobic paint from the same manufacturer whose plaster mixture you used. This layer will protect your plaster from water and will not allow external natural phenomena to adversely affect it. After protection from moisture, the finished smooth slopes can be painted with facade white paint. A recommended, but more expensive option would be to use acrylic sealant, which, in addition to protecting against moisture and dirt, will add another protective layer. In addition, it is easy to clean, which will allow you to return your slopes to their snow-white, original appearance using a regular rag and soap. In addition, the service life of this paint is approximately twice as long as usual, which will allow you to soon not return to preventive maintenance.
Choosing plaster
To be honest, it’s not a lot of work, but it needs to be done, otherwise moisture will reach the internal slope, and this is a potential danger of fungus appearing in the room. Why do window installers forget about slopes on the street side? It's simple - some install windows, others make slopes. If there is plastic on the side of the room, then the “window workers” also install it, but they don’t like to work with plaster.
The first rule when choosing a material is that you cannot use gypsum plaster for external slopes. None and never. The problem with gypsum is that it is afraid of moisture - it draws moisture into itself and crumbles when the temperature changes.
Plaster is used for work:
- facade,
- Typhoon Master,
- Lime with the addition of cement.
In rare cases, slope cracks are clogged with tile adhesive, but plaster is better. In the store, ask if the material can be used on the facade and read the composition - if there is gypsum, then plaster is in the air.
The best option is a ready-made dry mixture such as Typhoon Master. In addition to cement and lime, it contains polymer additives that make the mixture plastic and resistant to temperature changes. It costs a penny and lasts for years.
As for consumption, on average, the external slope of one plastic window requires 2-3 kg.