Energy prices have been getting higher and higher lately, and effectively insulating a home is one of the main challenges that homeowners have to solve. One of the latest materials that appeared on the market several years ago is polyurethane foam. This is a coating that is applied in a continuous layer to any (almost) surface. Insulation with polyurethane foam is the most effective.
House insulated with polyurethane foam
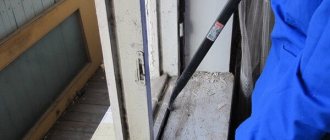
Spraying polyurethane foam
The method allows for insulation of structures inside and outside buildings. This method of insulation has a number of advantages that distinguish it from all others:
- PPU firmly adheres to any surface, regardless of the material. The geometry of the surface does not matter.
- No preliminary preparation of the spraying object is required. It is enough to remove dirt and dust.
- Not afraid of seasonal temperature fluctuations.
- Unaffected by precipitation.
- The lightness of the material means that there is no additional load on the object, which allows you to spray polyurethane foam everywhere without restrictions.
- This insulation option further strengthens the structure.
- The absence of seams and joints that can reduce the thermal insulation properties.
- Due to technical features, it does not require additional transportation costs.
- High environmental safety.
Spraying of polyurethane foam is carried out using special equipment. There are many varieties of such construction equipment for use on an industrial scale and for personal use.
Internal insulation of house walls
Most often, city apartments are insulated from the inside with polyurethane foam, and not all of their space, but only the walls facing the road or corner walls, as well as loggias and walls separating two adjacent apartments. In this case, polyurethane foam acts not only as insulation, but also as a reliable sound insulator.
Due to its low water absorption coefficient, polyurethane foam can be rationally used as insulation for walls and floors in the bathroom, kitchen and toilet. But in these rooms, characterized by high humidity, even for polyurethane foam it is desirable to create additional vapor barrier, which is not required at the natural level of humidity.
Scheme of insulating walls from the inside with polyurethane foam.
Before you begin insulating the interior, you need to make sure that it is free of furniture, carpets, plumbing fixtures and household appliances. A special protective film must be glued to doors, window sills and windows. These measures are very important because... the insulation itself is sprayed onto the walls of the house under high pressure, and its splashing cannot be avoided.
Possessing increased adhesion, foamed polyurethane foam can stick almost tightly to any type of surface, and after hardening it will be impossible to remove its splashes without leaving a trace. Therefore, it is necessary to initially take all necessary protective measures to prevent splashes of insulation on other objects.
You need to remove the facing material and finishing from the walls, reaching their base. Facing materials must be removed carefully so that upon completion of the spraying process they can be reused for finishing. Immediately before spraying, the frame must be treated with a wide damp brush to remove as much dust as possible.
Work of specialists
This is the best way out. Companies that spray foam foam use high-power foam generators equipped with a vortex chamber, where a pressure of up to 140 atm is created. The finely dispersed mixture resulting from the chamber exits forms a quickly forming layer of insulation.
It is with the help of powerful foam generators that thermal insulation is produced from high-density polyurethane foam of 40, 60 and 80 kg/m³. Today, such material is used in production and in the construction of frame houses, where 50 mm of polyurethane foam replaces 110 mm of brick wall.
As a rule, if thermal insulation is carried out by specialists, the owners only have to prepare the surfaces for their arrival. The wall, partition or ceiling requiring insulation must be dry and clean. It is necessary to remove debris and remove patches of peeling paint. For better adhesion (sticking) of polyurethane foam, the surface temperature should be at least +10˚.
Polyurethane foam is applied quickly. After just 20-30 seconds, the insulation expands to the required volume and begins to harden.
Thickness of applied layer
To insulate the wall, it is enough to apply a thermal insulation layer 50 mm thick. However, it will not be possible to spray over the entire surface with such precision. Therefore, professionals advise working within the range of 50-60 mm, where the minimum thickness of the thermal layer is 50 mm, the maximum is 60 mm. Foam that protrudes strongly beyond the sheathing is cut off with a knife. The data is given for a brick wall of one and a half bricks.
In all other cases you need to count. To do this, you can use an online calculator (see here) or do the calculations yourself.
Insulation density
The density can be adjusted simultaneously in several ways: by changing the proportions of the components, within hundredths of a percent, by the speed and force of foam supply. Therefore, it will not be difficult for an experienced specialist to adjust the equipment to the required density. And for walls it is about 40 kg/m3.
The cost of equipment for spraying polyurethane foam with your own hands
The spread of portable installations for independent work with polyurethane foam is explained by the fact that in private homes the area for insulation can be quite small. Teams of professional workers with expensive equipment simply do not go to such sites, since it is unprofitable. In other cases, small jobs will be very expensive due to the time-consuming assembly of the installations. Disposable kits are designed for safe use by hobbyists. In areas less than 20 m2 they prove advantageous.
The average cost of a one-time installation is from 16 to 30 thousand rubles. It contains approximately 1 m 3 of polyurethane foam. The same volume of composition purchased from a specialized company will cost more than 30 thousand rubles. The benefits of working independently are obvious.
Ready-made kit for spraying polyurethane Foam Kit
A disposable system for insulating polyurethane foam, Touch*n Seal Foam Kit, manufactured in the USA, is presented in the following configuration:
- 2 cylinders, sufficient for private use, filled with polyurethane foam.
- Hose – 4 m.p.
- Spray gun - “pistol”.
- Nozzles 8 pieces - 4 each, for flat and round pressure.
Hoses are connected to the cylinders, a suitable nozzle is put on the gun, and the gun is mounted to the hose. Several disposable attachments allow you to take breaks while working. The kit is usable for a month, from the first opening. The layer hardens in 1 – 2 minutes. Excess will be removed after hardening.
Insulation of residential buildings
and buildings for industrial or commercial purposes, experts recommend equipping them only on the outside. However, installing insulation on an external wall is not always possible.
Reasons
there may be several - from a ban by city authorities to technical difficulties that arise during the installation process itself.
In such cases, the option of internal insulation
subject to choosing the right material for insulation.
Among the few disadvantages of polyurethane foam
Most often, the high cost of the material required to perform thermal insulation work, equipment and the services of relevant specialists is mentioned.
However, upon detailed analysis
each of these disadvantages turns out to be only a small problem that can be solved without much effort. Thus, the risk of destruction of the coating under the influence of ultraviolet radiation is eliminated by cladding using lining or drywall.
Acquisition costs
polyurethane foam and spraying equipment pay for themselves due to the reduction in the amount invested in paying bills and purchasing medications, as well as the absence of the need to change the insulation two or three years after installation.
The thermal insulation layer obtained thanks to sprayed polyurethane foam will last at least five decades
, and its properties (high strength, moisture resistance, non-toxic, environmentally friendly), structure and shape remain the same as immediately after installation.
As an added benefit
It is worth mentioning the significant savings in space consumed when using other types of insulation. As for the costs of specialist services, they can also be eliminated if you do the insulation yourself.
For even more savings
, you should not purchase large volume cylinders. An intentional or forced break in work exceeding 1 month leads to the need to purchase a new spraying installation. The device, which was in operation, becomes unusable.
Why is it profitable to buy polyurethane foam in cylinders?
To be fair, we note that in addition to mini PU foam in 1000 ml containers, in Russia there are also disposable [rechargeable in the USA] PU foam kits in steel Foam Kit cylinders.
If you are trying to understand how good Polinor or Sipur are as PPU polyurethane foam, then you should compare it with the Foam Kit. It is incorrect to compare polyurethane foam from a cylinder with the foam obtained during application by the installation. Application areas differ.
Let's be honest: if the object is large enough, there are electrical connection points of sufficient power for equipment and a compressor, and it is possible to bring and unload barrels of material, then you should hire professionals with special equipment and entrust them with spraying polyurethane foam for insulation.
The Foam Kit consists of 2 pressurized metal cans with components. A nozzle-gun is connected to the cylinders through flexible tubes. If you open the taps, liquid R-component and ISO under pressure enter the nozzle and spray onto the surface.
The difference from Polinor and SiPur is that there are 2 large steel cylinders, and not 1 small and light cylinder. But, of course, weight and dimensions are not the main thing here. The main thing is money. Better is the polyurethane foam that is cheaper, because... The performance characteristics of both products are the same.
Cost of insulation per 1m2 of polyurethane foam from a cylinder
From an economic point of view, domestic mini PPU are more profitable. The fact is that FoamKit is produced and imported from the USA, i.e. purchased for foreign currency. At the current ruble to dollar exchange rate (today, for example, 60 rubles per 1 USD), a domestic product is cheaper than an imported analogue.
The benefits of purchasing liquid polyurethane foam in cylinders will be obvious if you compare the cost of 1 m2 of insulation, 10 mm thick, obtained from a SiPur polyurethane foam cylinder with the price of the same square meter from FoamKit 200.
The subscripts 200, 300, 600 and 1000 indicate how many square feet of surface area can be insulated with 1-inch thick polyurethane foam produced from such a cylinder.
Those. FoamKit 200 is rated to insulate 200 square feet at 1 inch thickness. For a better understanding, let's convert to the metric measurement system. 1 foot is equal to 0.3 m. 1 inch is 2.5 cm. Thus, a disposable FoamKit 200 kit under normal conditions will allow you to insulate 18 m2 with a thickness of 2.5 cm or obtain 0.45 m3 of lightweight polyurethane foam, i.e. 45m2 with a thickness of 1cm.
The price for 1 such disposable set of polyurethane foam is [August 2017] 27,900 rubles. Thus, the price of 1 m2 with a thickness of 1 cm of such polyurethane foam will be 620 rubles.
One mini PPU SiPur is designed for 6 m2 of insulation with a thickness of 1 cm. Therefore, if you buy PPU foam in a cylinder at a price of 430 rubles, then 1 m2 will cost 72 rubles.
72 rubles and 620 rubles. The difference is almost 9 times, we can say that it is an order of magnitude.
To be fair, we note that the price for 1 m of insulation when using the FoamKit 1000 kit will be lower than 650 rubles. 1000 square feet is 90 m2. With a thickness of 2.5 cm (1 inch) we get 2.25 m3, i.e. 225m2 with a thickness of 1cm. The price of such a kit today [August 2017] is 54,900 rubles. We divide 54,900 rubles by 225 m2 and get the price for 1 m2 of insulation with a thickness of 1 cm: 244 rubles. Result: 72 rubles is 3.4 times less than 244 rubles.
PPU insulation in SiPur or Polnior cylinders is perfect if you need to insulate a balcony or veranda; attic or attic; basement or bathhouse; a well or a plastic trough [outside so that the water does not cool down for a long time] of a swimming pool, etc.
PPU foam in cylinders is convenient for application to pipes, barrels, domes, and curved surfaces. The compact cartridge allows you to install heat and sound insulation in the most inaccessible places in an apartment or cottage. Liquid polyurethane foam in a 1-liter cylinder will allow you to foam where it would seem that nothing can be done: a box with pipes in the bathroom or under the bathtub, or the ceiling of a storage room, etc.
The retail price of polyurethane foam in a cylinder is 490 rubles. At the Century of Polymers company you can buy polyurethane foam in a cylinder of the Polinor and SiPur brands. Sale from 1 cylinder. Delivery across Russia. Discounts and bonuses when purchasing from 36 pieces.
The NST company offers an excellent solution for insulating polyurethane foam with your own hands. Household kits with liquid polyurethane foam in 10 liter cylinders. Portable device PENA-mini for spraying insulation.
The prototype for PENA-mini was the American household PPU Foam Kit . They appeared in Russia in 2011 and quickly became popular.
Foam Kit cylinders from Convenience Products USA are not unique in their kind. In the USA, we counted 4 more companies, the most famous of which is Dow Chemical, plus we discovered a plant in Canada and another in South Korea.
From 2011 to 2014, NST actively traded FoamKit cylinders. We offered our industrial PU foam installations to professionals and builders, and we sold American household PU foam devices Foam Kit Touch and Seal to those who like to work with their own hands.
The dollar exchange rate of 28-30 rubles, combined with the construction boom, made this product in demand in Russia. Such cylinders with polyurethane foam were in good demand until approximately August 2014, when the ruble began to weaken.
How polyurethane foam is made: basic principle
The production of polyurethane foam involves a very complex technological process. The PU foam mass is formed as a result of the reaction between a polyol and a diisocyanate or polymer isocyanate in the presence of certain catalysts and other additives. Since the polyurethane foam itself must be produced immediately before pouring or spraying, the manufacturer supplies two phases of the polyurethane foam mixture in separate containers. The phases are mixed in special installations before performing work. Here's what happens when the two phases mix:
Due to the variety of isocyanates and the huge range of polyols, polyurethanes with different properties and applications can be obtained. It can be elastic foam, rigid foam, elastomer, etc. It is impossible to find out everything about the production of polyurethane foam, since the exact formulation of the phases is kept secret by the manufacturers. Even if all the necessary components are available, an experienced chemist will have to select the necessary proportions for a long time to ensure the required properties of the mixture.
Video description
Pouring polyurethane foam using a household installation.
Insulation of attics and attics
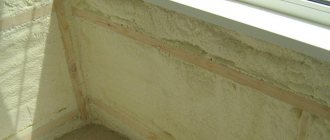
Polyurethane foam can be used for attics, attics and ceilings Source foamkit.ru
You may have the impression that to fill polyurethane foam you definitely need space between two vertically constructed planes, but this is not so. If you have the right equipment, liquid thermal insulation can be poured onto exposed vertical and inclined planes, as shown in the top photo. After all, in essence, laying the foam substance here is no different from applying polyurethane foam, only there is no such powerful expansion effect. Therefore, to insulate an attic or attic, polyurethane foam is applied to the walls, roof and floor, and after drying it is covered with facing materials. When the foam hardens on the floor between the beams, you can even walk on it to lay the floor.
Note: pouring polyurethane foam for insulating houses has one drawback: this will require special equipment, and the foam itself must be ordered in containers, based on the volume of voids to be filled.
Polyurethane foam spraying technology
Before insulation is carried out by spraying polyurethane foam, you need to prepare the surface to be treated. To do this, clean it from dirt and dry it well.
It is important to remove all rust from metals and degrease them. Aluminum requires mandatory coating with a primer with a high degree of adhesion, this will help increase the adhesion of the insulation to the surface
The temperature of the environment and components plays an important role in the spraying process. To obtain a highly effective layer, the composition must be from 10 to 25 ° C
The optimal temperature for the room is above +5 °C. Work in a colder environment can only be done with a solution heated to the desired state.
Spraying of polyurethane foam, reviews of which are almost always positive, is carried out under pressure above 100 atmospheres. Approximately two seconds after spraying, a foaming reaction occurs, followed by hardening of the composition. The resulting layer provides excellent thermal and waterproofing.
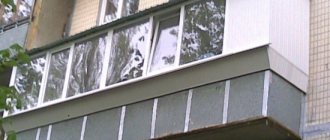
Balcony insulation technology
Insulating the balcony with polyurethane foam
Insulating a balcony with polyurethane foam will not take much time due to the small area of the room. Do-it-yourself thermal insulation is carried out from the inside of the balcony, since special equipment is required for external work.
During the insulation process you will need:
- aluminum profile for sheathing;
- screws and plastic dowels;
- level;
- drill;
- spray installation;
- insulation components.
Step 1. Surface preparation
Peeled or loose coverings are removed from the ceiling and walls of the balcony, and the corners and joints around the perimeter of the windows are checked. If there are deep cracks, they can be filled with pieces of foam plastic and sealed with putty. All small gaps and seams will be filled during the spraying process. There is no need to level or sand the surfaces.
Step 2. Making the sheathing
An aluminum profile is screwed to the walls and ceiling in vertical rows. Next, strengthen the sheathing with horizontal jumpers in increments of about half a meter. Be sure to screw the profile around the perimeter of the window and doorway. It is recommended to cover the window, door frame, and communication pipes with plastic film, since the insulation quickly sets and is very difficult to clean.
Step 3. Spraying insulation
Open the box of polymers and thoroughly shake the components. Connect hoses and a gun to them, select a nozzle with a narrow torch. First, polyurethane foam is blown into the cracks, the seams between the walls and ceiling are sealed, and the joints around the openings are treated. Then the nozzle is changed to a wide one and the insulation is sprayed onto the ceiling. Application should be uniform, the gun should be held at the same level and moved smoothly along the surface to be treated.
After insulating the ceiling, they move on to the walls; if there are noticeable defects, depressions, polyurethane foam is applied in a thicker layer, leveling the working plane. On smooth walls, the insulation layer should be as uniform as possible. After spraying, carefully remove excess material from the sheathing.
Step 4: Finishing
Drywall, plastic or wooden panels are attached to the profile on top of the heat-insulating layer. If finishing with decorative plaster is planned, a reinforcing fiberglass mesh is attached to the surface, on top of which the plaster is applied.
Thermal insulation of a house using polyurethane foam
The technology of insulating a house with polyurethane foam is valued for its efficiency and speed, meeting safety standards, and excellent insulating properties.
It is suitable for any external and internal structures, including loaded ones, the only limitation of application is the high price. Reviews from building owners are mostly positive; many are thinking about purchasing equipment.
Among the noted advantages are high adhesion, the absence of cold bridges, the ability to process complex and hard-to-reach areas, strength and resistance to moisture and fungus.
Features of polyurethane foam
The technology is relevant for any building surfaces, including metal. Moreover, it successfully protects the latter from corrosion by forming a film directly on the area in contact with the pipe or fittings.
Cured foam is completely impenetrable to external influences and is only afraid of mechanical damage and UV rays. There are two varieties: with an open and closed cell structure; in the cold climate of the Russian Federation, the second, more expensive and dense, is more often used for construction purposes.
This type of polyurethane foam belongs to the class of materials that are difficult to ignite and prevents the spread of flame.
Density is a controlled indicator, on which the cost of spraying polyurethane foam directly depends.
Changing the chemical composition and equipment settings allows you to vary this characteristic from 15 to 80 kg/m3 (it can be higher - up to 300, but according to reviews this is not necessary), which is important when insulating structures with varying degrees of load.
There is a clear relationship between the volume of foam formed and the ambient temperature (with the same insulation thickness, 17% more components are consumed); in the cold season, additional heating is required.
PPU with a closed structure has vapor permeability close to zero, this limits its use in internal insulation schemes. In any case, it is not recommended to completely cover both the floor and walls with it in unventilated rooms. As an option, a composition with a density below 12 kg/m3 with open cells and appropriate vapor and waterproofing is used.
Technology and basic circuits
Work on insulating polyurethane foam begins with choosing its density, taking into account the load-bearing capabilities of the structures and the thickness of the future layer according to the climatic conditions of the region. When doing it yourself, it is recommended to adhere to the following scheme of actions (using the example of a facade):
- Surface preparation: applied to stable, clean and dry structures, heated if necessary. Evenness does not play a special role, but there should be no peeling pieces of the old coating.
- Installation of sheathing (recommended). Theoretically, a frame is not needed, but installing guides helps control the level and facilitates the finishing process. The height of the sheathing is selected taking into account the future thickness of the insulation.
- Application of polyurethane foam: in a thin layer (no more than 5 mm) in the direction from bottom to top. If necessary, the process is repeated.
- Upon completion of the polymerization process, excess foam is cut off along the guides and external finishing is carried out. To plaster polyurethane foam, a chain-link mesh must be placed (similar to polystyrene foam, secured to the sheathing or material). The easiest way is to cover the facade with siding, clapboard, or, if you have an unlimited budget, to cover it with brick.
This guide is also suitable for roofs or floors on joists; experienced operators use up raw materials without leaving a trace, even without lathing.
It is allowed to use polyurethane foam in systems with heating elements (both pipes and cables); it is believed that such insulation reduces space heating costs.
When insulating pipelines, containers or metal walls, the preparatory stage includes the removal of old flaking paint and rust. A mandatory step in any scheme is sealing and hiding from ultraviolet radiation.
Floor insulation
To insulate the floor you will need:
- spraying installation;
- container with polyurethane foam components;
- cement;
- sand;
- water;
- building level;
- rule or long strip.
Step 1. Preparatory work
For insulation at the construction stage, the rough base is cleared of debris and dust, and the joints and seams around the perimeter of the room are sealed with mortar. If the floor is insulated during the renovation of a residential building, you first need to remove the top covering, remove accumulated debris, and check the joists for strength. Rotten sections of the floor should be replaced with new ones.
Step 2. Spraying polyurethane foam
Insulation of a wooden floor
Mix the components, connect the hoses and a gun with a nozzle and begin to cover the base of the floor with insulation. 2-3 layers of polyurethane foam are sprayed onto the concrete screed; applying the material in one thick layer is not recommended. The space between the joists is insulated at a time, especially carefully distributing the composition along the corners of the ceiling.
Device for applying polyurethane foam
Step 3. Applying screed and laying the coating
After the insulation has hardened between the joists, you can immediately install the main floor. If the spraying was on a concrete base, the insulation should be covered with a cement-sand screed on top. The solution is mixed in a container and distributed directly over the heat-insulating layer. Using a level, check the horizontality of the screed to avoid slope or unevenness. The solution is applied in a layer of 4-5 cm; a thinner screed will crack under mechanical stress.
When the layer of mortar has dried, begin laying the topcoat. Since polyurethane foam has high thermal insulation characteristics, linoleum or carpet on a thin backing can be laid on the screed.
Characteristics of polyurethane foam
PPU is popular not only because applying polyurethane foam with your own hands is a fairly simple process. This material has excellent characteristics:
- thermal conductivity coefficient 0.019-0.028 W/m*K;
- vapor permeability tends to zero;
- density 30-60 kg/m. cube;
- does not burn - according to GOST 12.1.044 it is classified as low-flammable materials;
- does not absorb moisture - the percentage of closed cells is from 85 to 95.
This also applies to the insulation of frame walls with expanded clay. In addition, it is quite heavy.
It has good adhesion (adhesion) to all materials. Thanks to its almost complete waterproofness, polyurethane foam protects metals from corrosion. In the characteristics of polyurethane foam there is also such a thing as start time. This is the number of seconds it takes for foaming to occur. The start time for different types of work is slightly different. For horizontal surfaces, the foaming time should be about 5-10 seconds. For ceiling insulation, this period is reduced to 3 seconds.
Equipment for applying polyurethane foam
Installations for spraying polyurethane foam come in high and low pressure. The main elements are a compressor and a spray gun, in which the PPU components are mixed. In low pressure equipment, mixing occurs at 5-10 atmospheres, and in high pressure equipment - at 100 atmospheres or more.
Different pressure affects the mixing method:
- at low pressure the components are mixed by swirling;
- at high pressure, mixing occurs through the diffusion of components.
And the leader in this niche is Rocklight stone wool insulation, made from basalt.
Low pressure units are smaller, cheaper, and easier to operate. In them you can set mixing proportions (1:1 or 1:2) and smoothly adjust productivity directly during operation. High-pressure units allow you to create a more even layer of thermal insulation; you can work at a distance of up to 125 meters from tanks with mixed components. The productivity of such equipment is significantly greater (up to 500 square meters in 8 hours). These are professional installations, which is why they are quite expensive.
Insulating a house with polyurethane foam: instructions and what critical mistakes should be avoided
Polyurethane foam can rightfully be called a new generation of insulation. In recent years, this technology for thermal insulation of buildings has become increasingly popular among owners of private houses. Do-it-yourself insulation with polyurethane foam is quite possible, but only if you have the necessary equipment and the master has studied the technology of applying this material well enough.
Do-it-yourself insulation with polyurethane foam
Polyurethane foam is suitable for insulating buildings both from the outside of the walls and from the inside. The material has a large number of positive qualities, which is why it has been used more and more recently. However, you need to be aware of the negative aspects that may arise when using this type of thermal insulation.
How is polyurethane foam used for insulation?
Insulation with polyurethane foam is most often done by spraying a heat-insulating layer onto almost any surface. By adhering well to it and gaining volume, the foam composition increases in size several times. Polyurethane foam, expanding, penetrates into all, even the smallest cracks, creating a dense and almost airtight coating, thanks to which the walls and roof are not afraid of cold and wind.
The most common method of using polyurethane foam is to spray it on the walls.
The most common method of installing it is spraying, but it should be noted that the pouring method is sometimes used. Most often, this technology is used at the stage of production of thermal insulation structures. Polyurethane foam is poured into special molds, and the resulting parts are used only after complete hardening.
Insulation can be carried out by filling cavities in structures with foam
Another filling option is to fill individual horizontal areas or voids with foam composition where spraying is not possible. For example, this method is used when it is necessary to fill a cavity between already installed or erected walls, or the space between installed layers of finishing material.
The foam composition is formed by mixing two components
Polyurethane foam is a product of mixing two of its constituent polymers, which are usually in liquid form - a polyol and a polyisocyanate. These components are mixed together without air access during the spraying process, foaming when exposed to carbon dioxide and heated to high temperatures.
The finished mixture is fed through hoses into a spray gun and applied to the structure thanks to the high pressure created. The foam composition adheres perfectly to the prepared surface and begins to actively expand, forming an insulating layer of the required thickness.
Video - Modern method of thermal insulation - spraying polyurethane foam
Properties of polyurethane foam
This material is used for insulation of both industrial and residential premises. Spraying of polyurethane foam is carried out on the floors of houses, the inner surface of the roof, various partitions, floors and walls. It is especially popular for insulating walls of frame structures.
Polyurethane foam is universal - it can be used to insulate walls, floors, ceilings, roofs, etc.
During the period of its active use, polyurethane foam has shown its unconditional effectiveness not only as insulation, but also as a waterproofing and soundproofing material. It perfectly protects the premises of the house from freezing, moisture penetration and external noise.
The main advantages of polyurethane foam
So, the remarkable properties of polyurethane foam include:
- Excellent adhesion, that is, reliable adhesion to almost any surface, be it concrete, wood, metal or roofing coverings made of other materials.
- The low thermal conductivity of polyurethane foam allows you to retain accumulated heat in rooms if insulation is done from the inside, and creates a reliable barrier against the penetration of cold air if the material is sprayed from the outside of the walls.
- Polyurethane foam tightly fills all holes and cracks, which helps isolate the room from extraneous sounds from the street. When sprayed onto the inner surface of the roof, the insulation is able to muffle the sounds of raindrops, which is especially important for rooms located in the attics of houses.
In addition to high insulating qualities, polyurethane foam has excellent noise absorption
- This insulation resists the appearance of corrosion on metal structural elements and protects the surface from the negative effects of an aggressive external environment.
- When sprayed with polyurethane foam, it not only covers large surfaces, but also neutralizes cold bridges that arise at the locations of the sheathing guides. They cannot be closed as reliably by any other type of material, therefore, even if insulation is used in mats or slabs (for example, mineral wool or polystyrene foam), the cold bridges are still treated with polyurethane foam.
- Spraying can be carried out on the most complex structures in their configuration, on which it is simply impossible to install conventional insulation.
- Polyurethane foam is a low-flammability material, since one of its components includes polyol substance A. One of the fire retardants is added to it, which gives the insulation the ability to self-extinguish and stop burning even if the material enters the fire zone. Fire of polyurethane foam is possible only at temperatures not lower than 450-500 degrees.
- The low weight of polyurethane foam allows it to be sprayed onto any roofing material from the attic side or onto the attic floor without fear of making these building structures heavier. Moreover, the applied layer of insulation after complete hardening will also give them additional rigidity.
Video - Using polyurethane foam for roof insulation
- When sprayed, the material forms a seamless surface, which cannot be done with other insulation materials without using additional means for their connection (mechanical or adhesive).
- Polyurethane foam is applied very quickly, expanding and hardening in a short time. Therefore, the entire insulation process will take little time - only one or two days, depending on the area and complexity of the structures being insulated.
- Due to the moisture resistance of polyurethane foam and the ability to seal surfaces, its use eliminates the need to use a vapor barrier and windproof film.
- Polyurethane foam is not susceptible to rotting, mold, or damage by rodents and insects.
- Leading manufacturers establish a guarantee for the service life of polyurethane foam of 50 years. However, judging by its components and application technology, the insulation will last much longer without losing its qualities if the foam spraying and its external finishing are done correctly.
- Not a single existing insulation material has such high performance, since none of them has such adhesive properties.
Disadvantages of the material
It is impossible not to mention the disadvantages of polyurethane foam - when insulating it independently and during further use:
- The big disadvantage of this insulation technology is its price, since purchasing or even renting equipment for applying polyurethane foam is not cheap.
- To work on spraying, you need to purchase personal protective equipment - a special suit and a respirator to protect against damage to the respiratory tract. All areas of the skin, mucous membranes, and eyes must be covered.
Working with polyurethane foam will require special safety precautions and the use of special protective equipment
- If there is no experience in installing such insulation, the work may take a long time, and its quality will not be guaranteed.
- Polyurethane foam is not flammable, but when it comes into contact with fire it smokes heavily. Moreover, the smoke contains a large amount of substances harmful to humans.
Polyurethane foam should never be left exposed to sunlight for a long time - ultraviolet light quickly “kills” the material
- If the insulation is applied to the outside of the building and is not covered with finishing materials, then it quickly begins to deteriorate under the influence of ultraviolet radiation, decomposing into monomers that are dangerous to human health.
How to insulate with polyurethane foam
Many would like to carry out the process of insulating their own home with polyurethane foam on their own, however, you need to know that this is quite possible only theoretically, and in practice it will require specific equipment, materials and certain work skills. It should also be noted that the technological equipment requires certain settings before spraying begins, and it is necessary to be able to do this correctly.
One of the main difficulties is the need for special equipment for spraying polyurethane foam
If you have an idea of how the whole system works, but there is no equipment, you can rent it, for which, however, as mentioned above, you will also have to pay a lot.
So what can we conclude? It will probably be easier to invite a specialist with his own equipment - he will quickly, without delay, complete all the technological stages of insulation, freeing the homeowner from a lot of problems.
If you still decide to test your own strength, then you need to take into account some features of this process:
Insulation with this material can be carried out during the construction of a building or in an already built house. In addition, spraying is carried out on individual areas or on the entire surface. Or, if necessary, fill the cavities with polyurethane foam.
Expert opinion: Afanasyev E.V.
Chief editor of the Stroyday.ru project. Engineer.
We have insulated the house from the outside, and now find out how to insulate the wall inside a country house, and also consider options on how to choose the right insulation from our new article.
When carrying out work, it is necessary to take into account the region where the building is located, since the thickness of the sprayed insulation layer will depend on climatic conditions.
Measures for insulation with polyurethane foam include the following actions:
- Insulated surfaces require certain preparation. For example, walls need to be cleared of existing old coating if it is clearly unstable (for example, old crumbling plaster or peeling paint).
- Next, on the wall you need to arrange a sheathing of wooden bars or metal profiles. The thickness of the guides is selected depending on what layer of insulation should be applied to the surface.
Wall surface lathing
- In addition, the lathing can play a leveling role for the wall. It is mounted on the wall surface level and plumb, and the openings between its elements are then filled with polyurethane foam, which will fill the unevenness and bring the coating to the proper level.
- Foaming insulation is sprayed onto the prepared surface using a special gun.
- The intensity of spraying also needs to be adjusted, since if you need a layer that is not too thick, then you need to adjust the device so that the composition is sprayed in very small jets. The sheathing, in this case, must be made from beams or profiles having a small thickness, since they will determine the thickness of the insulation layer.
- Spraying polyurethane foam always starts from the bottom of the wall, and applies it to the surface between the sheathing elements.
Spray gun for applying polyurethane foam
- Polyurethane foam is applied in a thin layer, which immediately gains volume. If the thickness of the first layer is not enough, then another layer of insulation is applied on top.
The insulation is applied in layers, from bottom to top.
- After the polyurethane foam has hardened and the hardened coating has been leveled along the sheathing guides by cutting off the protruding insulation reliefs, it is fashionable to install siding and lining. Nothing prevents you from doing the outside and brickwork or plastering the walls of the house.
- If it is planned to plaster the wall after insulation, then it must be tightened with a chain-link mesh, securing it to the sheathing guides. Then apply the cement mortar to the wall using the throwing technique. After it has set and initially hardened, it will be possible to apply any leveling composition of the plaster, as it will fit well on this base.
Video: the process of applying polyurethane foam to the wall yourself
In conclusion, I would like to note that in any insulation work two factors are very important - the quality of the material used and the experience of the craftsman. Therefore, it is best to entrust the work to a trusted specialist who will relieve you of unnecessary worries and carry out the spraying quickly and efficiently.
Prices for popular models of air compressors
Air compressors
Step-by-step instructions for polyurethane foam insulation using the disposable PENOGLAS™ KIT
The appearance in stores of disposable kits for applying polyurethane foam has significantly expanded the horizons of using this effective insulation. It is possible to do without inviting a team of specialists with their equipment. The kit includes everything you need, including personal protective equipment, without which it is not recommended to work with polyurethane foam.
One of the striking examples of such equipment is the domestically produced kit “PENOGLAS™ KIT”.
With this “PENOGLAS™ KIT-400” kit you can perform high-quality thermal insulation on an area of 20 m² with a thickness of 50 mm
The entire set is placed in three boxes, with a total weight of about 30 kilograms. Everything is very compact, so a regular car trunk is sufficient to transport the entire set.
The entire set fits easily into the trunk of any sedan
The manufacturer declares the following physical and operational characteristics of the thermal insulation being created:
- The system is two-component, producing foam with a closed cell structure, which minimizes possible water absorption.
- The density of polyurethane foam after complete hardening is from 35 to 40 kg/m³.
- Thermal conductivity coefficient is 0.024 W/m׺С.
- The number of closed cells is at least 85%.
- The full volumetric expansion of the “PENOGLAS™ KIT-400” kit is 1 m³, which will correspond to an area of 20 m² covered with a layer of thermal insulation 50 mm thick.
- The period of complete hardening of polyurethane foam is 1 hour.
The kit includes:
- Two cardboard boxes, each containing a cylinder with one of the components. Both the boxes and the cylinders themselves have clear color and letter markings: component “A” is indicated in red, component “B” is indicated in blue. The components are contained in cylinders under a pressure of 8 atmospheres.
When working with the kit, the cylinders are not removed from the boxes - the design of the packaging itself allows all operations to be carried out without completely removing it.
At all stages of working with the kit, cylinders are not removed from the boxes.
- The third box contains all the equipment, tools and spare parts necessary for the work. It contains:
The contents of the small box are everything that may be required to assemble the system and work with it
- a spray gun, in which the components are mixed. Two flexible transparent hoses are connected to the gun, ending with fittings with union nuts - for connection to cylinders. Typically, the hoses are also color-coded so that when reusing the kit, there is no confusion with the “polarity” of connection to the cylinders. The length of each hose is 3 meters.
— To spray the mixed composition, special replaceable heads with a spray nozzle are put on the gun. The kit includes ten of these heads.
To facilitate the connection of the heads to the gun and ensure a reliable seal of this connection, silicone grease is used - a small package of it is included in the kit.
Connecting the hoses to the cylinders requires tightening the union nuts using a wrench - it is also provided in the accessory kit.
The kit includes a set of eye, skin and respiratory protection - goggles, gloves and a respirator
— The manufacturer also thought about compliance with safety measures - the basic kit always includes a set of personal protective equipment - gloves, goggles and a respirator.
Working with the PENOGLAS™ KIT-400 system is quite simple and does not require any special user qualifications. All assembly and preparation of equipment for use takes just a few minutes. There is no need to use any power sources - the kit is completely self-contained. More details about this can be found in the instruction table below:
| Illustration | Brief description of the operation performed |
| The kit is delivered to the work site. When a small box is opened, you need to take it out and immediately put on protective equipment. | |
| Gloves can be rubber or polyethylene. You can, of course, use your own, but the use of protective equipment is a prerequisite, since the components of polyurethane foam are very toxic, and the resulting foam is very difficult to wash off from the skin. Not included in the kit, but it is strongly recommended to use a disposable work suit - foam that gets on ordinary fabrics cannot be washed off. | |
| Boxes with cylinders are being prepared for work. You can open the top lids of the boxes completely by cutting a strip of adhesive tape with a knife... | |
| ..and then - loosening the locking connection of the lid. | |
| Or you can even simply push the windows on the lid, perforated around the perimeter, inside. By the way, these windows are also convenient for carrying boxes - immediately below them there are metal handles for the cylinders. | |
| On the side wall of the box there is another window - round in shape. It is also easy to push it inward - there is cardboard perforation around the perimeter. Directly behind this window there is a cylinder fitting with a PPU component. | |
| The illustration clearly shows the threaded fitting of the cylinder and the tap for opening the supply of the PPU component. | |
| A spray gun with hoses attached to it is taken out of the box. | |
| The hoses assembled into a coil must be unwound along their entire length. | |
| The ends of the hoses with connecting fittings (with union nuts) are located near the windows of both boxes. Please note that the hoses may be color coded and it is recommended that you adhere to them. Of course, by and large, there is no particular difference which hose is connected to which cylinder now. But it happens that work needs to be suspended, postponed (the contents of the cylinders are allowed to be used for one month) or moved to another site. In this case, the system can be temporarily disassembled. It is also common practice that for large-scale work, several pairs of cylinders and one set of accessories are purchased. This is where it will be extremely important to maintain the same “polarity” that was in the original assembly. And color marking will help with this. By the way, there are kits that do not have color markings on the hoses - you should pay attention to this. | |
| The ends of the hoses are inserted into cardboard boxes through round windows. | |
| Then the union nuts of the hoses are screwed onto the fittings of the cylinders with PPU components. First, as far as possible, twisting is done by hand... | |
| ... and then the connection is tightened with the included wrench. The operation is repeated in exactly the same way on the second cylinder. | |
| Next, you need to make sure that the trigger lever of the pistol is locked. The spray nozzle should not be on it yet. After this, open both valves on the cylinders completely. You need to take an empty plastic bag (or any other unnecessary container) and test release the components into it for two to three seconds. This ensures that the pressure of the components is uniform in both hoses, and that nothing prevents their free passage through the gun. | |
| Next, you need to put the spray nozzle on the gun. To facilitate this operation, use the special silicone lubricant included in the kit. They coat the end part of the pistol with it... | |
| ...and the cylindrical part of the removable nozzle and the nozzle at the edges. | |
| Then the spray nozzle is inserted into the gun and pressed tightly so that the connection is securely fixed by the stopper located at the top of the gun (well shown in the illustration - yellow). | |
| The cylinders are placed in a place convenient for work, taking into account that the length of the hoses is three meters. It is allowed to move cylinders only by the metal handles located on their bodies. Carrying by the crane is strictly prohibited! | |
| You can proceed to applying polyurethane foam. The gun is aimed at the area to be insulated. The optimal distance from the spray nozzle to the surface of the building structure is considered to be 600 mm. Spraying is carried out sequentially, in a thin layer, gradually moving the stream of polyurethane to untreated areas. | |
| Often they start from places that are traditionally difficult to access or vulnerable from the point of view of the formation of “cold bridges”. This illustration shows that the craftsman first processed the corners between the floor beams and the rough covering, and then moved on to filling the free space between them. | |
| And this illustration demonstrates the filling with foam of the often ignored area of connection between the mauerlat, floor beams and rafter legs. The use of polyurethane foam allows you to cope with this task. | |
| This technology is also excellent for filling other voids formed at the joints of building structures. For example, the figure shows the insulation of the junction of an old partition with a newly erected ceiling - filling this gap with polyurethane foam will provide both insulation and the necessary sound insulation. | |
| Polyurethane foam also fits perfectly on metal structures, which, due to their very high thermal conductivity, are always the most pronounced “cold bridges”. | |
| You should not try to immediately apply a thick layer of thermal insulation. Foam increases in volume very quickly, and without experience working with such material, it is very easy to make the mistake of unnecessary waste of material. The optimal solution is to apply a thin layer, and after about 20 minutes evaluate the degree of expansion of the foam. If necessary, then briefly bring the insulation layer to the thickness required by calculations. (Calculations of insulation thickness will be discussed below). | |
| During the work process, it is necessary to monitor the quality of the applied foam. So, if it does not rise well or has changed in color (it has become darker or a pronounced brown tint has appeared), it means that the mixing proportions are incorrect. If the cylinders are not empty and everything is in order with the hoses, there is a high probability that one of the channels in the mixing and spray head is clogged. The kit contains spare heads, which means replacement is necessary. To do this, the release lever is locked. The replacement head stopper then lifts up. | |
| The head is gently moved forward with the help of your fingers. | |
| Its cylindrical guide protrusions come out of the gun channels, and then it is completely removed and put away when not needed. | |
| To install a new head, the above-mentioned lubrication of the mating areas with silicone grease is carried out. Then the head is inserted into place... | |
| ... and pushes it all the way through with your fingers, so that the upper stopper, fixing the sprayer in the gun, is activated. | |
| After this, you can again proceed to spraying polyurethane foam - normal mixing of the components and good spraying of the jet will be restored. |
When working, it is necessary to ensure constant compliance with safety precautions. If components or finished foam get on unprotected areas of the body or, even worse, on mucous membranes, it is necessary to immediately rinse with plenty of clean water. When washing off the skin, you can use regular soap. Foam that has frozen on your hands will not succumb to soap - you can wipe it off with a rag soaked in a nitro-based organic solvent (acetone or 646).
What should be the thickness of insulation with sprayed polyurethane foam?
In order to determine this parameter, you can independently carry out a thermal calculation. Its meaning is that any building structure (wall, ceiling or roofing) after insulation must have a total heat transfer resistance not lower than the standardized value established for a given area, taking into account its climatic characteristics.
The initial data will be:
- Parameters of the insulated structure. This refers to its thickness and the thermal conductivity coefficient of the manufacturing material. In addition, the structure may have a multilayer structure. For example, a wall (ceiling, the inner side of a roof slope) has a continuous finish (cladding) made of material, which also makes its “mite” to the overall thermal insulation. Those layers that are separated from the outside of the building from the main structure by a ventilated gap (ventilated facade or roof) are not taken into account.
- Normalized value of heat transfer resistance. It can be determined by the schematic map offered to your attention - for your region.
Diagram map for determining the normalized value of thermal resistance for building structures
Please note that three values are indicated for each location - separately for walls (purple numbers), floors (blue) and coatings (red). They vary significantly, and it is important not to confuse the values when calculating the insulation thickness of a particular structure.
Find out how to insulate a wall inside an apartment from our new article.
Knowing the listed values, you can carry out the calculation using a special formula. However, the formula will not be given, because below is a convenient calculator for quick and accurate calculations. All necessary dependencies and table values are already included in it.
Calculator for calculating the thickness of insulation with sprayed polyurethane foam
Go to calculations
The obtained value will become a guideline for planning the purchase of the required amount of material and for independently applying polyurethane foam to the insulated structure.
DIY polyurethane foam spraying
All work must be carried out in good weather. High humidity outdoors and indoors at this time can slightly damage the polyurethane foam. Do-it-yourself spraying needs to be done in several layers. This is one of the main principles of work.
Insulation with polyurethane foam by spraying begins with complex surfaces: chimneys, ventilation hatches and pipelines. At the same stage, you need to close all the joints that go out. It is advisable to apply the first layer with a thickness of approximately 14 mm. After it hardens, you can begin further work.
The second and third layers are applied to each other with a short time interval. It is optimal to carry out all work in one day. If this is not possible, then, starting each subsequent layer, you need to carefully prepare the surface. With proper planning of working hours, insulation of a medium-sized private house can be completed in 2-3 days.
The most effective sound and heat insulation is considered to be a structure consisting of three layers.
Application conditions and surface preparation
Even with good adhesion, which is characteristic of polyurethane foam insulation, surface preparation will not be superfluous. First of all, you need to remove everything that is crumbling - and first of all the old paint. Grease stains must also be removed and neutralized. They shouldn't exist.
Polyurethane foam is applied to dry, grease-free surfaces
Everything that should not be covered with foam should be covered with polyethylene secured with tape. It must be secured carefully, without gaps - it is difficult to remove the foam.
When insulating a roof with polyurethane foam, there are two ways to apply thermal insulation. The first is to make a permanent continuous sheathing onto which foam is poured. The second is to make a temporary frame consisting of two parallel planes.
If the outer walls of a building are insulated with polyurethane foam, a finishing finish is assumed. And after cleaning the surface, you need to make sure that you can strengthen it with something - it won’t work with foam. To do this, most often, wooden or metal strips are placed on the walls, to which the exterior trim is then attached. This completes the preparation. But applying polyurethane foam is only possible on a completely dry surface, at temperatures above +10°C. There are no other conditions.
PENA-mini B2 Russia vs PPU Foam Kit USA cylinders
We planned for our PPU household device, like the American one, to work on the “Touch and Seal” principle, i.e. "Touch and isolate." But it was not possible to copy the Yankees 1 to 1.
In fact, there are three differences. One is negative and two are positive. Read on and decide for yourself what is better to buy for thermal insulation of polyurethane foam with your own hands: American or Russian cylinders.
PENA-mini B2 is inferior to the American Foam Kit in that imported cylinders do not require a source of compressed air. Containers with components A and B are already under pressure. Therefore, to get started, just connect the sprayer, open the valves on the cylinders and spray. The “Touch and Seal” principle in the truest sense of the word.
Our device requires compressed air, i.e. small household compressor. It is needed to create excess pressure in the cylinders. Americans pump gas into cylinders with polyol and isocyanate and seal them somewhere in Florida or California. And to a Russian in Samara or Barnaul who decided to insulate a balcony, garage, etc. with PPU with his own hands. no compressor needed. That's a plus.
If suddenly there are not enough components in the cylinders, then you need to go to a gas station. The closest ones to Samara are located in Florida, Georgia and South Carolina. California or Arizona will be more convenient from Barnaul. Or, without leaving Russia, you can always buy another new Foam Kit kit.
FOAM-mini B2 is superior to imported Foam Kit in that our installation is REUSABLE. PENA-mini B2 cylinders are filled with PU foam immediately before work, on the balcony of a house in Samara or a garage in Barnaul.
From one canister we pour component A into the first cylinder, from the second - component B into the second. And now, to get to work, you need to create excess pressure in the cylinders. This function is performed by the compressor.
Yes, a domestic product requires a source of compressed air, but the components can be added to the cylinders and used repeatedly. American cylinders are disposable.
FOAM mini is also better because it is cheaper. Domestic cylinders and components for refilling them are cheaper than imported Foam Kits.
American cylinders are expensive and can only be used once, i.e.: sprayed and thrown. Therefore, the motto Touch and Seal in relation to Russia can be clarified: Touch, Seal and Threw.
The NST company offers a reusable device PENA-mini B2 for insulating polyurethane foam with your own hands and raw materials for self-refilling.
Characteristics, pros and cons
Polyurethane foam is the result of a high molecular weight compound (polymers) of a polyol (component A) and a substance from the isocyanate group (component B). The polyol forms the skeleton of the material (the shell of the air chambers), and the isocyanates foam the material with the release of carbon dioxide. At the same time, a slight increase, just 1%, in polyol dramatically changes the density, hardness and other characteristics of the material. For comparison: foam rubber contains 2% component A, and hard polyurethane foam contains 3%.
Various additives can be added to the composition to change the properties of the insulation. For example, fire retardants reduce the flammability of polyurethane foam.
Types of polyurethane foam and areas of application
- Open cell (elastic), with a density of 10-20 kg/m³;
- Closed cell (hard), with a density of 20-30 kg/m³ and higher, up to 80 kg/m³.
Polyurethane foam will perfectly protect the room from heat loss and also cope with its waterproofing.
In elastic polyurethane foam, up to 90% of the cells are open. Its low density gives it a certain stretchability. In hard polyurethane foam, up to 98% of the cells are closed. This and its high density make it an unusually strong insulating material.
Different types are used in different fields. If we are talking about spraying on a material that can change its size - for example, metal structures that contract and expand with temperature changes - then elastic polyurethane foam is used. It is indispensable for waterproofing, for protecting the connection between the wall and the roof, for spraying on wooden and metal surfaces that come into contact with cold air from the outside of the building.
Closed cell (rigid) polyurethane foam is used for internal insulation and outdoor work. It is usually sprayed on surfaces made of concrete, cement and brick. Closed cell polyurethane foam is also used when they want to give the structure frame additional rigidity. Its high strength allows you to significantly strengthen unstable elements. Both types of polyurethane foam have many advantages, but very few disadvantages.
Negative aspects of using foamed polymer
Most brands of foam have flame retardant additives. But this does not mean that the polymer is absolutely safe in fires. Like any organic substance, at high temperatures foam releases large amounts of toxic gases, which are most often caused by fires.
The second negative side is the intense destruction of the polymer under the influence of solar radiation. Often, to lose the properties of polyurethane foam, it is enough to expose the material to the open sun for a couple of weeks. Therefore, the insulation layer must be covered with sheet plastic or fiberboard.
The worst sin in carrying out work on applying a layer of foamed polyurethane foam is violating the proportions of the components used. If the mixing chamber and flow rate are set incorrectly, for example with too much isocyanate, the foam will be very weak and hard. If it is deficient, we will get the opposite effect - the foamed polymer will not harden, will be soft, and will gradually lose its bubble structure.
What is polyurethane foam?
Few people know, but polyurethane foam (PPU), which is in demand today, was manufactured back in the last century. It was first used as thermal insulation in 1957. Since then, it has not only not lost its relevance, but has also begun to be used in other areas far from construction. It is polyurethane foam that is one of the fillers in upholstered furniture, children's toys, etc. What is polyurethane foam?
At its core, polyurethane foam is one of the types of plastics. The uniqueness of the material lies in the fact that the main percentage of the substance is gas bubbles. According to studies that have been repeatedly carried out with the finished product, modified plastic in the finished product is only 10-15%. The rest of the space is occupied by gas bubbles. As a result, the material acquires special thermal insulation and performance characteristics.
. Namely:
- A 3 cm layer of polyurethane foam is identical in thermal conductivity to 7 cm, 16 cm mineral wool, 38 cm foam block and 1 m 70 cm brick wall.
- The material can be prepared directly at the construction site or purchased ready-made mixture in cylinders.
- Tests have shown that polyurethane foam retains its performance characteristics over a range of - 150° to + 220°.
- Has high adhesion to any surface
. Using polyurethane foam you can even insulate a metal structure. - After drying, the surface can be plastered or used as a base for laying ceramic tiles.
You need to know that there are several methods of insulation using polyurethane foam. You can purchase sheet material, prepare a two-component composition yourself, or use a ready-made mixture sold in containers resembling polyurethane foam.
Parameters of sprayed insulation
It’s worth saying right away that, as with any other insulation, it is preferable to insulate the walls of buildings from the outside. If you insulate from the inside, the outer wall will freeze. How many defrosting/freezing cycles it will withstand depends on the material, but rarely will such a house last more than 10 years.
When insulating the outside with polyurethane foam, a final exterior finish is required - the surface has a very unattractive appearance. But there are no problems with freezing of the walls, the building will last a long time.
There are no problems with the roof at all. Roofing materials are designed to withstand repeated freezing, so roof insulation with polyurethane foam can be done from the inside, spraying it directly onto the “underside” of the roofing material or onto the sheathing.
Sprayed thermal insulation can be applied to any surface, and the roof can be insulated from the inside
Whether to insulate the house from the outside or from the inside, we figured it out. Now a little about the layer thickness. Insulation with polyurethane foam is usually made of large thickness. This is not due to the fact that small is not enough. Usually, just according to thermal characteristics, an insulation thickness of 2-3 cm is required, but they make it at least 5 cm. This is so that under any conditions the dew point ends up in the thickness of the thermal insulation, and not in the wall material. Since polyurethane foam is non-hygroscopic, it cannot get wet, condensation simply does not occur, and excess moisture is removed naturally due to the vapor permeability of the material.