A plastic window provides high-quality isolation of the interior space from the street, but only if installed correctly. Errors when installing plastic windows negate the efforts made and money spent.
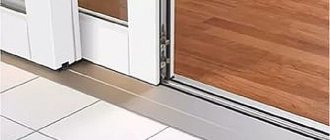
Measuring the installation depth of a plastic window.
The manufacture and installation of plastic window openings is a complex technological operation, it is performed only by an experienced specialist. However, the construction market is filled with fly-by-night companies and unprofessional workers. It’s good if a window manufacturer was recommended to you by friends.
It's good when you are confident in the quality of the work being performed. But what to do if you found the manufacturer of double-glazed windows through an advertisement or were recommended to you by people you don’t know? Here is a list of criteria that will help you evaluate the quality of window installation and promptly detect mistakes made.
Error in matching geometric dimensions
The most common mistake made when installing plastic windows is incorrect measurements. Ideal window opening measurements are made during the construction process by measuring empty window openings.
In reality, plastic windows are often used to replace old (wooden) frames. In this case, measuring the opening becomes more difficult, since old frames take up space and make it difficult to estimate the dimensions accurately. Incorrect measurements will lead to incorrect geometry of the finished frame and glass unit. How to evaluate this at the stage of installing plastic windows?
Installation on a double-glazed window frame.
The gaps between the plastic frame and the wall should be 3-4 cm. At the bottom, the gap may be larger, taking into account the required slope of the external ebb. Gaps that are too narrow will not cope with thermal expansion (with a plus, the plastic expands, with a minus, it contracts).
The frame rests against the wall, causing curvature. This will affect the decrease in durability, and possibly the appearance of cracks in the glass unit. In addition, the narrow gap is difficult to fill with foam. Because of this, unfilled holes remain, which will disrupt the tightness of the seam.
Too large gaps will not provide sufficient fastening of the frame to the wall; the structure will be shaky and unsafe.
Is it possible to fix the error? Sometimes yes, more often no. If deviations from the required dimensions are small and are directed towards reducing the width or height by a few centimeters, they can be compensated for with polyurethane foam. In all other cases, it is necessary to manufacture new plastic windows.
The main stages of preparation in a private house
Preparation can be done in 2 ways:
- using support reinforcements;
- by one-piece fastening.
Actions:
- Remove the old glass unit along with the glazing beads. Number them so that during installation they are installed in the same order, to prevent the appearance of gaps.
- Tilt the frame towards you slightly and remove the glass.
- Remove the plugs from the canopies and unscrew the bolts.
- Turn the handle to ventilation mode and open it slightly. Remove the transom so that the special jumpers for separating the sashes do not fall off the frame.
- Mark points for anchors, 2 at the bottom and top of the glass package, 3 on each side. Drill holes.
If the walls are made of cellular concrete ((in a panel house), i.e.
fragile, it is important to make fasteners from anchor suspensions. Fix to the wall with hardened self-tapping screws
If old elements (for example, metal) cannot be removed in any way, then you can saw them. Next, clean the work area from dust.
Errors in the slopes of frames and double-glazed windows
Window measurement - typical diagram.
The frame and glass unit must be installed strictly vertically. The correspondence of the frame position to the verticals and horizontals is difficult to assess visually. Only significant tilts or shifts are visible to the naked eye. Small slopes (1-2º) are unacceptable in the installation of plastic windows, as well as significant deviations.
To evaluate horizontals or verticals, a building level is used. This tool looks like a large ruler. There are capsules with air bubbles on the side and in the middle of the ruler. The ruler is applied to the surface of the frame, and the location of the air bubble is visually assessed. When the surface is horizontal, the bubble of the side capsule is located exactly in the middle. The displacement of the bubble in any direction indicates that the frame is tilting to the right or left.
To assess the vertical, look at the capsule located in the middle of the ruler. It also has an air bubble, and it should also be in the middle.
Measurements are performed for three levels:
- horizontal frame (a level is applied to one of the horizontal parts of the frame);
- verticality of the frame in the plane of installation of the double-glazed window (the level is applied to the vertical part of the frame);
- no tilt of the frame inward or outward (the level is applied to the inner surface of the vertical frame element).
Rules for installing plastic windows.
Another way to visually assess the vertical installation of plastic windows is as follows. It is necessary to open the window in various ways (swing it open from the side or open it with a window at the top) and leave it in the open position without holding it. If there are no installation errors, the sash should not change its position and be in the same place where you left it. A persistent movement of the sash towards closing or, conversely, towards opening indicates an existing misalignment.
All of the above measurements are performed by the worker. The owner (customer of the work) only needs to come up and make sure that the air bubble is in the correct position in the capsule.
What is the danger of non-compliance with spatial geometry? Even small deviations (1-2º) lead to a shift in the center of gravity and improper distribution of load in the structure. As a result, after some time the frame will warp. A sign of a misalignment is that the window opens with difficulty (or it is impossible to open it at all).
Stage 7. Window assembly
Window assemblyInstallation of plastic windows
After attaching the anchors, the glass unit is inserted back.
Step 1. The glass is inserted and fixed with glazing beads (the latter should snap into place, for which you can lightly tap them with a rubber hammer).
Step 2. The doors are opened and their tightness is checked. In the open position, arbitrary opening/closing of the sash cannot happen if the window is installed level.
Step 3. The assembly seam is sealed on the sides. Polyurethane foam will provide high-quality waterproofing and prevent glass fogging. Before and after sealing, the seams are sprayed with water to improve polymerization.
Step 4. The perimeter of the window is glued with a special vapor barrier tape, and material with a foil surface is used underneath.
Stage 8. Installation of the window sill
Window sill installation
Step 1. The window sill is cut so that it fits into the opening and at the same time rests against the lining profile. There remains a small gap (about 1 cm) for thermal expansion. In the future, the gap is hidden by plastic slopes.
Step 2. Wooden wedges are placed under the window sill. It needs to be laid with a slight slope towards the room, and then applied with something heavy until the foam dries. Additionally, the window sill can be fixed with anchor plates.
Window installed
Error - insufficient installation depth
Insufficient distance between the double-glazed window and the outer surface of the wall will result in the windows getting wet in winter. This occurs due to the condensation of warm air on the cold glass of the window. If the plastic structure is located close to the line of the outer wall (and the outer window sill is narrow), the glass from the outside is exposed to sub-zero street air.
Fastening elements for installing a window into a window opening.
The outer glass is cooling. The cold is transferred to the inner glass. Following it, the warm air of the interior cools down. When warm air cools, moisture drops out of it. Drops of water condense on the cold surface of the glass and frame, flow down, collect in puddles on the windowsill, or are absorbed into things near the window (books, toys, phones). Similar processes occur when a glass jar is brought into a house from the street. It quickly fogs up (becomes covered with small drops of water).
Features of measurements for glazing balconies
To determine the width of the glass structure, it is necessary to measure the length of the part of the balcony on which the balcony window will be installed, minus 7 cm on each side. This distance will be required for the installation of the corner profile to which the structures of the side elements of the balcony are attached. The height is calculated as the distance from the support to the roof on the balcony or loggia, and a tolerance of 3 cm must be subtracted for the gap.
Balcony measurement diagram
If the glazing of balconies will be done from the floor, then the height must be measured, respectively, from the floor to the roof. The side elements are measured in the same way, only the width is minus 7 cm for the corner profile and 3 cm for the gap with the wall of the house. Read more about panoramic glazing of balconies and loggias.
Errors in frame fastening
Places for fixing a plastic window.
The frame is attached to the wall using special mounting plates. Their number on each of the four sides should be at least two, with a total of eight on one window. The lack of fastenings impairs the stability of the window structure and increases the possibility of it falling out in emergency situations: there is a strong hurricane wind or a child leans his back on the window. Even in the absence of force majeure, the lack of fastenings will affect their warping. Over time, the window will sag, become warped, and stop opening.
The lower frame of the window is installed on the so-called stops or lower blocks. After filling the gap with foam, the pads are not removed. They bear the main weight of the structure.
Now comes the most difficult part of the test. You need to look at what is used to secure your windows to the wall. Possible options are using a plate or using a bolt. Both methods of attaching a window frame to an opening are used in the installation of swing structures. But with reservations.
The bolt (called an anchor bolt) drills through the profile completely, this happens with any rod fastening. The plate (called an anchor plate) is attached to the end with a galvanized self-tapping screw. In this case, the closed space inside the profile is not disturbed, the frame is not drilled, and the strength and durability of the profile are not reduced.
Installation of a plastic window.
The length of the anchor bolt should ensure the strength of the installation of the structure. The rod is recessed into the wall by 4 cm, plus the width of the frame is 4 cm, plus the distance between the frame and the wall is 4-7 cm.
In what cases is it important to check how the window is attached to the wall:
- if you are installing aluminum warm profiles;
- if your wall contains internal insulation.
Inside the aluminum profile there is a layer of thermal insulation. Drilling such a frame will lead to loss of thermal insulation properties. An experienced master should know this feature.
In a multi-layer wall, the thermal insulation can be on the inside (between the inner and outer masonry) or on the outside (on the supporting wall, covered with a protective layer). The internal location of the insulation does not allow screwing in an anchor bolt, since there is low-strength insulation in the middle of the wall. Attaching plastic windows to the opening of a multilayer wall is done only with anchor plates.
Methods for securing the frame
Before installing a plastic window with your own hands, an important point is the choice of the fastening method that will be used in the future. The window profile can be fixed using anchors or mounting plates. Both options have their own strengths and weaknesses, which is why before making a final preference you need to not only familiarize yourself with them in more detail, but also take into account some of the features of the room.
Initially, you need to pay attention to the material the wall is made of. If you have to install a window in a brick or panel house, then there are almost no cardinal advantages or disadvantages of using one or another type of fastening
When there is a need to install in a building made of foam blocks or aerated concrete, the more preferable option is to secure it using mounting plates.
Features of installation using anchor bolts
Anchors as fasteners are mainly used when installing large-sized window structures, as well as those that have enormous weight. With this method of fixation, the window stably resists many shock loads, which arise, for example, during the operation of windows with sashes that can be opened in two different positions. In addition, anchor bolts passing through the frame provide the opportunity to perform more precise adjustment of the verticals and horizontals of the installed window structure. If all rules are followed, such a mount is more durable, ensuring the absence of vibrations that can occur during strong gusts of wind. Another positive side is the minimal risk of sagging of the installed window structure during further operation.
A significant drawback when using them is that due to through drilling, there is a huge probability of depressurization of the chambers of the new window. Given this, an imbalance in the temperature inside them may occur. The second disadvantage of fixing the frame with anchors is the need to maintain extreme accuracy and avoid even minor defects when making holes in the profile, since otherwise, as a result of incorrect drilling, gaps may form, incomplete closure of window sashes and other negative consequences.
Features of fixing plastic windows using mounting plates
This method is simpler, thanks to which even a person who is faced with such a task for the first time can use it without difficulty. When fixing a plastic window using mounting plates, you can certainly avoid depressurization of double-glazed windows, and also save a significant amount of your time. Mounting plates are a suitable option for window structures with fixed double-glazed windows and small dimensions. Ultimately, the appearance of the window will not deteriorate, since in the future the slopes will be finished, which will completely disguise their presence.
There is also a drawback and lies in the possibility of some trembling, which can arise due to an insufficiently tight fit of the fastened components to each other, since the mounting plates are fixed to the profile, and not as when using anchors, when through holes are made in it.
Note! To attach mounting plates in an opening made of concrete or brick, it is recommended to make small recesses, thereby avoiding the need to apply an extra leveling layer before creating internal slopes.
Very often, during installation, specialists combine both types of fasteners. Fixation using anchors is carried out into the walls through the side elements of the frame and the window profile, and from above, only mounting plates are used for fastening. If the installation of a plastic window is carried out in a wooden bathhouse, then the second type of fastenings is used in rare cases, since they may become loose. In some situations, galvanized screws are used instead of anchors.
Other installation errors
Adjusting plastic windows.
- Insufficient cleaning of the opening from construction debris and other dirt. This leads to weakening of the installation and leakage of the connection between the window profile and the wall opening.
- Insufficient treatment of seams (seams are foam between the frame and the opening). At the beginning of the era of plastic windows, they were installed simply: fastenings, foam - ready! Modern installation technologies provide protection of the seam from moisture penetration. To do this, the material is provided with vapor barrier from the inside and waterproofing from the outside. The vapor barrier stops the penetration of moisture from a warm room into the foam. If moisture gets inside, it may freeze with micro-tears in the material. The vapor barrier of the seam is tape, which is used to seal the seam from the inside.
- External waterproofing protects the mounting foam from street moisture. It is done with a special tape, sealant or cement mortar.
- Limiting the seam material from any moisture (street or room) guarantees its reliable and long-term operation. The seam is covered with steam- and water-resistant materials after the foam has hardened.
- Gaps or holes in seams. Any through holes in the seams are not allowed. This leads to the formation of “cold bridges” and the blowing of cold air into the room. Possible cracks are detected visually.
- Gaps in the window sash. The presence of this defect is checked by hand; it must be brought to the dividing line of the glass unit/profile. If there is a feeling of a breeze blowing, then there is a gap. This defect is eliminated by adjusting the window fittings (rotating the eccentrics at the ends).
- There should also be no gap between the window and the window sill. If the inner window sill is laid firmly and does not move, the gap can be filled with foam or filled with sealant. If the window sill is “playing,” ask the worker to eliminate the detected defect.
The listed violations occur at the stage of installing the finished profile in the window opening. In-house inspection of the installation of a plastic window gives confidence in the quality and reliability of the work performed.
Customers always pay great attention to the choice of windows based on cost and thermal characteristics, but do not think at all about how to correctly install a window according to the depth of the opening? They naively believe that the installers of the supplier company know for sure how to do it correctly. But the fact is that most window manufacturers (they usually do the installation) do not want to “bother” with such a complex issue, so they install windows as the client wishes. For them, the main thing is to install the windows technically correctly and without complaints, and they are not at all concerned about how the window systems will work during the operation of the house. The Full House construction company, when working as a general contractor, assumes the functions of selecting the optimal window systems, preparing and analyzing several commercial proposals from trusted manufacturers (from 5 to 10 companies), monitoring the timing of window production, their delivery and, most importantly, , monitors compliance with standards and requirements for the installation technology of window systems.
Window measurements: everything you need to know
First, we determine the type of window opening.
It can be of two types: either with a quarter or without a quarter.
Taking measurements of a window without a quarter
A clean window opening is the easiest to measure. Such an opening is found only in a new house. We measure the opening itself in the vertical plane and subtract 5 centimeters from the resulting figure. We have height. Of these 5 centimeters, 1.5 centimeters will be filled with mounting foam at the top of the window, and 3.5 centimeters will be laid for installing the window sill. Similarly, we measure the opening in the horizontal plane, subtract 3 centimeters for the gaps (1.5 cm on the right and left) and get the width of the window.
Next, measure the length and width of the ebb and window sill. To the resulting dimensions you need to add from 5 to 20 centimeters in order to “embed” the window sill a little into the wall on both sides. If you are getting down to business for the first time, then set the size of the window sill larger - during installation, all excess will be cut off. As a rule, window sills and ebbs have a standardized width (10-60 cm) and length (up to six meters). Having minimal dimensions, installers will be able to select and deliver the most suitable parts.
We take measurements of the window and a quarter
Width: measure the opening in the horizontal plane between the quarters and add three centimeters to the resulting figure (one and a half centimeters on each side). Height: measure the distance from the bottom edge of the opening to the edge of the top quarter. There is no need to add or subtract anything from the resulting figure.
The window sill and ebb are measured, as in the first option.
As a result, after all the measurements made, we should have written down:
- window height and width;
- length and width of the ebb;
- length and width of the window sill.
When replacing old windows, the previous structure is located in the opening, which means that the opening itself cannot be measured. Therefore, it is necessary to take measurements from the window frame, which will subsequently be dismantled.
When ordering a window, try to find out what comes with the windows. Typically the following elements are included:
- windowsill;
- end caps. To choose the right plugs, you need to indicate the width of the window sill (the protruding part from the wall);
- installation profile;
- anchor plates – structural fastening elements.
If these parts are not included in the kit, you will have to purchase them additionally.
In addition to dimensions, other data may be required:
- profile type (number of cameras);
- double-glazed window option (number of glasses and air chambers);
- type of opening window sashes. The most common: swing, tilt and turn with ventilation, combined. In addition, in some cases, blind windows are installed that cannot be opened. The type of opening is determined by the fittings installed in the structure. The ease of use, functionality and durability of the window depend on the type and quality of the fittings. There are several types of window openings. For convenient ventilation, the window should be equipped with tilt-and-turn fittings. Blind versions of the sashes are unsuitable for ventilation; conventional hinged sashes without turning are inconvenient.
Correctly install the window according to the depth of the wall
This must be taken into account so that condensation does not form on the inner surfaces of glass, window frames, and slopes in your home at subzero temperatures, which leads to fogging of the glass, wetting of window structures and interior finishing of slopes, as well as the formation of ice. The location of the window block should be determined by the designer, taking into account the structure of the wall, the type of wall material and based on the calculation of isotherms - lines connecting points in the wall with the same temperature. In winter, the structure of the external load-bearing wall on a straight section is homogeneous in terms of thermophysical indicators, the isotherms are directed parallel to the wall surface, the heat flow moves from the premises of the house outward perpendicular to the isotherms.
In the outer corners of the house, around window and door openings, the temperature distribution is uneven. As you approach the window, parallel isotherms begin to bend, tending to the junction of the window frame and the opening. At this point, the temperature of the wall decreases, and there is a risk of cooling to the dew point, at which moisture begins to condense on the slopes and window structures.
At troom = +20 0 C and humidity = 50%, water vapor begins to condense upon contact with a surface with t 0 C
The temperature and humidity of the air in the house can fluctuate (t = 18-22 0 C, humidity = 40-60%), therefore, to calculate the connections of building structures, they are guided by the 10 ° C isotherm. To prevent condensation from forming, the 10°C isotherm must pass inside the building envelope. Therefore, windows in openings are shifted to the zone of positive temperatures or the junction area is insulated.
Purpose of casing and its types
The tree reacts to drying unevenly. The linear dimensions change most of all across the direction of the fibers, while the longitudinal dimensions remain almost unchanged. When a wooden house made of logs or beams shrinks, the height of the wall and, accordingly, the height of the openings (windows, doors) decreases. To prevent the window from “shrinking” and its movable sashes from jamming, install a rough wooden frame - casing.
It compensates for the effect of shrinkage due to the following factors:
- sliding method of vertical fastening to the wall in the opening;
- the gap between the top board of the rough frame and the top rim of the opening itself;
- using exclusively dry wood for staking, which has already passed the drying stage.
There are different types of sockets, differing in the way they create a sliding fastening. Although the basic principle of fixing the casing frame in the opening is the same - it is a “tenon and groove” type connection.
The following options can be distinguished:
- Grooves are cut at the ends of the side walls of the opening.
The casing frame is made in advance from ordinary planed boards. Embedded bars are prepared for it, the cross-section of which should be less than the width and depth of the groove.
The bars are placed in grooves so that they slide freely in them. The casing frame is attached to the bars.
The advantage of this method is its ease of manufacture. Disadvantages are the gap between the embedded bars and the casing, as well as the risk that the screws may come out from the side of the block and jam it in the groove of the opening. - Grooves are cut in the side walls of the opening. For the side posts of the casing frame, a profiled block with a “T-shaped” section is used.
The frame is assembled on site (in the opening itself), placing the pins of the side posts into the grooves of the opening. The advantage is the absence of gaps in the casing frame. The disadvantage is the complexity of assembly. - Spikes are cut into the side walls of the opening.
Grooves are made in the side posts of the casing frame. The casing is assembled on site.
The advantages and disadvantages are the same as in the second option.
If we talk about the inside of the casing frame, it can be the same as the window opening of a brick house - smooth or profiled (with a quarter).
This part of the casing determines the method of installing the window itself.
Basic requirements for the location of the window in the opening
- In a 1-layer wall made of wall materials such as aerated concrete (AEROC, H+H, YTONG); large-format porous bricks (RAUF, POROTHERM), expanded clay concrete blocks (Polarit Comfort), which meet the requirements for thermal protection of the window, are installed in the middle of the opening.
- In a 2-layer wall (bonded thermal insulation system), windows are installed closer to the outer surface directly behind the insulation.
- In a 3-layer wall, windows are installed in the plane of the insulation.
Constructive solutions for installing window openings in walls made of large-format porous bricks
- When installing a window with a narrow profile, it is necessary to insulate the slopes of the opening to a width of ½ the thickness of the outer wall. The location of the window in depth does not matter, but no closer than ¼ of the wall thickness from the outer surface of the wall.
- When installing a window with a wide profile, it is enough to plaster the slopes and not insulate them. Window location in depth - the outer plane of the window should be within ¼ and ½ of the wall thickness.
- When installing a window with an emphasis on the outer quarter of facing bricks, it is necessary to insulate the slopes to a depth of at least ½ the thickness of the main layer of the wall.
- When installing a window into a wall with external insulation and facing bricks, the window block is located in the plane of the insulation. There is no need to additionally insulate the slopes if the thermal resistance of the insulation is more than half the total resistance of the structure.
- When installing a window into a wall with external insulation and facade plaster, the window block is located immediately behind the insulation.
If you decide to change the plastic windows yourself, then you should carefully approach the installation process. It may take an inexperienced specialist up to four hours to dismantle old structures and install new ones. Whereas an employee of a specialized company will complete all the work within an hour. It is also worth considering that double-glazed windows with a tilt-and-turn mechanism must be installed with a partner if you do not have certain skills.
Replacement technology
Even if the glass is cracked in a two-chamber design, we still recommend replacing the entire glass unit. It's all about tightness, which can be broken if done ineptly, and then the window will cease to perform its functions. You will also see that condensation forms on the glass, which will cause new troubles regardless of any temperature difference.
In principle, the company itself can also replace only one glass, but under different conditions. The entire structure will be removed and taken for repairs, while the tightness will be restored under production conditions. This will only slightly reduce the price, in the absence of a guarantee.
Do-it-yourself repairs are also possible. If you don't have a lot of free time, then do the following.
- Remove the glazing beads. This can be done using a chisel;
- Pull out the structure and take accurate measurements of the glass;
- Unfold the glass so that the one that cracked is on the inside, in the room;
- Return the glass to its place;
- Secure again with glazing beads.
Complete set of window systems
Before installing plastic window structures, it is necessary to study all aspects and details of the assembly. To do this, you need to decide on the names of the components. The supporting part of the structure is the window frame. Window production technology involves the use of a plastic profile, which can be found in several modifications - three-chamber, five-chamber, etc. The stiffener in this design is located in the center. A special insert is responsible for the strength of the glass unit, which, depending on the class of windows, can be made of plastic or metal.
The profiles offered on the domestic market have a clear gradation into classes, each of which differs in build quality and cost of the blade. There are economy, middle and premium classes. There is also a large selection of colors available. Plastic windows can be not only white, but also other shades, or made to look like wood. However, double-glazed windows made of colored profiles differ significantly in cost.
How to expand or reduce?
Expanding the window opening may be necessary in the following cases:
- incorrect calculations by the designer, mistakes by builders;
- redevelopment during construction;
- installation of another type of windows.
The first thing to do is to make sure that the expansion will not affect the strength of the wall. You can remove the excess both in length and in height (in this case, dismantling of the reinforcement will be required).
Tools:
- building level;
- marker;
- ruler 2 m;
- hacksaw, saw (manual or electric) for aerated concrete;
- chisel.
How the process works:
- Draw a mark along which the blocks will need to be dismantled later.
- Cut the seams vertically using a saw.
- The outermost block is removed first (for the side of the opening this is the top one). Use a chisel to knock out the vertical seam. Brittle aerated concrete will not withstand impacts and will break in the right place. Possibly with a piece of an adjacent block.
- Cut off the remaining parts.
- Clean the surface and remove debris.
To dismantle the fittings you will need a grinder. First, the block is cut with a saw.
Why you may need to build up a wall in a window opening:
- raise the window sill;
- builders' mistakes;
- redevelopment.
Tools and materials:
- hacksaw for aerated concrete;
- solution container;
- solution;
- trowel;
- rubber mallet;
- building level;
- plane.
Wall building process:
- Carefully calculate the required block sizes and cut off as much as needed from a large element. Clean, remove any unevenness.
- Place new blocks on the glue, maintaining the order.
- If necessary, reinforce again (for example, on the first floor of a 2-story building).
The increase in window opening is described in the video:
What are plastic windows made of?
Studying modern window products, we can identify the following components of a plastic window:
- frame – is an important structural part of the product;
- double-glazed windows – have a wide range of characteristics. They can have several layers, and also be tinted, energy-saving and reinforced;
- Glazing beads – allow you to fix glass in any position. Rubber seals are also used to provide additional density;
- fittings - includes a set consisting of rotary and folding devices, hinges and other devices;
- drainage holes - allow accumulated moisture to escape;
- ebb tides - installed from the street side;
- slopes - this design is a decorative element and allows you to hide building fastenings.
How windows are installed
It can be cold and uncomfortable in an apartment or house just because the windows are installed incorrectly. This is accompanied by moisture and mold formation in the window area. Such phenomena are not difficult to eliminate, but it is better to prevent them during installation and do everything correctly. When installing windows, it is important to ensure long-term reliability. The frame should not move over time, and the seam around the perimeter of the window should not collapse.
How to install windows correctly so that they do not get wet and heating energy is not wasted? Next, there are several design diagrams and rules for installing windows.
Installation steps
- Measuring the opening, determining the required dimensions of the window frame and the gaps along its contour.
- Order a window. Choosing a suitable window design.
- Preparing the opening for installation, cleaning, removing debris and dust, priming for plaster.
- Determining the location of the window by the depth of the opening.
- Preparation of spacers and beams.
- Installing the window frame on the backing beam, checking the position with a level, wedging with spacer pads.
- Fastening the window frame in the opening with anchors.
- Hanging sashes, adjusting fittings.
- Filling the seam along the contour of the window frame.
What is the recommended gap around the perimeter of the window?
It is necessary to leave a certain gap between the window frame and the opening, the width of which will directly depend on the size of the window. The gap data is given in the table.
In most cases, it is recommended to rest the window frame on a backing beam. It will redistribute the loads from the frame to the base. A metal-plastic (aluminum) profile is also used for metal-plastic frames. For wooden frames, dry wooden beams impregnated with an antiseptic are used.
For this purpose, a gap thickness of about 4 cm is provided at the bottom.
The frame is reliably wedged in the opening using spacer wedges. As such, it is necessary to use a material that does not swell and does not shrink. More often it is wood impregnated with an antiseptic. Distance pads should be installed opposite the crossbars and imposts to prevent the profile from bending.
Alignment according to wall depth
The inner surface of the window should be at an isotherm of +14 degrees. and warmer. The dew point in calculations is assumed to be about +10 degrees, which corresponds to a room temperature of approximately +21 degrees C, and a humidity of +50%.
To ensure that heat loss through the window unit is minimal and dew does not appear on the windows, the following depth for placing windows in the wall is recommended.
- for a single-layer wall - in the middle line of the wall;
- in a two-layer wall, insulated in accordance with the requirements of the standards, along the border of the load-bearing layer and insulation;
- in a three-layer wall - opposite the insulation layer.
After taking measurements, determining the position line of the window in the wall, cleaning and preparing the window opening, they proceed directly to installing the window.
Operations before fastening
The assembled window is disassembled, the sashes and double-glazed windows are removed, and they are made as light as possible to simplify operations.
The frame is leveled on the backing beam, propped up with temporary wedges and spacers. If there is (leave) a quarter in the window opening, provide a small gap between the frame and the quarter, for convenient, reliable sealing of the seam from the outside.
Spacers are left in the seam, positioned opposite the crossbars to prevent the profile from bending (up to 20 cm from the crossbars is allowed).
The position of the exposed frame is checked again, the diagonals are compared. If during construction several windows are installed in a row, then it is important to maintain a single elevation mark so that the building does not lose its appearance.
When the position of the window is verified and the frame is securely wedged, proceed to attaching it to the wall.
Securing the window in the opening
Fastening the window in the opening is often done using anchor plates, which are then hidden under the finishing of the slopes. The spacing of the plates is usually up to 70 cm for a white metal-plastic profile (50 cm for a colored one) and up to 80 cm for wooden and metal frames. In practice, depending on the linear dimensions of the window, installers, for reliability, reduce this value to 40 - 60 cm.
The anchor plates are fixed to the wall with dowels.
Anchor plates are selected individually for each type of profile and attached to the frame before it is installed in the opening.
When installing the frame in the opening opposite the insulation, it is attached to a metal corner.
Another method of fastening is directly through the frame with a dowel. But it is rarely used, since this violates the integrity of the profile, its thermal insulation qualities, and possible accumulation of water. It is mainly used when fastening several frames in one window to each other.
With a relatively large opening width, to increase rigidity, a metal profile (bone) stand is installed between the individual frames, to which the frames are attached with dowels. The specific largest dimensions of the opening without a reinforcing profile depend on the design of the window and are recommended by manufacturers.
When screwing the frame dowel, do not apply great force so as not to bend the profile.
An example of the design of a window opening in a single-layer wall made of large-format weak blocks is shown in the figure.
Seam seal
Proper sealing of the seam is especially important, since the filling material is polyurethane foam, which is destroyed under the influence of water and ultraviolet radiation.
Polyurethane foam fastens the window frame to the wall, fills and seals the seam, and also thermally insulates the seam itself and the frame from the wall.
If the integrity of the seam filling is destroyed due to exposure to water or misalignment of the frame, drafts will occur, cooling of the slope and frame, their wetting, and the development of mold.
On the outside, the polyurethane foam is insulated from the weather and the sun by a material with high vapor permeability. Experts recommend using a special vapor diffusion tape PSUL.
From the inside, the polyurethane foam is insulated with a composition that is impermeable (difficult to permeate) to steam. It is recommended to use a special vapor-tight membrane.
The use of such materials for sealing the seam will avoid an increase in humidity in the seam and steam condensation at the dew point.
If you follow these simple rules, then installing windows yourself should be successful. When building a house, it is advisable to install wooden frames after all the wet finishing processes have been completed and the house has dried out a little. But the slopes will have to be completed later, again inviting master plasterers.
How to prevent fogging
Fogging of slopes and frames often occurs due to their cooling under the influence of a draft through the seam along the window contour. If the vapor exchange in the polyurethane foam has been disrupted and it has become moistened and destroyed, then the seam must be re-sealed. The finishing is removed, the remaining polyurethane foam is removed, after which re-foaming is carried out, and the seam is fenced according to the rules.
Installing a window close to the outside, in a cold part of the wall, cools its surface. In this case, dew will form on the windows at lower temperatures and humidity levels inside the room. A significant displacement of the window into a cold zone, or a violation of the thermal insulation properties of the double-glazed window, will lead to the fact that dew will form on the window even under normal indoor conditions - +22 degrees C and 60% humidity.
But the appearance of dew on properly installed windows indicates an excessive increase in humidity in the room, as well as temperature. For example, at +24 degrees C and 80% humidity, the dew point will be +20.3 degrees C, i.e. In winter, in such conditions, any window, as well as slopes, and possibly walls, will fog up. More information - dew point in the wall
stroy-block.com.ua
Is it possible to perform installation according to GOST without outside help?
Installation of new window frames, contrary to existing opinions, does not cause any difficulties not only for professionals, but also for amateurs. To complete the installation, you will need to prepare construction tools and purchase the necessary equipment. The whole process, depending on the skills, can take from one to three to four hours.
The installation technology requires strict adherence to the instructions for dismantling and installing the canvas. However, it is worth considering that if you refuse professional installation, you will lose the warranty period and free service in case of breakdown. That is why it is often beneficial to work directly with the manufacturer, bypassing intermediaries. If you decide to carry out all stages of the work yourself, the manufacturer of plastic windows will not revoke the warranty on the product, unlike third-party organizations.
Depending on the type of building, the depth of the mounting bolts that hold the window frame in the opening may change. There are various methods of fastening when installing the canvas in brickwork, concrete or wood. Therefore, to determine the mounting depth, it is necessary to rely on the measurements taken.
When placing an order for plastic windows, you need to provide the following parameters - the width and height of the canvas, the width and length of the slopes and window sills. During work, you must always measure the narrowest part. If the opening shows different values, then you should rely on smaller parameters, adding 3 cm to them. If the opening is level, measurements before installation are carried out slightly differently - 3 and 5 cm must be subtracted from the obtained width and height values, respectively.
Step-by-step instructions for correct measurements
When you place an order, you will be asked to indicate the following dimensions: the width and height of the structure, the width and length of the slope and window sill.
Before you start measuring, do not miss an important point - what type of opening you have: with or without a quarter. Look carefully at the window opening: if the outer part is narrower, it means there is a quarter-sized opening in front of you . The measurement is carried out as follows: you need to measure the narrowest part, you will need to measure in several places, find the smallest value, add 3 cm to it. The height is indicated as it is. If your opening is even, then the measurements are done as follows: after measuring the width, subtract 3 cm; Having measured the height, minus 5 cm. Read a detailed article about measuring windows.
Before taking measurements, you need to determine the type of window: with or without a quarter
To determine the size of the window sill, you need to add about 10 cm to the width of the opening inside the window. For low tide, the same is done, only along the outer part of the window. Everyone chooses the width for the window sill for themselves: it is better if it protrudes slightly beyond the radiator.
In addition, when placing an order, you need to decide what components your design will be made of: what options for two-, three- or single-leaf windows you need, how they will open, on which side the capercaillie is located. Don’t forget to decide on the type of fittings (handles, locks, ventilation mechanisms).
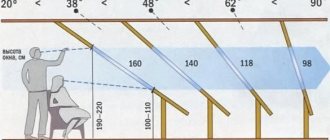
If you order several designs at the same time, the width of all openings may be different, but the height should be the same; you must choose the smallest size. Please note that window openings can be located at different distances from the floor. In apartments, the distance from the floor to the window is approximately 80 cm, while on the balcony the windows can be from the floor. Accommodation in a private house can generally be anything at the discretion of the owners.
Preparation for installation of plastic windows
Having dismantled the old window frames, it is necessary to carefully examine the resulting opening, clean it of dirt, and remove all elements that could collapse when installing a new panel. Protruding parts of the wall should be removed. If the depth of individual sections of the opening is too deep, it is worth covering them with a special solution.
In addition to surface treatment, preliminary work is also carried out on plastic windows. For convenience, it is necessary to remove the window sashes, or remove double-glazed windows when installing large frames. When installing small structures, this procedure may not be performed.
Where do you recommend going for professional window installation services?
Installation of wooden window structures requires the performers to have certain knowledge, skills, and possession of special tools. Such work must be carried out by highly qualified specialists. To avoid mistakes during installation, take a responsible approach to choosing a contractor, study the market, read reviews on the Internet, and ask for the opinions of friends and acquaintances.
The Oknabau company has been professionally manufacturing and installing wood windows for over 10 years. We have our own production and the best European fittings. We use natural, environmentally friendly materials. We carry out any tasks quickly and efficiently and implement the most daring creative ideas.
Instructions for installing window frames
Installation in the opening requires the use of mounting blocks on which the plastic window is placed to the required depth. After the frame is secured, use a level and align the glass unit vertically. If you are working with blind types of structures, then the entire installation process will be no different.
Depending on the type of building, installation in the opening can be done in several ways. In the first case, the exposed window frames are drilled through. An anchor bolt is inserted into the resulting hole and driven to the required depth. This technology is characterized by high fastening strength, however, performing such work significantly increases the installation process. The second method involves the use of anchor mounting plates that are installed on the window profile and wall. The installation depth in this case can be controlled using fasteners. This method takes much less time, but cannot boast of installation quality. Due to the flexibility of the plates and the shallow drilling depth, window frames can become deformed during operation in strong winds and subsidence of the house.
The installation depth of plastic windows is directly related to the wall material. If the house consists of foam blocks, bricks or concrete, then the canvas should be located 2/3 of the depth from the inside of the opening. If the walls of the house are insulated with any material, it is necessary to install and fasten plastic windows up to the insulation material. When the insulation is installed and the brick lining is installed, the window frames are fastened in the area where the insulation is located. In order for the mounted structures to withstand the entire service life without deformation, it is necessary to choose the correct installation depth.
The entire installation process can be divided into the following stages:
- aligning the frame in the opening to the required level depth using support blocks;
- fastening the structure to the wall;
- assembling a plastic window;
- checking the opening/closing of the doors and the operation of other mechanisms;
- sealing the frame in the window opening. Polyurethane foam is used, which is poured to the entire depth of the opening.
In order for plastic windows to last a long time, after installing and drying the construction foam, it is necessary to protect the installation seam. To do this, you will need to install ebbs and window sills on both sides, as well as make slopes. Having followed all the recommendations, you should not open the windows for 24 hours. This will allow the structure to take the required position without violating the tightness of the foam.
For high-quality installation of ebb tides, there are a number of rules that should be followed:
- The ebb is mounted from the street into a special stand profile, which is located at the bottom of the frame. In order for the structure to be securely fastened, it is necessary to tighten the screws to the required depth;
- installation of a window sill has its own specifics - the canvas is cut so that it can fit in the opening of a plastic window, reaching the end of the profile;
- both structures are installed on pads and leveled using a level, then the resulting space under the elements is blown with foam and filled with putty to the full depth.
Preparatory work
Before carrying out them, first of all, from the room in which the plastic window is to be installed, it is necessary to remove furniture and other objects that can interfere. Anything that cannot be removed and may get dirty should be covered with plastic film using masking tape. It would also be a good idea to protect the finishing of the walls and floor near the window opening using the specified materials if they are not expected to be replaced in the room in the near future.
Preparing the window opening
As a result, in the area of the opening, before installing a plastic window, it is imperative to remove the paint, as well as remove all debris and dust. If the installation is carried out in a wooden house in a previously used box, then before carrying out the installation work it is necessary to plan off its top layer, which was subject to various kinds of adverse effects during the previous period of service. If you are not completely confident in the quality of the top coating, and there are concerns that peeling will occur over time, then it is better to remove it.
When the house is not made of wood, it is necessary to ensure that there are no protruding elements, which can be removed using appropriate hand or power tools, as well as potholes, cracks and crevices in the opening area. If areas with such and similar damage are detected, it is necessary to level them using ordinary cement mortar. As a result, it is necessary to achieve maximum evenness of the opening, since this has a significant impact on the ease of further installation. Upon completion, all debris and dust generated during the preparatory work should be removed.
Preparing a plastic window
It must be done in the following sequence:
The first step is to pull out the pin, which is inserted into the upper hinge, thanks to which it will be possible to separate the sash from the frame
To do this, you need to carefully pry it up at the bottom using pliers and a screwdriver. Further, with a slight perfect lifting, it is necessary to remove the sash from the lower hinge. If you are going to install a blind plastic window, then you should remove the double-glazed windows from it, which is why you need to remove first the longitudinal and then the transverse beads in advance
To remove them, you can resort to using a knife or spatula, the tip of which must be carefully placed in the gap and slowly moved to avoid damaging the glass.
Important! You can install a small plastic window without removing the sashes or double-glazed windows if you use mounting plates to fix it. If possible, it is better to avoid violating the integrity of the structure by leaving it in its original form.
- At the next stage, you need to lean the glass unit or sash at an angle against the wall, placing it on a flat surface, on which you must first lay cardboard or other soft material.
Note! It is strictly forbidden to place a double-glazed window or sash flat, or to place it at an angle, since even a small pebble that may be under the base can lead to the formation of cracks.
- Next, remove the protective film from the outside of the frame. If this is not done in advance, then in the future it will be much more difficult and you will need to resort to the use of special means, for example, using a hair dryer.
- Next, regardless of the type of fasteners by which the fixation will be carried out, it is necessary to mark the places of their future location. Experts recommend keeping a step of 40 cm or slightly less, and in accordance with the standards, the distance between them should not exceed 70 cm. According to the standard, a space of 15 cm is required from the corners and impost. When using mounting plates, they must first be screwed before installation work. to the frame with self-tapping screws. If anchors or long self-tapping screws are used during fastening, then holes must be made for them. To do this, you need to use a metal drill, with which you need to work on the outside of the frame.
At times, you can hear from some specialists about the need to paste the PSUL protective film before installing a plastic window, but often people who install it with their own hands encounter inconvenience and argue that it is more prudent to fix it after the process is completed.
Mistakes a newbie can make
There are many stages of work where an inexperienced worker can make a mistake. This often happens when determining the planting depth of the canvas, choosing fasteners, as well as when sealing plastic windows. In order for new window frames to last for a long time, it is necessary to take into account some features:
- installation with glazing beads outward is not carried out, since this negatively affects the safety of the structure - such a canvas can be easily dismantled from the street;
- special attention should be paid to the depth of the frame - an incorrectly positioned canvas can let in cold air and extraneous noise from the street;
- leveling the structure is a mandatory stage of installation - if installed incorrectly, the process of opening and closing the glass unit will be disrupted;
- polyurethane foam must be protected from ultraviolet radiation, otherwise it loses its properties and cracks, which breaks the tightness;
- The structure must be secured not only with polyurethane foam - anchor bolts are used to securely fix the canvas.
If you follow the technology for preparing the window opening, the correct choice of the seating depth of the canvas, the specifics of fastening, and other installation rules, you will be able to install the structure yourself without fear for the result.
| Article rating: |
Preparatory work before installation
Before installing a new window, you need to dismantle the old one. This is done in stages. First, the glass is removed from the window frame, after using a chisel to pry the glazing beads that hold it in place. If this is not done during installation, the glass may break and injure you. Next you need to cut the frame. This can be done either with a regular saw or with a grinder. However, it is worth remembering that the grinder can only be used if you have a diamond disc or a concrete disc. To avoid injury, it is strictly forbidden to use discs on wood and metal. Having cut the frame into pieces, you can begin to dismantle it, armed with a hammer drill, crowbar or nail puller.
The next step is to remove the old window sill and flashing. If they are wooden, then the same principle is used for dismantling as for the frame. The window sill or ebb needs to be cut into several parts and pulled out one by one. With a concrete window sill, things are somewhat more complicated. It can only be removed by first breaking it into pieces using a jackhammer.
Having gotten rid of the old window, you can begin the final preparatory work. The window opening must be thoroughly cleaned of construction dust and debris generated during the dismantling process. This can be done using a regular vacuum cleaner. It is also worth removing the remnants of old insulation and polyurethane foam.
After all the work carried out, the surface of the window opening must be treated with a primer. Next, a so-called stand profile is installed at the bottom of the future window, to which the glass unit itself will be attached in the future. The profile is secured using polyurethane foam.