Protecting the window opening is a mandatory action after installing a plastic structure.
It is necessary to take a responsible approach to the choice of material.
This will increase the service life of the slopes and the performance characteristics of the entire block.
Let's take a closer look at metal slopes and their installation on PVC windows.
Can installation be done outside?
slopes on plastic windows , especially outside . They will qualitatively protect the foam from exposure to ultraviolet radiation and protect the material from destruction. As a result, the window structure lasts much longer and no unnecessary expenses are required for reconstruction.
If the external slopes of the window are made with high quality, then the internal decoration may not be necessary.
On the outside you can use plastering, sandwich panels, metal slopes.
Metal is not suitable for the inside due to the high degree of noise it produces.
But for the facade part this is the most profitable option :
- does not burn;
- tolerates any weather conditions well;
- reliably isolates the opening from external influences;
- provides reliable sealing of the opening;
- When coated, it exhibits high corrosion resistance.
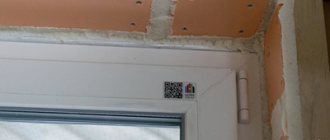
Important! Metal slopes should be installed immediately after installing a plastic window.
If for some reason this is not possible, then you need to cover the foam with plastic wrap. During installation, it is recommended to simultaneously install a special noise-absorbing tape to reduce sound effects.
For internal slopes it is recommended to use aluminum composite. This is the name of a sandwich panel made of two aluminum plates with a polymer layer between them.
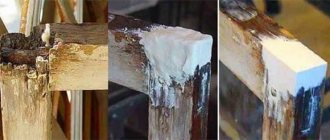
Manufacturing nuances
The production of metal protection has been actively developing in our country since Soviet times. The technology is being improved, so each such product is reliable and has a long service life. Today, you can mainly find galvanized slopes, which are made from steel of the same name, resistant to corrosion processes. The inner side of the steel is covered with a layer of soil. A special polymer coating is applied on top of the product to enhance its strength. The structure resembles a metal tile or corrugated sheet: a layer of zinc guarantees protection against rust, and polymer powder paint prevents mechanical damage to the zinc.
The production of slopes occurs only after the completion of the measuring stage, because the width and height of the product must correspond to the opening from the inside and outside. The side segments, as well as the upper and lower parts, are simply cut out from a sheet of metal prepared in advance, focusing on the collected dimensional data. The optimal thickness of the steel sheet is also determined by the parameters of the opening, but also by the required degree of rigidity. Thin metal is more often used - no thicker than 0.55 mm.
Requirements
Products must meet the following specifications:
- Be durable. To do this, you should choose a material with a high-quality coating.
- Match the style and design of the glass unit and the building as a whole.
- Fully perform the functions of protecting the window opening from moisture and cold.
Among the regulations, it is necessary to follow GOST 30971-02, GOST R 52749-2007, SNiP 3.04.01-87. If you decide to entrust the installation to professionals, then you need to conclude an agreement. It must contain a paragraph indicating the regulatory documents that guide them in the process of work.
Video description
An option for professionally made drip sill is shown in the following video:
The side parts of the drip bent upward will allow you to avoid through gaps during installation and will prevent water from penetrating into the opening. Moreover, during installation they are covered with slopes.
The manufactured part is screwed to the bottom of the window frame. It is first recommended to apply a layer of liquid nails directly to the joint. They will completely close the gap between the window frame and the ebb. The lower part of the cladding is also fixed on the vertical walls of the opening. Fastening is carried out through previously created side bends.
What metal are they made of?
The main material is galvanized steel with a protective coating . A decorative polymer composition, such as plastisol or pural, is used as protection. Polymers are necessary to protect metal from corrosion. Copper or aluminum slopes are also used.
Aluminum
Aluminum products are characterized by rigidity and ease of installation. The advantages of the material include :
resistance to mechanical damage;- high-quality tightness;
- strength;
- durability;
- versatility of use - aluminum goes well with buildings made of different materials;
- aesthetics;
- precise convergence of corners;
- fire and sanitary safety.
Note. Among the disadvantages are high thermal conductivity and cost. Also, not all manufacturers can offer this option.
Steel
The most popular material for the manufacture of metal slopes. Its advantages include :
- long service life;
- ease;
- high-quality sealing;
- strength;
- maintainability;
- fire resistance.
Cons: cost and sound effects.
Copper
Copper slopes look very presentable and have the greatest durability . However, it is impossible to make slopes from them for windows of non-standard shape and it is necessary to take measures for sound insulation.
Briefly about the main thing
To design a window or doorway, metal sheets made of galvanized steel with a polymer coating, less often aluminum or copper, are used.
Installation of the canvases is carried out using self-tapping screws in the following order: ebb, side walls, top.
The space between the metal and the opening is often filled with low-expansion polyurethane foam; penoizol and basalt slabs are allowed for insulation.
All joints in the structure are sealed with silicone compound for external use.
Tools and Supplies
In order for the process to go quickly and the result to be high-quality, you should immediately prepare all the necessary tools and equipment.
For installation you will need:
- square;
- roulette;
- screwdriver or drill;
- construction level;
- hammer;
- perforator;
- construction knife;
- metal scissors;
- foam mounting gun;
- putty knife;
- marker or construction pencil;
- chisel.
From materials:
- Set of slopes. This can be a whole sheet of metal or special panels.
- Sealant. It is recommended to take silicone.
- Finish bar.
- Polyurethane foam;
- Self-tapping screws. Their color should match the shade of the metal.
- Putty.
- Soundproofing tape. It will help reduce noise from wind, rain or hail.
Important! It is imperative to check the quality of the metal profile for slopes and its quantity.
Basic rules for carrying out work
Do-it-yourself window siding will be done slightly differently depending on the design of the window opening. As a rule, windows in our houses are made according to several standards:
- According to European standards, slopes are less than 19 cm. Then the size of the window strip will be standard - up to 22 cm. It is very easy to attach with your own hands, even by non-professionals - for this they use a finishing profile into which the strip is inserted. The finishing profile can even be replaced with a J-profile and bevel, which will help reduce overall costs.
- According to Russian standards, slopes are more than 19 cm. For such windows, you will need a J-profile placed near the frame. An outer corner is mounted around the perimeter of the window, into which the siding panels are inserted.
- Windows without a slope - a casing must be installed, and then siding is attached to it.
- An arched window requires the use of a flexible J-profile. A regular one will do, but it will need to be cut a little - in those places where the shape of the window bends.
To attach siding around window openings, it is recommended to use standard metal profiles.
The process of designing a window opening begins with installing a starting strip. After this, serial installation is carried out, with each row carefully adjusted to the grooves of the previously installed ones. If a standard size plank cannot be installed in the slope, the sheet is cut to the required dimensions.
Installation diagram of window profiles for siding finishing
After the entire area of the slopes has been sheathed, additional accessories are installed. However, these elements are completely optional - all their functions are performed by standard siding.
Work is being carried out in a special way to cover the arched window opening. Here you will need a special elastic profile. It is secured with nails or self-tapping screws around the perimeter of the window opening. Next, sheathing is carried out - always observing a 15-cm step. Where the siding touches the supporting profile, the strongest possible fastening is ensured - no gaps are left for expansion in arched windows.
If the emphasis is placed on window openings in the design of the facade, then the finishing is done with platbands 6.2 cm wide. If the design of the slopes implies “invisibility,” then preference is given to a narrow J-profile. However, you can independently choose the option that suits you best in terms of decor and price.
Installation features
The main difference between installing metal products is cutting the material yourself. The very first and most important step during installation is measurements. They make it possible to correctly cut out parts for framing. You will need to measure the length and width of the contours of the window opening. External dimensions are recognized by the wall, and internal dimensions by the contour of the window.
All parts must be measured very accurately ! This will prevent the appearance of cracks at the joints of the elements. At the same time, increase the size of the upper cornice and ebb by 15 cm for a uniform protrusion beyond the structure.
Experienced craftsmen advise beginners to transfer the dimensions onto paper, for example, a sheet of Whatman paper, and attach them to the openings. If the dimensions are correct, then the parts can be cut out using a paper blank.
The next stage is cutting the product. To do this, you need to record the measurements on a sheet of metal or on a special strip, and cut the parts with metal scissors. Then :
- Immediately before installation, excess polyurethane foam should be cut off. A stationery knife is used for these purposes.
- Remove all debris and blow off any remaining foam.
- Fill the seams with silicone sealant. This is necessary for high-quality waterproofing of the window.
Another feature of installing metal slopes is that you need to start by installing the ebb . You will need a building level and soundproofing tape, which is placed inside the ebb. It is laid first and covered with a metal product on top.
The ebb should be screwed to the frame with self-tapping screws and pressed down with a heavy object. This must be done so that the lower slope does not subsequently raise all the others.
Further actions consist of installing the side elements, the top one is installed last. All cracks that are noticed must be immediately filled with mounting foam and treated with sealant. Before installation, lubricate the parts with foam.
Important. During operation, be sure to apply sealing tape to prevent freezing.
You can install metal slopes on plastic windows yourself. The main attention should be paid to the correct calculation of the material, measurements and cutting of parts. If the products exactly match the openings, fastening will not be particularly difficult even for a beginner.
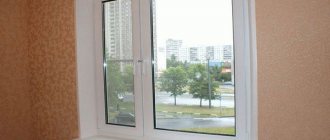
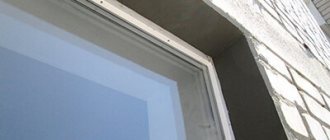
External slopes for PVC windows
In the last article, I talked about how to seal the gaps between a plastic window and the wall of a house on the street side. This stage has been completed, the foam is sealed and protected from fading in the sun.
The next step is plastic external slopes. They are beautiful and will also be additional protection for the window mount, which is a rather unreliable and drafty place in the entire structure.
Material:
- U-profiles (cost pennies) for panels (8 mm, in my opinion)
- Plastic panels (used surplus left over from finishing the loggia)
- Polyurethane foam
- Sealants
- Primer
Tools:
- Jigsaw
- Foam gun (if the can was taken without a spout)
- Caulking gun
- A clear head and relatively straight arms
- Tape measure/ruler/marker
Preparation
The slopes will cover the end part of the outer wall, so all three sides (top, right, left) must be carefully measured in order to cut a trapezoid from the panels.
Note!
You need to start from the top slope. It is the most fragile, due to the fact that it is forced to be suspended
The side ones will then hold it.
I got lazy, cut it anyhow, then smoothed the edges on the sharpening machine. It’s better to cut straight away, less waste, dirt and work. If you doubt the accuracy of your measurements, you can use cardboard.
After cutting all three parts, I packed them into U-profiles, which I put on the panels and cut them very evenly... with a grinder =). One touch - and the profile part is cut perfectly evenly, without chips or burrs.
In general, the method is not for everybody. Some people cut with a hacksaw, some with a knife, some with scissors. As I already said, I started the installation from the top of the slope, along the rough side of which I covered it with foam.
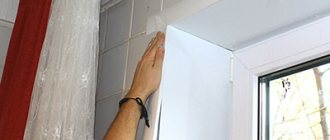
Installation
Next, with all the profiles attached to the panel, we firmly lean our slope against the previously primed and cleaned surface (plaster/slab/brick should not crumble). And so that it (the upper slope) does not fall, it needs to be thoroughly supported (I used old baseboards).
At this point, I removed the P-profile from the outer edge due to the foam that had come out (more precisely, I removed it myself and put it on later, after I had cleaned off the foam).
The tape pieces need to be prepared in advance. And just in case, some clear tape too. If the paint does not stick well to the wall, it can be reinforced with transparent (packaging). The foam dries very quickly, but I left it for a day, as recommended by the foam manufacturer.
You need to press the upper slope (and the rest too) against the wall (opening) very tightly. It’s the same problem with the side slopes: we pack them into profiles, glue them and press them hard. A lot depends on the condition of the opening. I came across a crooked one, the brick protrudes at the top, so gluing it was more difficult.
Note!
And let me remind you again: before installing external slopes on PVC windows, be sure to think about how you will fix the panels, and also prepare clean rags and acetone (cleaning liquid) in case of smeared foam.
The last flaws must be cleaned out immediately, before a yellow stain appears, which can be left on the plastic by polyurethane foam. And the gluing surface must be smooth, without holes, crumbs and protrusions.
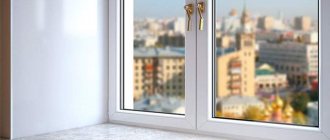
I used glossy panels and they look very nice. But for internal slopes I recommend matte (or sandwich) ones. The tape must be peeled off the next day to prevent the glue from sticking in the sun.
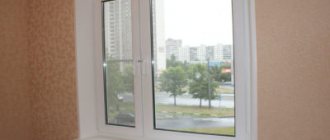
Sealing of slopes
Sealing of slopes
No matter how tightly the slope with the U-profile is pressed against the window frame, there are still gaps. As I read, people seal them with whatever they can: liquid plastic, sealants and even putty.
My gaps turned out to be narrow, and I coated them with acrylic sealant. It is washable and can be painted with a small brush to ensure reliability.
In the last photo you can see that the upper slope is covered (on top of the gap between the slab and the slope) with polyurethane sealant.
He definitely doesn’t care about the frost, water and sun. It wasn't necessary to do this, but just in case.
Note
I did not use the F-profile due to the unevenness of the wall. I was afraid of water flowing under it and the growth of black mold.
Polyurethane and acrylic sealants, as well as liquid plastic and similar pastes must be applied very carefully: without proper experience, it is easy to ruin the working surface. So first practice on something less valuable than new plastic windows
Possible difficulties and errors
In the process of installing products on plastic windows, some difficulties may arise . Especially when installing it yourself without practical experience:
Saving on materials or tools. This leads to poor-quality installation of slopes and reduced window efficiency.- Lack of knowledge and practice. In this case, you need to seek help from specialists or study materials on the correct installation of metal slopes. Otherwise you can
- Installation of slopes on an arched window. It may be difficult to do the work yourself. This configuration requires knowledge and experience.
- The panels are attached to the frame too rigidly.
- Removing foam from joints to a much greater extent. In this case, the slopes will not be able to fully perform.
Improper installation of metal slopes leads to condensation on the windows and freezing.
Important! The consequences of errors may take some time to appear.
Wet finishing method
This cladding variation is the most traditional and economical option. The simplicity and simplicity of this method makes it possible to plaster and paint the slopes yourself. To finish the surface, you need to prepare a dry mixture based on cement or gypsum. It should be noted that this type of work differs in the duration of the manipulations performed. And also the “fur coat” needs to be dyed periodically.
Before plastering external walls, they should be prepared. Preparation consists of cleaning from dirt, defects, and excess foam. To protect the window, it is recommended to cover the structure with masking tape. Plastering slopes should be done in stages:
- The first step is to install the beacons at a distance of up to 5 cm from the window frame; fixation is done with nails.
- The thickness of the plaster layer should cover the window by 1 cm. The generally accepted thickening is 2 cm. The corners should be aligned with a square.
- After making sure that the opening is clean, it is possible to apply a primer. Priming is intended to improve the adhesion of the plaster to the base.
Puttying external slopes
- The cement-gypsum mortar should be applied over the beacons and smoothed with a spatula. Manipulations must be done from the bottom up.
- After the first layer has dried, the beacons should be removed, and the locations should be covered and leveled.
- 1 layer of plaster should not exceed 7 mm. It should be taken into account that it is correct to apply a new layer of plaster only on the dried previous layer. Also, don't forget about angular alignment.
- After the plaster has set, the wooden frame is removed, and the defects are covered and smoothed.
- You can slightly moisten the coating with a wet rag and remove any imperfections using a grater.
- After thorough drying, whitewash or paint is applied.
The window must be closed during work. Because if the mixture penetrates into the fittings, functionality may be impaired. An obvious negative property of the finishing method is the failure to combine the cement mortar with the PVC profile. This contributes to the appearance of a hole between the slope and the frame base. Therefore, the resulting gaps should be sealed with silicone-based sealant.
Pros and cons of use
Product advantages:
- Good resistance to environmental influences. Metal slopes are not afraid of rain, wind and snow.
- Durability. The ability to withstand mechanical damage and climatic changes allows the elements to be used for a long time.
- Easy to care for. It is easy to remove dirt or dust on a metal slope - just a damp cloth is enough.
- You can do the installation yourself.
- Metal is suitable for decorating houses made of any material.
- Aesthetics.
Flaws:
- Noise effects during rain and hail. You can get rid of this or significantly reduce the manifestations using soundproofing tape.
- Price. Metal products will cost much more than plaster or plastic slopes.
The price is justified by the durability of the products.