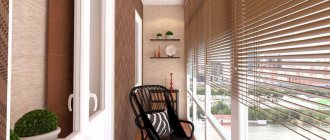
The topic of the article is slopes for entrance doors. We will talk about what options for finishing slopes are used today, what materials are used for this, the advantages and disadvantages of each, and an individual approach to solving the problem. We will also consider the factors that need to be taken into account when forming the overall interior design of the premises, taking into account the slopes of the entrance doors. And some comments on financial costs.
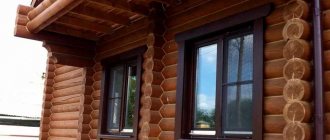
Slopes on the front door Source www.lit-tech.ru
Methods for finishing slopes
You can trim slopes in different ways:
- Cement and carefully putty;
- Install slopes from a sandwich panel. This is an inexpensive type of finishing. But sandwich panels are fragile and short-lived.
- Install MDF slopes. This is a more expensive and at the same time reliable method of finishing. MDF slopes are more durable. In addition, they can be matched to the color of the door. Torex produces slopes that fully match the selected door model in color and texture.
You can perform any of these options either independently or with the help of professionals. You can order the installation of MDF slopes from a certified Torex team. In this case, we guarantee high quality of work performed. Since installing MDF slopes is the most complex and time-consuming, you need to know a number of nuances. If you decide to do this yourself, use our instructions.
Sandwich panels
Sandwich panels made of a veneered surface with a porous filler are an almost ideal barrier against the spread of extraneous sounds. In addition, finishing structures have a low thermal conductivity coefficient and retain the heat of the room. Fastening of such materials is carried out similarly to PVC products, using liquid nails.
Installation of sandwich panels on slopes
Considering that the thickness of the element is 15 mm or more, their ends will be noticeable on the wall during operation. In such cases, experts recommend using additional platbands made of the same material as for interior paintings.
What will be needed to install slopes?
To install MDF slopes you will need the following tools:
Photo 1. Set of tools for installing slopes
- 1 – miter saw;
- 2 – roulette;
- 3 – pencil;
- 4 – angle;
- 5 – knife;
- 6 – hammer;
- 7 – masking tape;
- 8 – fastening elements;
- 9 – screwdriver;
- 10 – polyurethane foam;
- 11 – drill.
Stage 1. Control measurement of the opening after door installation
We make accurate measurements of the actual dimensions after installing the door - even if we know the exact factory dimensions. It is necessary to measure the width, height of the vertical and length of the horizontal extension.
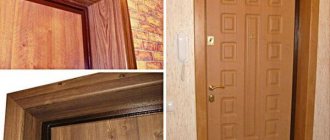
Door trims are decorative strips that cover the walls of a doorway. They are installed if the opening is wider than the door frame. Most often, MDF panels are used for this.
Photo 2. Measuring the width of the extension
It is necessary to measure at three points vertically on each side and at two points horizontally (from above).
Photo 3. Measuring the length of the horizontal extension
The additional element must necessarily be adjacent to the door frame, so we measure the length along the width of the door.
Features of entrance door jambs
Door slopes are characterized by the following features:
- give an aesthetic appearance to the internal and external space around the entrance;
- They perfectly “hide” the joints between the walls and the door frame, creating additional protection against burglary;
- When manufactured with high quality, they perform a soundproofing and insulating function.
Slopes are involved in ensuring tightness, sound insulation and thermal insulation, and increase the resistance of the front door to burglary.
Advice: in order for the design to be as harmonious as possible, the jambs will have to be carefully integrated into the existing interior design, carefully selecting the material.
Stage 2. Setting aside and marking the required dimensions of the extensions
Photo 4. Preliminary markings
After we have measured the required dimensions of the additions, we set them aside on the blanks of the additional elements. We make preliminary markings directly on the panel.
Photo 5. Gluing future cutting areas with masking tape
Using masking tape, mark future cutting lines.
On one blank for additional elements, you can put two parts - the threshold and the upper part of the additional elements.
In the same way, we set aside the dimensions of the second part, make preliminary markings on the workpiece and glue it with masking tape.
Photo 6. Re-mark
We re-mark the length of the extension directly on the masking tape.
If you do not glue the edge of the additional element with masking tape, chips may appear on it during sawing.
Photo 7. Checking dimensions
Once again we check the correctness of the markings.
Photo 8. Postponing the cutting angle
Use a miter angle to mark a cutting line perpendicular to the edge of the panel.
Preparatory work
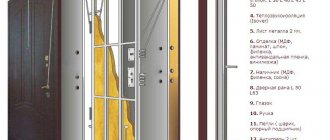
For any method of forming a slope, the preparatory stage is the same. Before any work, the door leaf and door frame should be covered with film and masking tape to avoid damage. First of all, all particularly protruding parts are combed off, which may interfere with the installation of the frame of the future slope or will protrude above the plastering level. Then the entire surface is swept and primed. It is better to use a deep penetration primer. Only if the wall is made of foam concrete or similar loose material, a surface primer is used.
At the preparation stage, you can also lay a power cable to connect a switch that will light the lamps in the hallway. If you plan to use the option with a frame fastening of the slope, then it is better to postpone laying the wire until the frame has already been installed.
Tip: For clarity, display the outline of the future slope on the floor. Subsequently, it will be easier to navigate using these marks.
Stage 3. Trimming the extensions to the required sizes
Photo 9. Sawing blanks
Using a miter saw, we cut blanks for additional elements exactly along the marks.
Photo 10. Sawing the second workpiece
We saw off the first and then the second horizontal parts of the extension.
We repeat the procedure for the vertical parts.
Stage 4. Assembling the accessory box
Before installation, we assemble the extensions into a solid, rigid box.
Photo 11. Drilling holes for self-tapping screws
Using a drill, we drill holes for self-tapping screws - for fastening from the inside. This is a mandatory step so that when screwing in the screw does not split the MDF panel.
Photo 12. Drilling holes for self-tapping screws
We make several holes at a distance of 10–15 cm from each other.
Non-standard solutions
In addition to the above standard methods using popular materials, you can use more original options that will highlight the interior, decorate the front door and surprise your friends:
- Artificial stone is a non-standard finishing of slopes. The main advantage is resistance to mechanical stress (if it is not a plaster model, it is fragile). Not a cheap option, requires the participation of a specialist.
- Tile. A type such as clinker (imitation brick or stone) is suitable.
- Plastic panels are an affordable but unreliable finish.
- Decorative plaster – in terms of aesthetics and durability, it has no equal. But you will need to work hard to find a good specialist in this field, because this work requires a creative approach and professionalism.
Materials can be combined if their properties are similar (sandwich panel parts + stone, laminate + tile and others).
Stage 5. Installation of the extension box
Photo 13. Installation of extensions
We install the extension box in the opening. We set it relative to the door so that the gaps between the door and the frame are the same on all sides.
Photo 14. Preparation of spacer elements
Spacer elements are needed to fix the extension box in the opening. We cut them out of a wooden block. The thickness of the spacer element is selected according to the size of the gap.
Photo 15. Preparation of spacer elements
A total of 10–12 spacer elements are required. 3-4 pieces for each vertical extension. Top and bottom – 2 pieces each.
Photo 16. Hammering spacers
Since in the future we will need to install platbands and close the gap, it is important that the spacer element does not protrude beyond the trim and the wall.
Photo 17. Installation of spacers
In the same way we hammer in all the spacer elements.
Lathing or plaster
After cleaning the slope, use a tape measure to determine its future thickness. From the base of the wall we take measurements to the place on the door frame where the cladding material ends. Based on this measurement, we select the type of sheathing. It can be based on a metal profile or wooden blocks. Experts give preference to a metal profile; this type of frame is more complex in design, but much more durable than a wooden one and is not afraid of mold and mildew. It often happens that the total thickness of the slope does not allow the use of sheathing, since the distance between the wall and the frame is minimal. This means that we are better off using the second option, namely using plaster. After we have made our choice - frame or plaster, we move on to the next stage.
Stage 6. Installation of platbands
Photo 18. Measuring the length of the casing
We attach the casing and mark the required length. The size is set according to the angle of the internal intersection of the horizontal and vertical extensions.
Photo 19. Measuring the length of the casing
Similarly, we set aside the length of the second casher.
Photo 20. Measuring the length of the casing
We mark the length along the inner corner of the extensions.
Photo 21. Trimming the platband
We cut the trim using a miter saw at an angle of 45 degrees.
Photo 22. Filling the gap with foam
Polyurethane foam is used to fix the extension box. Gives the structure rigidity and additional sound and heat insulation.
Photo 23. Filling the gap with foam
It is important not to overdo it with the volume of foam, so as not to deform the extension.
At the same time, if there is too little foam, the opening will be leaky and not rigid enough.
To remove excess foam, you need to wait for it to cool and cut it off with a knife.
Try to avoid getting polyurethane foam on the boards, walls and flooring.
Photo 24. Installation of vertical trims
First we install vertical extensions, then horizontal ones.
We attach the casing to the trim using decorative nails.
Photo 25. Installation of vertical trims
To install the trim you will need about 20 decorative nails. They are clogged at a distance of 20–30 cm from each other.
On average, each vertical trim will require 7 decorative nails, and each horizontal trim will require 3–4.
Photo 26. Installation of horizontal trim
We measure the size of the horizontal platband.
Starting from the larger size, we cut at 45 degrees to reduce it.
The horizontal casing is fixed to the extension box and the vertical casing.
Photo 27. The final stage of installing slopes
We press the structure against the door frame and fix it with masking tape until the mounting foam hardens - for 1–2 hours. The exact time depends on the drying time of the foam, which can be found on the packaging.
After this, you can remove the masking tape. Your front door is ready!
Finishing options
Having decided to improve the slopes on the front door with your own hands, choose the material not only based on the price. Each type has its own negative and positive sides and suits certain interior styles.
Plastering
Mortar is rapidly losing popularity for a number of reasons:
- requires certain construction skills;
- creates a large amount of dirt;
- due to non-compliance with technology, it may crack and crumble.
How to choose the right door to your apartment?- Kitchen design in Khrushchev: useful tips for those who have a small kitchen (100+ photos)
Which laminate to choose?
It is considered one of the most affordable and reliable types of coatings, so it is unlikely to disappear from the market in the near future. Sold as a dry mixture, which when combined with water turns into a solution. It hardens quickly, which requires high speed work.
After applying a centimeter layer of mortar, it is necessary to lay a reinforcing mesh; it will prevent cracking in the future. The building mixture allows you to prepare walls for wallpaper or painting. The rough processing is covered with textured putty.
Plasterboard finishing
Plasterboard sheets are appropriate only in two cases: when you need to cover an opening with many deformations and, if desired, change the shape of the structure. This finishing of the entrance door slopes is done only from the inside. Even inexperienced, novice builders can handle it. But the installation process is quite lengthy, since all the formed joints require additional processing.
The drywall is primed and puttied, thereby preparing for the final cladding. Starting putty is enough for wallpaper. If you plan to paint, you should additionally apply a finishing mixture.
MDF slopes
There are several reasons for the widespread demand for MDF panels:
- preliminary plastering or plasterboard covering is not necessary;
- color variations are unlimited;
- subject to special treatment, it is resistant to moisture and mechanical damage;
- service life exceeds 12 years.
MDF panels are always mounted on a frame using self-tapping screws and dowels. Work starts from the top of the opening, then the sides follow. Joints will inevitably form at the corners; they are sealed with a matching decorative strip.
Cladding
Lining is a product of wood processing, and therefore has the same disadvantages as pure natural solid wood. It deforms in conditions of high humidity and does not tolerate sudden changes in temperature. To reduce the degree of flammability, it is impregnated with a fire retardant. They also use various protective agents against insects and possible rotting. Only wide jambs are covered with lining. The basis of the product is a wooden crate. The cost of this is relatively high, but not as much as the price of oak or pine.
PVC slopes
The specifics of assembling plastic panels are similar to MDF. But unlike the last one:
- PVC panels are glued to a perfectly flat surface (after plastering or plasterboard covering);
- they are very thin and fragile.
Liquid nails are suitable as a fastening agent. The color of the panels usually imitates natural wood, but there are also simpler, plain types on sale. The price for such cladding is low. Another advantage is very simple installation.
laminated chipboard
Thin sheets with a thickness of 0.6 to 1 cm are used for cladding door frames. Laminated chipboard is much better than conventional particle board, and is practically not inferior in properties to MDF. At the same time, it belongs to a number of inexpensive, accessible, easy-to-process materials. Laminated chipboard holds fasteners well and can last 10 years or more. The panels are produced in different colors. They imitate wood and stone, come in glossy and matte, and fit into most interior styles.
Stone decor, brick, tiles
In different interior styles, after installing an iron door, the doorway is finished with natural, artificial stone or brick. Tiles are used much less often in the interior, in the kitchen or bathroom.
For work, small elements with an unobtrusive relief are taken. More pronounced transitions will create a feeling of bulkiness and are unlikely to fit even into the industrial-urban style of the interior. Undeniable advantages:
- allow the implementation of unconventional design ideas;
- are restored and do not require repairs for a long time;
- safe for adults and children;
- available.
The main difficulty is preparing the surface; it must be absolutely flat. Each cladding element is glued with liquid nails. When forming seams, colored grout is used.
Laminate
Laminate on the walls looks no less solid than on the floor. First of all, you should choose the right color. It should be in harmony with the wallpaper and even the baseboard. There are 3 ways to attach panels:
- The walls are leveled with plasterboard or mortar. Installation of panels begins from the top. Each part is fixed with liquid nails.
- A frame is pre-fabricated, inside which thermal insulation is laid. The laminate is attached to the perimeter slats using self-tapping screws.
- Polyurethane foam is used as an alternative to liquid nails. The principle of operation is identical to the first option.
Saving on raw materials is not rational. A quality purchase will last for 20 years or more. Such an investment will fully pay for the endless expenses on budget analogues.
Wallpaper
Wallpapering is the simplest and oldest method available to absolutely everyone. If you do not want to renew repairs every 2-3 years, you should choose high-quality wallpaper that is resistant to dampness. To make the opening invisible, a design identical to the walls is selected. To highlight it, on the contrary, emphasis is placed on contrasting colors, photo wallpapers, patterns, geometric, simple and complex shapes.
Too light colors are impractical for jambs in the hallway. An unfortunate move with your foot in your shoes or a rolling baby stroller will definitely leave dirty stains. To prevent this from happening, you can give preference to other colors or choose washable wallpaper.
Polyurethane
Polyurethane is a good alternative to expensive and bulky gypsum stucco. It can be given any shape, regardless of the size of the intended product. Suitable for decorating large rooms with high ceilings. The high-grade polymer does not break, is not susceptible to high humidity, is very durable and lightweight. When connecting two parts, the seam is masked with putty and sanded down with sandpaper.